Pages

Friday, May 29, 2015

There's Something Bloomin'!


At Linnie Blooms you’re going to find oodles of fun projects to really take your mixed media in a new direction.  We met this new company at CHA in January and we immediately had heaps of ideas for using her clever products.  What a new dimension to journals, canvases, books, and scrapbook pages!  We know you’re going to love seeing the inspiration from this week’s hop!

Plus, there are prizes!  Three lucky winner will each win a set of Linnie Blooms Fabric Mini File Folders just like they provided four our team.  Plus, you’ll receive a Dreamweaver Stencil background and our Vintage Press Perfectly Clear™ Stamps Set.  You’ll be creating Mixed Media fabric accents in no time!  These winners have to have a US mailing address, but, Aussie Fans, good news!  The Stencil Specialists are sponsoring one Australian prize for this collaboration!  You could win a Stampendous Stamp, an LL-sized Dreamweaver Stencil of your choice, a silicone buttons mould, and a Stampendous Embossing Powder (your color choice)…Wow!!  Be sure to let us know you’re from Australia in your comments!  Wait!  There’s more!  Linnie Blooms will be giving away a FREE all new DIY Home Decor Kit!  Make sure to comment on their blog and their designer’s blogs posting in our hop this week!  Now, on to my project for today:


Here’s what I used to create my project:

Linnie Blooms Mini File Folder
Stampendous® Single Adirondack 
Stampendous® Coral Tree
Stampendous® PenPattern Seaside Perfectly Clear™ Stamps
Stampendous® Seaside Chair Perfectly Clear™ Stamps

Stampendous® PenPattern Mermaid
Stampendous® Encouraging Words Perfectly Clear™ Stamps
Stampendous® PenPattern Fish
Stampendous® Goldfish Pair
Stampendous® Seashell Jar
Archival Inks™ in Jet Black, Emerald Green, Viridian, Vermillion, Sienna, Manganese Blue, Cobalt
DecoArt® Americana® Acrylic Paints, colors too numerous to list
DecoArt® Metallic Lustre™ Champagne Ice
May Arts Ribbon®

Here’s what I did to create my project:

Paint sand and sky/water on each page
Stamp images and paint as desired
Punch two holes on left side
Add rings and tie on bits of ribbon to each ring

Here’s the complete list of teammates posting today:

Lea Kimmel (Me!)


Remember, if you don’t see the Blog Hop post as soon as you click the link, you may need to click on the header or home button of the blog and scroll a bit to find the post.  Some bloggers post for more than one thing each day.  If you have trouble commenting on a blog, please let us know at submissions@stampendous.com.  Thanks for your patience, designers across several time zones mean every post may not be active immediately.

Thanks so much for stopping by today.  Don’t forget to comment to be eligible to win a prize.  I’ll see you again soon.  Have a wonderful weekend!

Hugs,
Lea

Wednesday, May 27, 2015

Wicked Wednesday with Nikki Burnette

It’s Wicked Wednesday ATC Challenge Blog time and this week our sponsor is The Fantasy Art of Nikki Burnette and the theme is to use some ribbon.  My image is Giselle.  She’s listed on the web site as currently unavailable.  I’m not sure why and I do apologize but, hopefully she’ll be available again soon.  She really is a lovely image!  Nikki has several mermaids on her site, so, if you don’t want to wait for this one, I’m sure you could find another that’s equally lovely.


Here’s what I used to create this ATC:

Nikki Burnette’s Giselle
Copic® Markers
May Arts Ribbon®
Blue Bling™ Cardstock by Bazzill Basics Paper®
Want2Scrap® Pearls
Zip Dry Paper Glue from Beacon Adhesives
3D Foam Mounting Squares by 3L® Scrapbook Adhesives®
Beige paper from my scrap stash, not sure of maker

Here’s what I did to create this ATC:

Print image, color with markers and fussy cut image 
Trim blue cs base to ATC size
Trim a piece of beige scrap paper to fit along bottom of ATC
Snip off bits of leaves ribbon and trim strips of net ribbon
Adhere ribbon pieces to ATC base as shown
Using foam squares, attach beige scrap to bottom
Adhere cut out image as shown
Attach last piece of leaves ribbon as shown
Apply pearls as shown

This was a super easy ATC to put together.  I love mermaids and I really love to use the May Arts Ribbons as seaweed and sea grass, they’re the perfect addition!

Thanks so much for stopping by today!  It would be awesome if you would play along with us.  Using ribbon on an ATC is certainly an easy theme for even beginners, so, if you’re feeling shy, don’t, just play!  I look forward to seeing what YOU create!

Hugs,

Lea

Friday, May 22, 2015

Are We There Yet?

Ah!  That age old question coming from the back seat of the family sedan, "Are we there yet?"  I wonder how many times I've said that as a kid and heard it as an adult!  LOL!  No matter how advanced we have become in travel, that question is still the bane of many a parent.

This week, Stampendous has been celebrating the great outdoors and picnics, one of my favorite outdoor activities!  What better way to see this great country of ours than by getting up close and personal with the outdoors by camping?  It allows you to fully enjoy and appreciate all the beauty and natural diversity on display all across this great land.  With camping being such a popular activity, especially in the summer months, it only seemed appropriate for Stampendous to create an awesome stamp to help you celebrate the fun.  For today's project, I've created a card using Trailer Travel, isn't it the coolest?


Here's what I used to create this card:

Aqua Cardstock by Bazzill Basics Paper®
Neenah® Classic Crest™ Solar White Cover Stock
3-in-1 Advanced Crafters Glue by Beacon Adhesives
Copic® Markers:  (B0000, B06, B91, B93, B95, B97, B99; G0000, G24, G28; YG11, YG91, YG93, YG95, YG97, YG99; R24, R27, R29, R43, R85; YR00, YR01, YR02; Y13, Y18; BG0000, BG000, BG01, BG02, BG53; BV01; E11, E13, E15, E33, E34, E35, E37, E41, E42, E43, E71, E74; C0, 1, C3, C6)

Here's what I did to create this card:

Stamp image, color and trim
Create an A2 horizontal card base with a tent fold
Trim a mat for image and adhere the image to mat
Adhere matted image to card base

There was plenty of fun coloring to do in this card but it was all pretty simple!  If you're a happy
camper, or even a grumpy camper, this stamp is sure to be a new favorite!  If that was your convertible and camper, where would you want to travel to?   In the meantime, travel around my teammates blogs and leave them some love!  Here's a list of everyone posting today:

Lea Kimmel (me!)


I'm so glad you stopped by today.  I hope you have a wonderful Memorial Day weekend and you get to enjoy some time with your family.  Have a lovely day!

Hugs,
Lea

Wednesday, May 20, 2015

Wicked Wednesday with Sweet Pea Stamps

It's Wicked Wednesday ATC Challenge Blog time and our sponsor this week is Sweet Pea Stamps and our theme is Harlequin or Diamond Pattern.  The image I've used this week is A Clown For You from artist Katerina Koukiotis.  As soon as I saw this image, I fell in love with it and knew I had to use it for my ATC this week.  Isn't this the cutest little clown you've ever seen?!


Here's what I used to create this ATC:

Copic® Markers
Memento™ Inks in Dandelion and New Sprout from Tsukineko®
VersaFine™Onyx Black Ink by Tsukineko®
Sizzix® Tim Holtz® Harlequin Embossing Folder
Echo Park® Hello Summer 6x6 Paper Pad
Basic Grey® Basics White 6x6 Paper Pad
Scrapbook Adhesives® 3D Foam Mounting Squares by 3L®
Zip Dry Paper Glue by Beacon Adhesives
Berwick® Wired Snowball Celery
Smooch - Siren

Here's what I did to create this ATC:

Print image, color with markers and trim closely around image
Trim ATC base paper, place in embossing folder and run through machine
Add inks to embossed ATC base
Trim dot paper, attach to base and stamp sentiment
Attach clown with foam mounting squares
Trim a piece of Wired Snowball and attach to hands as if the clown is juggling
Cover heart on face with Smooch

I have to admit, I really love how this turned out!  I've made a lot of ATC's but I think this has to be in my top five, maybe even my #1.  Hmmm...

Thanks so much for stopping by today.  I always appreciate your visits and your comments.  We would love for you to join us this week and play along with our challenge.  I'll see you again soon and in the meantime, have a wonderful day!

Hugs,
Lea

Friday, May 15, 2015

Two Great Companies...

...one awesome hop!

This week we are playing with some fantastic products from our friends at Clear Scraps and we’re excited to share our finished projects. You can image how much fun it is to have a clean canvas to start with but when you use Clear Scraps it’s a see-through canvas!

Our friends at Clear Scraps take pride in new product inventions with the best interactive albums and the best innovative designs.  In addition to their own fantastic and innovative products, Clear Scraps sells a huge selection of Stampendous products as they travel the nation visiting various consumer shows like Scrapbook Expos and others.

For my project today, I've taken a set of pages and created an album perfect for anyone buying a new home or even a military family moving to a new duty assignment.  I had a fun time making this as the idea popped into my head almost as soon as I saw the products I received.  Here's my project:


Here's what I used to create this project:

Green Cardstock by Bazzill Basics Paper®
Derwent® Inktense™ Pencils
Archival Ink Jet Black Pad by Ranger®
Copic® Markers: Y15, Y18, YG67, W7
Solid Oak, Inc. Steampunk™Small Gears
Zip Dry Paper Glue by Beacon Adhesives
AC Remarks® Highline Alphabet Stickers
Tim Holtz® Idea-ology Key

Here's what I did to create this project:

  • Stamp houses, color with pencils
  • Cut houses out but leave a grassy section creating an increasing height of grass with each page
  • Lay each house/grass section down on green cardstock, draw around it and trim to match that section (This gives you a way to adhere the pieces to the acrylic but cover the glue and it gives it a more finished look and a place to write)
  • Take clear gear embellishment and color both sides of it with the darker yellow Copic® marker
  • Remove protective covering from pages and adhere papers as shown, be sure to insert sun/gear behind top paper on the last page
  • With a green Copic®, color gears that have been matched up to create trees
  • With the warm gray Copic®, draw tree trunks and branches and attach gears, one on each side of acrylic page for each tree
  • Stamp sentiments on each page
  • Adhere letters to tabs to spell "Home"
  • Using lighter yellow Copic®, add sun rays on back page
  • Poke holes through papers to add rings
  • Put rings through and add a key to top ring and add extra gears to bottom ring


I hope I've not left anything off but I really think it's pretty obvious what I did if you just look at the photos.  I really love how this turned out.  It makes me super happy when a project comes out pretty much exactly the way I have it pictured in my head.

So, do we have prizes for this hop?  Clearly we do!!! In fact, we have three prize packages up for grabs.  Each will include our Cling Jumbo Filigree Stamp Set, a Jumbo Perfectly Clear™ Acrylic Handle, PLUS a Clear Scraps Mixable Album and some extra acrylic accents! Comment on our blog and each designer’s blog of the day throughout the week of our hop and the winners will be announced Monday, May 18th. Official Rules apply for Stampendous prizes. Please let us know where you live. As you know, prize winners have to be US residents EXCEPT….

Aussies – Look HERE!  An exciting treat for our fans “down under”!!  The Stencil Specialists , one of our Australian Wholesale Distributors, is going to offer a prize to one Australian fan every time we have a giveaway!!  How completely exciting! Plus they’re stocking way more than stencils from Stampendous now!

For the Clear Scraps Blog Hop, The Stencil Specialists are offering A Stampendous Stamp, A Dreamweaver Stencil (LL size customer choice), A Silicone Mould.  A Tub of White Ultra Light Paper Clay and 3 packs of Adhesive Gems.  WOW… Now there’s a prize package! Comment each day on the Stampendous and participating designer blogs and include in which area you live! We’ll announce the winner the following week!

Here's the list of each teammate hopping along today.  Be sure to comment on each blog if you want a chance to win one of the awesome prize packages.

Lea Kimmel (me)


That's it for me today!  Thanks so much for stopping by.  Please be sure to check back with us on Monday to see if you're a lucky winner.  In the meantime, have a wonderful weekend!

Hugs,
Lea

Thursday, May 14, 2015

Terrific Trio


This week we are playing with some fantastic products from our friends at Clear Scraps and we’re excited to share our finished projects. You can image how much fun it is to have a clean canvas to start with but when you use Clear Scraps it’s a see-through canvas!

Our friends at Clear Scraps take pride in new product inventions with the best interactive albums and the best innovative designs.  In addition to their own fantastic and innovative products, Clear Scraps sells a huge selection of Stampendous products as they travel the nation visiting various consumer shows like Scrapbook Expos and others.

When I created my card, I went old school and used Prismacolor Pencils.  I wanted this to have a softer feel and I thought the pencils would do just the trick.  Without further ado, here's my card:

 Front of card


Inside of card

Here's what I used to create this card:

Memento™London Fog Ink Pad by Tsukineko®
Memento™ Angel Pink Ink Pad by Tsukineko®
Prismacolor® Pencils
Bo Bunny® C'est La Vie Collection
3L® Scrapbook Adhesives® 3D Foam Mounting Squares
Fast Finish by Beacon Adhesives

Clearly we have prizes!!! We have three prize packages up for grabs each will include our Cling Jumbo Filigree Stamp Set, a Jumbo Perfectly Clear Acrylic Handle, PLUS a Clear Scraps Mixable Album and some extra acrylic accents! Comment on our blog and each designer’s blog of the day throughout this week of our hop and the winners will be announced Monday, May 18th. Official Rules apply for Stampendous prizes. Please let us know where you live. As you know, prize winners have to be US residents EXCEPT….

Aussies – Look HERE!
An exciting treat for our fans “down under”!!
The Stencil Specialists , one of our Australian Wholesale Distributors, is going to offer a prize to one Australian fan every time we have a giveaway!!  How completely exciting! Plus they’re stocking way more than stencils from Stampendous now!  For the Clear Scraps Blog Hop, The Stencil Specialists are offering:  A Stampendous Stamp, A Dreamweaver Stencil (LL size customer choice), A Silicone Mould,  A Tub of White Ultra Light Paper Clay and 3 packs of Adhesive Gems.  WOW… Now there’s a prize package! Comment each day on the Stampendous and participating designer blogs and include in which area you live! We’ll announce the winner the following week!

Here's the list of teammates posting today:

Lea Kimmel (me)


Thanks for stopping by today to have a look!  Don't forget to leave a comment to be eligible to win a prize!  Tomorrow is the big hop so don't forget to stop back by for my next project.  In the meantime, I hope you have a wonderful day!

Hugs,
Lea

Wednesday, May 13, 2015

Wicked Wednesday with Power Poppy (and Just Some Lines)

Yep, it's Wicked Wednesday ATC Challenge Blog time and this week our sponsor is Power Poppy.  The image I've used is French Lilac Digital Stamp Set; it comes with the sentiment.  It's truly a lovely image and one that I know I'll be using again and again.  Our theme this week is Daffodils or Lilacs, so show us what you've got!


Here's what I used to create this ATC:

Copic® Markers
May Arts Ribbon®
Neenah® Classic Crest™ Solar White
Lavender Cardstock by Bazzill Basics Paper®
Zip Dry Paper Glue by Beacon Adhesives

Here's what I did to create this ATC:

Print image and trim to ATC size
Color image with markers
Trim a base for the ATC from lavender cs
Adhere image to base
Tie a bow with ribbon and cut from main ribbon length 
Cut another piece of ribbon to go across bottom and adhere
Adhere bow over stem of lilac

Such a pretty little ATC!  I think this is one of my favorites that I've created.  I love lilacs and lavenders and greens are my favorite color combos.   That cute little ladybug really sets it off just right!

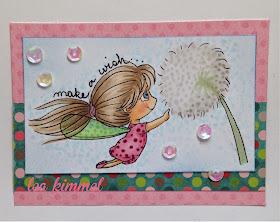
Okay, confession time.  I've had a really busy couple of weeks and I've been a little bit frazzled.  So, last week I made the above ATC for my post only to discover that I had created with the wrong image for that week.  I was feeling pretty good until I found that out!  The sponsor for last week was actually Just Some Lines.  I managed to squeak out the right ATC but then I forgot to write my blog post for it.  Geesh!  How did I manage to do that?!  So, I'm also including my ATC that was supposed to be posted last week with today's post.  You get a two-for-one deal and I get to give Just Some Lines the credit they deserve.  Here's my ATC that made it to the main blog post but not here:


Here's what I used to create this ATC:

Copic® Markers
Bo Bunny® Dots Cardstock
Neenah® Classic Crest™ Solar White
Tim Holtz® Tumbled Glass Distress Ink by Ranger®
Zip Dry Paper Glue by Beacon Adhesives
Iridescent sequins 

Here's what I did to create this ATC:

Print image and trim to desired size
Color image and lightly add distress ink around edges
Trim pink cs to ATC size for base
Trim accent paper to fit as shown
Adhere all the layers
Write desired sentiment 
Adhere sequins

In case you missed it, the theme for last week was Polka Dots.  I made my ATC as dotty as possible!  Thanks so much for indulging me as I play catch-up!  Thanks, too, for stopping by today and I'll see you again soon!  Have a wonderful rest of the week!

Hugs,
Lea


Wild About You

Today I'm sharing the Stampendous® Cling Jumbo Parrot set and the Wild Sayings Perfectly Clear™ Stamps Set for the sentiment.  I absolutely love this jumbo stamp set!  Parrots are such pretty and regal looking birds, and, since they come in so many different colors, you can be as wild or as tame as you choose.  The foliage stamps can be used with so many other stamps that have just been released with the April catalog so there's plenty of overlap between sets.  Great way to get lots of bang for your buck!


Here's what I used to create this card:

Jet Black Archival Ink by Ranger®
Dylusions Ink Sprays by Ranger® in Postbox Red, London Blue, Lemon Zest, Dirty Martini and     Squeezed Orange
Derwent® Inktense™ Pencils
Red Cardstock by Bazzill Basics Paper®
Zip Dry Paper Glue by Beacon Adhesives

Here's what I did to create this card:

Stamp parrot and three leaves with black ink
Color all images with Inktense Pencils and blend with water
Trim background paper to 3.75" x 7.75" and spritz with Dylusions Sprays, set aside to dry
Trim card base from red cs to create a 4" x 8" card
Cut out parrot and leaves
Adhere background paper to card base
Stamp sentiment on background piece in upper right corner
Adhere leaves and parrot to card front

This was a super easy card to create with lots of color that creates a big impact.  This set would also be great for mixed media cards, journal pages and even canvas home decor projects.  I love how versatile the larger stamp sets are from Stampendous.

Thanks bunches for stopping by today.  I'll have more Stampendous goodness for you on Thursday and Friday so be sure to check back by for those projects, too.  Hope you have a wonderful day!

Hugs,
Lea

Tuesday, May 12, 2015

Let's Face It!

Hello!  I've decided to periodically share some of my own art, either from my sketchbook or my art journal.  I love to sketch, paint, and just create art that makes me happy.  I'll share bits of my journey with you as I learn new things, tips and techniques.

Pinterest has a ton of pins on drawing, painting and creating mixed media pieces.  I've always loved to draw but I've never been good at drawing faces.  Thanks to Pinterest, I've found various sites that teach you how to do faces.  I'm going to be brave and share with you all my first face.  Granted, it took me several months to complete as I was only working on it here and there.  I've done a few artsy stylized faces but not a realistic face.  I'm not saying photo realistic but somewhat realistic.  So without further ado, here's my first completed, somewhat realistic, face:

Done with a No. 2 Pencil and a blending stump

And here's a page from my altered book journal:

Done with DecoArt Gesso and Derwent Inktense Pencils

I am always open to constructive criticism, so, if you happen to have a neat tip or trick to share with me that will help me learn or possibly improve a sketch I've done, please feel free to share.  I would love your feedback but please be kind.  I'm still working on my technique so be patient as I grow!

Thanks for stopping by today!  I hope you're going to enjoy this personal touch to my blog.  I'm kind of excited about it, myself!  I would love to know what you think about it!   Have a wonderful day!!

Hugs,
Lea


Friday, May 8, 2015

Give Me Liberty...

...Lady Liberty, in fact, from Stampendous!  She's one of our newest stamps showing our patriotic spirit.  I've also used Free and Brave for my sentiment.  I love these two stamps together, it really appeals to my military pride as I previously served in the U.S. Army for 9 years of active duty.  It's nice to design for a company that appreciates our beautiful country as much as Stampendous does!  Here's my card using some fun Fran•táge technique:


Here's what I used to create this card:

Memento™ Tuxedo Black Ink by Tsukineko®
Memento™ Toffee Crunch Ink by Tsukineko®
Tim Holtz® Antique Linen Distress Ink by Ranger®
Iced Cocoa Cardstock by Bazzill Basics Paper®
Smoky Cardstock by Bazzill Basics Paper®
Zip Dry™ Paper Glue by Beacon Adhesives
Copic® Markers (N2; G00, G02, G24; Y13, Y17; T2, T4; B91; E42, E43)

Here's what I did to create this card:

Stamp main image and color, trim closely and set aside.
Stamp sentiment and trim to desired size and add distress ink.
Create an A2 card base with a tent fold and stamp with Vintage Note.
Create mats for both images and adhere all layers as shown.
Run embossing ink over areas desired, add embossing powder and heat.


So, whether you're creating cards or invitations for the upcoming Fourth of July or you simply want to thank a soldier for their service through Operation Write Home, these stamps are perfect for the job!  Thanks for stopping by today and I hope you have a wonderful weekend with plenty of crafting, creating time!

Hugs,
Lea

Saturday, May 2, 2015

Wicked Wednesday and Fred, She Said Designs

Okay, I know it's not Wednesday but I've had an awful lot going on the past week so I'm running a little behind.  So, it's Wicked Wednesday ATC Challenge Blog on Saturday and our sponsor this week is Fred, She Said Designs with a theme of One for the Boys.  The image I've used today is Nolan and the Bullfrog.  I just had to make this little guy a redhead, that just seems to go with the frog!


Here's what I used to create this ATC:

Neenah Classic Crest Solar White Cover Stock
Copic Markers
Tim Holtz Distress Inks in Tumbled Glass and Rusty Hinge

Here's what I did to create this ATC:

Print image, color with markers and trim to ATC size
Add blue distress ink closely around image
Edge bottom of ATC with rust ink
Using black ink, stamp sentiment with alphabet stamps

My apologies for being tardy this week.  It really has been a crazy one and sometimes life just gets in the way of crafting.  I hope you enjoy the rest of your weekend!

Hugs,
Lea

Friday, May 1, 2015

KLIK It, KLIK it Good!


Klik Interchangeable Jewelry from Metal Complex is a fantastic new line of DIY accessory options. With two snap sizes and dozens of settings to snap your creations into, this terrific product is fun to play with for every level of crafter. There are tons of pre-made snaps so you can just “klik and go” to change up your look. But this week we’re playing with the Metal Complex Snap Bezel Blanks so we can craft our own masterpieces of wearable art.  Here’s what I’ve created:


Here’s what I used to create my project:

Metal Complex™ Klik Triple Round Pendant with Crystals
Metal Complex™ Klik Large Snap Base with Bezel
Metal Complex™ Klik Small Snap Base with Bezel
ETI Jewelry Resin
Copic® Markers BV01, BV02, BV04
Liquitex® Cadmium Yellow Medium Hue Acrylic Soft Body Paint
DecoArt® DecoPage
May Arts Ribbon

Here’s what I did to create my project:

Stamp images with black ink on white paper and color with markers
Cut out flowers and add a small dot of yellow paint in the the center of each flower
Mix glitters and fragments together
Coat each side of flower with DecoPage to seal it, set aside to dry
Coat bottom of each bezel with a coat of DecoPage and sprinkle on mixture of glitters and fragments
Mix your resin, be sure to pay close attention to directions
Once mixed, start adding resin over glitter and fragments
Gently add in flowers as shown and continue to add resin
Allow resin to cure for a minimum of 24 hours
Once resin has cured, snap bezels to pendant piece and add ribbon

You can see all the wonderful Klik products and tons of ideas for creating with this super fun product in their flippy catalog HERE and you can find a retailer HERE. We’d like to recommend www.resinobsession.com because they carry Stampendous products as well!


To make our wonderful Klik jewelry pieces we used products by Environmental Technology, Inc. (ETI) who generously sent our team some of their wonderful Jewelry Resin. This two part resin is incredibly easy to use and creates fantastic, professional results. We love using it here on the Stampendous Design Team. This great resin is sold at Resin Obsession, but you can also find it at Michaels and other fine craft stores. You can get thousands of ideas for using resin to create your own pieces on the resincrafts blog or on the I Love Resin blog.

Some of you will be sharing your new jewelry soon because there are prizes! Three random winners will receive a prize package that includes Klik Snap Bezel Blanks and jewelry components, a package of ETI Resin and a Stampendous Eclectic Perfectly Clear Stamp Set. To win one of these awesome prize packages, you need to comment on our blog and that of each Stampendous designer in the list provided below. 


Eligible winners are those comments that provide a valid email and indicate a U.S. Mailing address. Here are the Stampendous Official Rules for all contests. Commenting will close Sunday, May 3rd and winners will be announced the afternoon of May 4th, so, be sure to check back Monday to see if you’re a winner!

Thanks for stopping by today!  I have really enjoyed this collaboration and plan to create even more similar pieces in the coming months.  I hope you have a wonderful weekend and I’ll see you again soon!

Hugs,

Lea