Pages

Friday, July 31, 2015

Got Paste?

If you've got it, spread it!!  Those of us on the Stampendous Design Team have been sharing pasted projects all week with our fantastic Dreamweaver Stencils Embossing Paste.  Most of you use your paste with stencils but did you know you don't have to?  You can spread it directly onto your paper for some great texture like I did on my card today.  I've got a mini tutorial showing you almost each step I took, the final steps were pretty obvious.  Truth be known, I went to a ballgame and when I came home to finish my project, I forgot to take pictures!  Oops!  So here goes:

Ready to spread the paste!

Paste is all spread!

Spray stamp with water and stamp into paste!

Spritz with Memories Mists™while paste is wet!

Card base trimmed and scored, ready to go!

Image stamped onto clear transparency film with VersaMark™ and heat embossed with powders!

The finished project!!

A close up of the heat embossed image and the great texture in the paste!

Here's what I used to create this card:

Memories Mists™ in Mango Lemonade, Pink Lemonade, Orange Juice, Fruit Punch and Copper Shimmer
Mat Board
Clear Transparency Film
Glue Dots Small Dots
Zip Dry Paper Glue by Beacon Adhesives

Usually I would post the steps I've taken to complete this project, however, since I've provided pictures, I think you can see for yourself how it was done.  The main thing to remember when stamping into the wet paste is to spritz your stamp with water first.  This prevents your stamp from sticking to the paste.  You really don't want perfectly smooth paste either, a rough texture adds more interest!  To finish it off, trim your heat embossed image, add glue dots behind the image and adhere to pasted card front piece.  Tie your bow and attach to card front.  Adhere card front to card base.  It's such a simple card but you do need to allow for drying time so don't expect to complete it quickly.  

Here's a complete list of my teammates that have more pasted projects to share for your inspiration:


Thanks so much for stopping by today!  I hope you've enjoyed my mini tutorial and that it has inspired you to try something new and fun with embossing paste.  Have a wonderful weekend and I'll see you again next week with more fun projects designed to inspire you!

Hugs,
Lea

Thursday, July 30, 2015

Let's Get Paste-y!

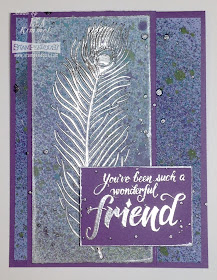
Hello there!  It's Dreamweaver Thursday at Stampendous, thanks for stopping by to check it out!  We've been spreading the paste at Stampendous this week!  We love our Dreamweaver Stencils Embossing Paste and my favorite is the Metallic Silver that I've used today.  Here's my card:


Here's what I used to create this card:

Memories Mists® in Sparkling Silver, Blueberry Shake, Lavender Tea, Blue Martini,  and WheatGrass
Delicata™ Silvery Shimmer by Tsukineko®
Periwinkle Cardstock by Bazzill Basics Paper®
Purple Cardstock by Bazzill Basics Paper®
ZipDry™ Paper Glue by Beacon Adhesives
Scrapbook Adhesives® 3D Foam Mounting Squares by 3L®

Here's what I did to create this card:

Trim a piece of mixed media white paper to fit stencil
Using mists, spritz and drip the colors desired onto paper, allow to dry
Tape down stencil onto spritzed paper and paste emboss with silver paste, set aside to dry
Create an A2 card base with a tent fold from purple cardstock
Trim a piece of periwinkle paper and spritz and drip with sprays
Trim a small piece of purple cardstock for sentiment
Ink stamp with VersaMark™ pad and stamp onto purple cardstock, add embossing powder and heat
Trim a piece of purple cardstock to mat stenciled piece
Once paste has dried, edge stenciled piece and sentiment with silver ink
Adhere layers as shown
Drip additional silver spray onto card

Here are my teammates that are posting today for Dreamweaver Thursday:


Thanks so much for stopping by today.  I'll have another post for you tomorrow using paste in a slightly different way!  I hope you'll stop by and check it out.  Until then, I hope you have an awesome day.

Hugs,
Lea

Wednesday, July 29, 2015

Wicked Wednesday and Polka Doodles

It's Wicked Wednesday ATC Challenge Blog time and this week our sponsor is Polka Doodles.  Our theme is to "Make It Sparkle."  I've added an adequate amount of sparkle to my sweet little fairy using Stampendous® Crystal Micro Glitter.  I love how it picks up the color you place it over!  The image I've used is Octavia Moonfly Rose Garden.  If you look closely, you'll see she has a handful of sparkles she's been sprinkling on the roses in her garden!  She's currently not in the link and I'm not certain why, however, this link will get you to the other awesome images!


Here's what I used to create this ATC:

Copic Markers
Red Cardstock from Bazzill Basics Paper
Glue Dots Small Dots
Zip Dry Paper Glue by Beacon Adhesives

Here's what I did to create this ATC:

Print image, color and trim slightly smaller than ATC size
Trim ATC base to 3.5" x 2.5"
Adhere image to base
Add glitter as desired
Add glue dots and cover with glitter

Thanks for stopping by today!  As always, your visits/comments make my day.   I'll have more to share tomorrow and Friday, so come on back by!  See you soon!

Hugs,
Lea

Wednesday, July 22, 2015

Wicked Wednesday and Digi My World

It's Wicked Wednesday ATC Challenge Blog time and this week our sponsor is Digi My World.  This week our theme is Not In Kansas Anymore and I've used the Big Eye Oz collection with Dorothy, Tin Man, Scarecrow and the Cowardly Lion!  Yep, you read that right, all four characters! I used the same scenario for each which kept it very simple and tied them all together rather nicely!


Here's what I used to create these ATCs:

Copic® Markers
Spectrum Noir™ Markers
Green Cardstock by Bazzill Basics Paper®
Blue Cardstock by Bazzill Basics Paper®
May Arts Ribbon®
Christmas Red Stickles™
Scrapbook Adhesives® 3D Foam Mounting Squares by 3L®
Zip Dry™ Paper Glue by Beacon Adhesives

Here's what I did to create these ATCs:

Print all four characters, color and fussy cut each one
Trim four pieces of blue cardstock to ATC size
Trim two pieces of green cardstock and die cut trees
Cut die cut trees in half and then trim to ATC width
Adhere cut trees to blue ATC, color tree trunks and branches gray
Using Stickles™, add "apples" to trees
Adhere yellow ribbon to bottom of each ATC, go over ribbon with yellow marker
Using foam squares, attach each character to their ATC
Add Stickles™ to Dorothy's shoes, set aside to dry

The ribbon that I used wasn't quite yellow enough, it was originally more of a butter color.  My solution was to pull out a Spectrum Noir™ marker and brighten it!  I love how easy it is to fix those aggravating little problems with these markers!  I know I didn't have to do all four characters but I just couldn't decide which one to do since they're all so darn cute.  These were quick and easy!

Thanks for stopping by today. 

Hugs,
Lea

Friday, July 17, 2015

Chameleon Color Tones


This week the Stampendous® Design Team has celebrated Christmas in July and Chameleon™ markers.  Chameleon™ Art Products is a company determined to change the way you think about marker pens. They pride themselves on having developed real innovation that enhances your ability to maximize your creativity. Their markers bring color control and simplicity to your art, and you can create stunning 3D effects, smooth transitions, highlights, and shading gradations all with one pen.

When you combine this simple coloring versatility with Stampendous® and House-Mouse Designs® images, you can create fantastic projects quickly. Stampendous® stamps are beautifully enhanced by the simple blending made possible with this range of innovative markers. The colorless blending tool acts as a “foolproof” finish for your project. You won’t believe the stunning range of colors that can be achieved with these markers, and the array of original projects you can create with the combination of Stampendous® and Chameleon.™  Here’s my project for today:


This is what I used to create this card:

Stampendous:
R236 Crystal Angel
EP525 Sparkle Puff Dimensional Embossing Powder
FRM11 Teal Mica Fragments
MG10 Teal Micro Glitter
MG01 Crystal Micro Glitter
EP161 Winter Green Opaque Embossing Powder
MPW811 Mixed Media White Paper
MEM01 Memento™ Tuxedo Black Ink by Tsukineko®
VM001 VersaMark™ Watermark Ink Pad by Tsukineko®
VP001 VersaMarker™ Watermark Pen by Tsukineko®

Plus:
Chameleon Markers® (BG4)

Copic® Markers (E50, E51, E53, E21, E41, E42, E43, C0)
Turquoise Mist Cardstock by Bazzill Basics Paper®
Kachina Cardstock by Bazzill Basics Paper®
ZipDry™ Paper Glue by Beacon Adhesives™
Scrapbook Adhesives® 3D Foam Mounting Squares by 3L®

This is what I did to create this card:

Using VersaMark™ pad, ink and stamp image onto white paper, sprinkle on winter green ep, tap off excess powder and heat set.
Stamp image with black ink onto separate white paper and color with markers.
Cut out angel image closely and set aside.
Trim embossed image close to edges as shown.
Create a mat from teal cardstock for embossed image and adhere the two pieces.
Create an A2 card base with a tent fold and adhere the matted image to the card base.
Take cut out angel and, using VersaMark™ pen, add ink to wings only, sprinkle on the NEW Sparkle Puff Dimensional Embossing Powder, tap off excess and heat set.
Mix fragments and glitters together and adhere to card as shown.
Allow time to for glue to dry.
Using foam squares, attach cut-out angel over embossed angel.

Did we say prizes????  Three prizes are up for grabs from commenters who post on our blog that of each designers blog during our hop this week.  Be sure to tell us where you live when commenting for a US or UK winner will receive a Cling Create Christmas Stamp Set and Perfectly Clear™ Stamp Handle from us or our UK distributor, Woodware Craft and a winner from Canada will receive a $20 USD Rewards Card to spend at our website. Deadline to comment is Sunday, July 19th, 11:59 pm PDT.  Chameleon will be offering a fantastic prize as well, so be sure to visit their blog for more details.

There is more! Our Australian Distributor, The Stencil Specialists, are sponsoring a prize for one friend “down under” to win a Stampendous Stamp, a Dreamweaver Stencil and a surprise goodie from their terrific stock of Stampendous merchandise! Tell us where you live when you comment to be in the drawing!

Here’s the list of my teamies hopping along today for the final hop:

Lea Kimmel (me)

Don’t forget to leave a comment if you want a chance to win a prize!  Thanks for stopping by today.  Have a wonderful weekend!

Hugs,

Lea

Thursday, July 16, 2015

Colorful Chameleons


This week the Stampendous® Design Team is celebrating Christmas in July with Chameleon™ markers.  Chameleon™ Art Products is a company determined to change the way you think about marker pens. They pride themselves on having developed real innovation that enhances your ability to maximize your creativity. Their markers bring color control and simplicity to your art, and you can create stunning 3D effects, smooth transitions, highlights, and shading gradations all with one pen.

When you combine this simple coloring versatility with Stampendous® and House-Mouse Designs® images, you can create fantastic projects quickly. Stampendous® stamps are beautifully enhanced by the simple blending made possible with this range of innovative markers. The colorless blending tool acts as a “foolproof” finish for your project. You won’t believe the stunning range of colors that can be achieved with these markers, and the array of original projects you can create with the combination of Stampendous® and Chameleon.™  Here’s my project for today:


I absolutely love using the Stampendous Color Fragments and Shaved Ice.  I really enjoy mixing the colors and creating my own unique color combinations.  They're perfect for adding texture and visual interest as well as a fun way to tie colors together.

This is what I used to create this card:

Stampendous:
W152 Whispered Wishes

SSC1231 Holiday Expressions Perfectly Clear™ Stamps
SSH38 Small Perfectly Clear™ Acrylic Handle
MEM01 Memento™ Tuxedo Black Ink by Tsukineko®
GX358U Melon Ultra Fine Pearl Glitter

FRG10C Shaved Ice
FRC19 Amethyst Color Fragments
FRC18 Teal Color Fragments
MPW811 Mixed Media White Paper

Plus:
Chameleon™ Markers (BL3, OL3, YL2, RD4, YG3, OR4, GR3, BG4, BR5, PK3, YO3, V04, BK4)

Memento™ Teal Zeal Ink Pad by Tsukineko®
Pixie Dust Purple Cardstock by Bazzill Basics Paper®
Aqua Cardstock by Bazzill Basics Paper®
Tim Holtz® Distress Ink in Tumbled Glass by Ranger®
Zip Dry™ Paper Glue by Beacon Adhesives

This is what I did to create this card:

Stamp  image, color and trim as shown.
Create a 5” square card base from aqua cardstock.
Stamp snowflakes in a random pattern with teal ink on aqua card base.
Trim a mat with purple cardstock for main image.
Adhere all layers.
Add melon glitter to hat and sweater.
Mix fragments with shaved ice and adhere across bottom of image, tap off excess.
Set aside to dry.

Did we say prizes????  Three prizes are up for grabs from commenters who post on the Stampendous blog and each designer's blog during our hop this week.  Be sure to tell us where you live when commenting for a US or UK winner will receive a Cling Create Christmas Stamp Set and Perfectly Clear™ Stamp Handle from us or our UK distributor, Woodware Craft and a winner from Canada will receive a $20 USD Rewards Card to spend at our website. Deadline to comment is Sunday, July 19th, 11:59 pm PDT.  Chameleon will be offering a fantastic prize as well, so be sure to visit their blog for more details.

There is more! Our Australian Distributor, The Stencil Specialists, are sponsoring a prize for one friend “down under” to win a Stampendous Stamp, a Dreamweaver Stencil and a surprise goodie from their terrific stock of Stampendous merchandise! Tell us where you live when you comment to be in the drawing!

Here’s the list of my teamies playing along today:

Lea Kimmel (me)

Don’t forget to leave a comment if you want a chance to win a prize!  Thanks for stopping by today and I hope you’ll join us again tomorrow for the final blog hop.  Have a wonderful day!

Hugs,

Lea

Wednesday, July 15, 2015

Wicked Wednesday with That Craft Place

It's Wicked Wednesday ATC Challenge Blog and this week our sponsor is That Craft Place with a theme of Stitching, Real or Faux.  The image I've used is Sugar Remembrance.  I created mine in remembrance of our fallen Soldiers, Sailors, Airmen and Marines.  After spending 9 years in the Army, I know first hand about sacrifices that are made on a daily basis.  Of course, I didn't make the ultimate sacrifice but, when I joined the Army, I knew there was always a chance I would be called upon for just that.  I love my country and all that she stands for so I served her with pride.  Without further ado, here's my ATC:


Here's what I used to create this ATC:

Red Cardstock from Bazzill Basics Paper®
Copic® Markers
Faber-Castell® XS Black PITT Pen
Zip Dry™ Paper Glue by Beacon Adhesives

Here's what I did to create this ATC:

Print image, color and trim to 1/4" smaller than ATC size
Using PITT Pen, add faux stitching around edge of image and for sentiment
Trim red cardstock to ATC size
Adhere image to cardstock

Thanks so much for stopping by today.  We would love for you to play along with us this week!!  I'll have a Stampendous post to share with you tomorrow and another on Friday so I hope you'll come back by and check those out, too!  In the meantime, have a wonderful day!

Hugs,
Lea


Friday, July 10, 2015

Sheltering Tree

Today is our last day of this week's Stampendous theme celebrating trees!  For today's card I've used the new Tree House Rubber Stamp.  I absolutely love this stamp!  It takes me back to my childhood and summers spent with cousins and friends.  I hope it gives you some warm fuzzy feelings about your childhood, too!


Here’s what I used to create this card:

Stampendous:
W145 Tree House
L262 Friendship Tree
MPW811 Mixed Media White Paper

Plus:
Memento™ London Fog Ink by Tsukineko®

VersaFine™ Smokey Gray Ink by Tsukineko®
Tim Holtz® Antique Linen Distress Ink by Ranger®
Tim Holtz® Tumbled Glass Distress Ink by Ranger®
Everglade Cardstock by Bazzill Basics Paper®
Painted Desert Cardstock by Bazzill Basics Paper®
Beacon 3-in-1 Advanced Craft Glue
Scrapbook Adhesives® 3D Foam Squares by 3L®
Copic® Markers (C1, C3, C6, C7; W1, W4, W7; YG13; YG91, YG93, YG95, YG97; G20, G21, G24, G28; R24, R27, R29; E97, E99)

Here’s what I did to create this card:

1 Stamp main image, color and trim to desired size.
2 Add distress inks.
3 Stamp sentiment and add distress ink.
4 Create an A2 card base with a tent fold from green cardstock.
5 Trim mats for both stamped images from red cardstock and adhere the images to the mats.
6 Adhere the main image to the card as shown.
7 Using foam squares, attach the sentiment as shown.


Here’s a list of my teammates that are playing along today, be sure to check them out and leave them some love!  


Thanks for stopping by today!  I’ll see you again next week with some more Stampendous love!  Hope you all have a wonderful weekend!

Hugs,
Lea

Thursday, July 9, 2015

Family Tree

Stampendous is climbing trees this week!  LOL!  Okay, we're really not climbing trees but we're posting lots of cards WITH trees!  I have to admit, I'm a tree hugger!  I love the majesty and beauty of trees and have always enjoyed drawing, painting or just coloring them.  I love how they seem to be reaching for the heavens!  Here's my card for today:


Here's what I used to create this card:


Stampendous:

Plus:
Memento™ Angel Pink Ink by Tsukineko®
Memento™ London Fog Ink by Tsukineko®
VersaFine™ Smokey Gray Ink by Tsukineko®
Copic® Markers - W0, W1, W4, W7; YG63, YG91, YG93, YG95, YG97; B0000; BV23; R22, R24
Tim Holtz® Antique Linen Distress Ink by Ranger®
Everglade Cardstock by Bazzill Basics Paper®
Painted Desert Cardstock by Bazzill Basics Paper®
Ribbon by May Arts
ZipDry™ Paper Glue by Beacon Adhesives


Here's what I did to create this card:

Stamp images, color and trim as shown.
Edge images with distress ink.
Trim mats for images from red cardstock and adhere as shown.
Create A2 card base with a tent fold from green cardstock.
Stamp background onto card base with VersaFine grey ink.
Trim a length of ribbon to wrap completely around card and adhere ends under images. 
Adhere images as shown.


Here's the list of my teammates that have more inspiration for you today:


Thanks so much for stopping by today!  Hope you've enjoyed the week so far, I have one more day of inspiration for you tomorrow, so, please stop by!  In the meantime, have a wonderful day!

Hugs,
Lea


Saturday, July 4, 2015

Happy Birthday, Alice!


Today we are celebrating the 150th Anniversary of Alice in Wonderland, and what better way to do that, than to share lots of creative projects inspired by this wonderful story.

Not only will you see lots of amazing artwork today, but you can also win prizes from the following amazing companies;


Prize winners will be selected from Random blogs throughout the hop using Random.org to select each winner.  In order to be eligible for a prize you must visit all stops on the hop and leave a comment. The prize draws will be open until July 18th, with winners announced on July 20th.

Here's my Alice in Wonderland inspired project:


Here's what I used to create this card:

Copic® Markers
atyouSpica® Glitter Pen in Silver
Tim Holtz® Distress Ink in Tumbled Glass
Tim Holtz® Distress Ink in Bundled Sage
Memento™ Rose Bud Ink by Tsukineko®
Blue Cardstock by Bazzill Basics Paper®
Green Cardstock by Bazzill Basics Paper®
Fancy Pants Designs® Winterland 6x6 Patterned Paper
May Arts Ribbon®
Zip Dry™ Paper Glue by Beacon Adhesives

Here's what I did to create this card:

Print image, color with markers and trim to desired size
Stamp sentiment in upper left corner of image
Add blue and green distress inks as shown
Create a 5" x 5" card base from blue cardstock with a top fold
Trim a mat for image in green cardstock
Adhere image to mat
Trim patterned paper to 4.75" x 4.75"
Cut a 5.25" length of pink ribbon 
Adhere to middle of patterned paper securing ends on back
Adhere layers as shown


Blog Hop List
Leadonna (Me)
Thanks so much for stopping by!  I do hope you'll come back by again for another visit.  Have a wonderful day!

Hugs,
Lea