Friday, November 30, 2012

Such Charming Bangles!

Hey there!  I've caught the wooden bangle bug and made two more simple bangles to share with you for this week's collaboration between Stampendous and DIY Bangles of Indus Trading Company.  I'm telling you, these are the easiest bangles in the world to create with, it just doesn't get any easier!  First things first, I wanted to give them a natural look so I picked out two Tim Holtz Distress Ink pads, tea dye and peeled paint, and stipple brushed one color on each bangle.  I looked through my stash of Stampendous stamps and there was my Charm Collection Perfectly Clear Stamp Set just calling my name.  It was definitely an "a-ha" moment.  The charm-sized stamps are perfect for these bracelets.  For the larger bracelet I used both butterfly stamps, both bird stamps and the crown.  Using my Jet Black Staz-On, I stamped each image on each one of the flat parts.  For the green bangle I only used the one butterfly stamp.  I really like how these came out, simple but pretty.


I hope I've inspired you to give these a try, like I said before, they're so easy to do!  Be sure to come back on Saturday for the final hop.  Don't forget to leave a comment on my blog today to be eligible to win a prize from either Stampendous or DIY Bangles.  Thanks for stopping by!

Hugs,
Lea

Tuesday, November 27, 2012

DIY Dangles and Bangles

One of the highlights of being on the Stampendous design team is the opportunity to collaborate with other companies using a mix of their products with Stampendous products.  Indus Trading Company of DIY Bangles has provided the team with a variety of wooden bracelets, beads and wreaths for us to turn our imaginations loose on.  Now how fun is that!  Pretty darn fun, if I may say so myself!

Steampunk is a huge trend at the moment and I must admit it appeals to my funky side.  I grew up in the 60's and 70's so this particular style suits my inner hippie!  Here's my bangle and my dangles!


I made a point of photographing the bangle on all sides so you can see each one.  These were both really easy to make but it did require some patience.  I did the bangle in small sections by covering it with Stampendous Boss Gloss first and then a mix of aged black embossing enamel and aged silver embossing enamel.  I love the texture it created! Once I had the entire outer side of the bangle covered and cooled, I added the gears from Michael's using Beacon Adhesives Gem-Tac.  The gears are from Bead Landing's Found Objects line and are in the bead section at Michael's.  The gears are super cool and can be used on a variety of projects.  To finish off the inside, I dusted on some Tim Holtz Distress Ink in black soot.

The earrings, or dangles as I've called them here, were done in a similar fashion.  They sent me the two large teardrop wooden beads that I've covered in the same mix of embossing enamel.  I put jewelry wires up through the middle and added the gears with jump rings.  I added some spacer beads I already had in my stash on top, formed a small loop at the top and put them on the hooks.  These were very easy and fun to create.

Be sure to check back on Saturday when I'll have another project for this same collaboration.  The dt is taking turns throughout the week sharing projects on their blogs and we'll have a blog hop on Saturday.  You can find out who's playing each day on the Stampendous blog.  Be sure to leave a comment for your chance to win Stampendous or DIY Bangles goodness.  See you again soon!

Hugs,
Lea

Friday, November 16, 2012

Have a Holly Jolly Christmas!


Ho! Ho! Ho!  Merry Christmas!  Isn't that what every Jolly Santa says!?  Here I've used Stampendous Jolly Santa that can be found this season at Michael's stores.  I love this particular stamp of Santa as he looks like the traditional Santa of my childhood.  I used Bazzill as my card base and Recollections Sugar Plums 6x6 paper pad for my two patterned papers.  I stamped my image on Neenah paper with Memento Rich Cocoa and colored it with my Copics.  I trimmed the image, distress inked the edges with Tim Holtz distress ink in bundled sage and layered it on Bazzill.  I put my layers of paper together, added some ribbon I knotted, pop-dotted my layered Jolly Santa image and finished it off with some buttons from my stash. Well, I almost finished it off!  I decided at the last minute to add some Stampendous fresh green crushed glass glitter to the holly leaves on Santa's hat using Zip Dry from Beacon.  I liked the little touch of sparkle it added which really just completes the card.  Here's a close-up of Jolly Santa:


 I love how this card came out.  There's just something magical about a rosy cheeked Santa that looks like he just got home from a night out delivering wonderful gifts! In my heart, I will always believe in the magic of Santa.  I know he's not the reason we celebrate Christmas but I love the symbolism of St. Nicholas, a.k.a. Santa!

May you find the perfect gift for the warm and wonderful family and friends on your Christmas shopping list.  May you not be trampled while shopping.  May all the register lines be short.  Most of all, when December 25th arrives, may you have the merriest Christmas ever!

Hugs!
Lea

Saturday, November 10, 2012

I {heart} Fast Finish!

Really!  I love this stuff and you will, too!  It's so easy to use and just like the name says, it's F-A-S-T!


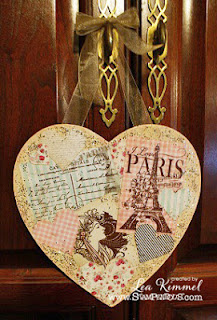
I went to Michael's earlier this week and picked up this really cool wooden heart.  I've been wanting to create some decorative wall items for my shabby chic-styled craft room.  I'm fortunate to be one of those people that can pick something up and an idea instantly pops into my head as what I can do with it.  Well, as soon as I saw this heart, I knew what I wanted to do!  First, I stamped these images and embossed them with Clear Bark embossing powder on a Lost and Found 6x6 paper pad from My Mind's Eye.


  I used Stampendous images Deco Lady, I Love Paris, and Carte Postale.  I loved the vintage feel of these stamps and knew they would be great together.  (I added a tiny bit of pink and green to Deco Lady with my Copics!)

After stamping and embossing the images on the papers I picked out, I set about doing the background of my heart.  First I covered it with Tim Holtz distress ink in Antique Linen, then added accents in Spun Sugar.  Next I covered it with a thin coat of Distress crackle paint in Picket Fence.   While waiting for the crackle paint to dry, I used my Spellbinder heart and scalloped heart dies and cut out a few hearts using scraps from the paper I stamped my images on.  When the paint dried, I laid the stamped images and hearts out and found a layout I was happy with.  I did end up tweaking it just a little!


Next up was adding the Beacon Fast Finish Decoupage adhesive.  Let me tell you, I love how quick and easy this adhesive works!  I let the first coating dry, added a little more around the edges and sprinkled some chunky glass glitter around the edges for a little vintage sparkle!  For a finishing touch, I added some ribbon and bow to hang it with.   Here's a close-up.


I'm so pleased with how this project turned out and I hope I've inspired you to try this product for yourself.  I'm sure you'll love it just as much as I do!

These are the team members playing along today, so be sure to visit all of the blogs and leave some insightful, kind comments (the kind that let us know you looked at the project) and we'll give some great prizes, sending some of you with U.S. mailing addresses some Fast Finish Decoupage Medium and some Stampendous Stamps. Here we go...
Lea Kimmel (me!)

Thanks for stopping by and I'll see you again soon!  Have a blessed day!

Hugs,
Lea

Monday, November 5, 2012

Happy Birthday!

Last week was Fran Seiford's birthday.  In case you don't know, Fran is the owner and artist behind all those wonderful stamps at Stampendous.  Happy birthday, Fran!  Anyway, some of us made cards to celebrate her special day and this is the card I created.


The top layer of the cake comes out since I made the bottom layer a pocket!  These cute candles are from the Fifteen Candles Perfectly Clear Set.  I also used a selection of Stampendous glitters, each candle is a different color.


And when you untie the top layer and open it up, it's a mini card with in a card!  I used Timeless Twine to tie the card.  There's a method to my madness, I add the twine to keep the top layer from sinking too far into the bottom layer.  I used Beacon's Zip Dry to adhere the Multi Ultra Fine Crystal Glitter to the drippy goo icing!


And here's the inside sentiment!  This stamp is from the Party Invite Perfectly Clear Set, one of my all time favorites!

Other products used:

Bazzill Paper
Bo Bunny Dots
Bella Blvd Sugar Rush
EK Success Daisy Chain Punch
Martha Stewart Drippy Goo Punch
Queen & Co. Pearls

This is a simple but cute card and I do hope you like it!  Thanks for stopping by and sharing in my love for all things Stampendous!  Have a good day and I'll see you back here soon!

Hugs,
Lea

Sunday, November 4, 2012

Meow-ry Christmas!

Who wouldn't want this cute little Christmas Kitten from Stampendous for Christmas?  I actually have a cat and a kitten that look just like the one on this stamp, Louie and Cleo.  That makes this stamp extra special for me.

And here's the whole card:


I stamped Christmas Kitten with Memento Tuxedo Black, colored it with Copics and die cut it with Spellbinders Label 17.  I inked the edges of my kitten image with Tim Holtz Distress Ink in Tea Dye and then softened that with some Distress Ink in Antique Linen.  My card base is Bazzill and the patterned paper is from DCWV The Four Seasons Stack.  I stamped Christmas Background from Stampendous on a piece of Neenah using my VersaMark pad, I embossed it with Detail Gold embossing powder from Stampendous, inked it with Tim Holtz Distress Ink in a mix of Tea Dye and Antique Linen and cut it to fit in the red stripe of the patterned paper.  Instead of doing the usual ribbon, I thought it would be fun to do a row of small buttons as an accent that I've attached with Mini Glue Dots. Using foam dots, I mounted the kitten on the front and now it's a happy Christmas Kitten! Meow, meow, meee-ow!

That's it for today, I hope you've enjoyed my card.  See you again soon!

Hugs,
Lea