Showing posts with label Little Yellow Bicycle. Show all posts

Wednesday, September 9, 2015

Wicked Wednesday with Crafty Sentiments Designs

It's Wicked Wednesday ATC Challenge Blog time and this week our sponsor is Crafty Sentiments Designs.  Today I've used the image Mia - Howdy and our theme is Cowgirls/Cowboys.


Here's what I used to create this ATC:

Copic® Markers
Neenah® Classic Crest™ Solar White
Little Yellow Bicycle® Patterned Paper
Light Blue Cardstock by Bazzill Basics Paper®
Red Cardstock by Bazzill Basics Paper®
Burlap Twine
Zip Dry™ Paper Glue by Beacon Adhesives
Scrapbook Adhesives® 3D Foam Mounting Squares

Here's what I did to create this ATC:

Print image, color and fussy cut
Trim base for ATC from light blue cs
Trim patterned paper 1/4" smaller height and width than ATC base
Trim strips of red cs and weave into a plaid pattern over denim-look paper
Adhere strips to patterned paper and snip off ends of strips that hang over edges
Adhere patterned paper with strips to ATC base
Create a "lasso" with twine and adhere to ATC
Using foam mounting squares, attach Mia to ATC
On a scrap of white paper, write sentiment, edge with red Copic® and adhere to front of ATC

I did take a little creative license with this image by giving her boots and a dot of a nose and a tiny mouth.  I just felt like she needs boots to be a cowgirl and they were easy enough to draw onto her legs.  She was actually quite fun to color and I think she's turned out cute as can be!

I do hope you'll play along with us!  Thanks for stopping by and I hope to see you again soon!

Hugs,
Lea

Thursday, March 26, 2015

Texturize This!

We have a different sort of collaboration for you!


At Stampendous we’re very excited to be able to offer our products in many countries around the world. We’re able to do this thanks to our terrific distributors in those countries who help retail stores to stock our products. In the UK we have a very long and valued partnership with Woodware Craft Collection. These wonderful folks stock almost all of our products, and they even stock several classic items that have retired from our store here in the US. They also stock almost all of our new Dreamweaver Stencils line, so we thought it would be another great event to celebrate the addition of Dreamweaver to the Stampendous family.

This week we’re going to celebrate with the awesome Woodware Design Team and the Dreamweaver Stencils Dream Team all of the the great Stampendous and Dreamweaver Stencils products that Woodware makes available to the UK market. This is good news for our crafty friends in the UK because we’ll be offering prizes and our UK friends are eligible to win!! We’ll be offering three prizes in the UK and three in the US. Each prize package will consist of Nathalie Kalbach’s terrific Grunge Mixed Media Cling Rubber Stamp Sets and the beautiful Zen Butterfly Dreamweaver Stencil! Both products are ideal for adding texture and backgrounds to your projects!
Deadline to comment is Sunday, March 29th, Pacific Time. Winners will be picked using random.org and announced Tuesday, March 31st, in the afternoon.


And that’s our theme!! Making Texture. We hope you’ll enjoy the wonderful inspiration that three talented teams will bring you this week! Be sure to visit all the blog links listed and leave your comments! Each comment will count as an entry towards one of the terrific prize packages.

Here's my project:


Here's what I used to create this card:
Memento™ Tangelo Ink Pad by Tsukineko®
Little Yellow Bicycle Splash 6x6 Paper Pad
Neenah® Classic Crest™ Solar White Cover Stock
Copic® Refills G21 and Y17
Beacon® 3-in-1 Advanced Craft Glue

Here's what I did to create this card:
  1. Tape Jellyfish stencil down on patterned paper that has been trimmed to 5.5x5.5" square
  2. Mix small amount of translucent paste with yellow refill and add in micro beads to make a thick paste
  3. Mix another small amount of translucent paste with yellow refill only
  4. Cover jellyfish tentacles and spread paste with beads in main section of stencil
  5. Uncover tentacles and spread paste without beads in the rest of the stencil
  6. Mix small amount of translucent paste with green refill only
  7. Using tentacles only, paste green mix along bottom of patterned paper to create seaweed
  8. Set pasted patterned paper aside to dry
  9. Create a 6x6" card base with a tent fold from light blue paper
  10. Trim a piece of darker blue paper as a mat for patterned paper
  11. Stamp sentiment with orange ink on white cardstock and trim
  12. Trim mats for sentiment as shown
  13. Once paste has dried, run boss gloss across bottom of patterned paper and add embossing powder and  heat
  14. Adhere all layers as shown

Be sure to check out the rest of my teammates and others playing along today:

Thanks so much for stopping by today.  Tomorrow is the BIG final hop so don't forget to stop by.  I've got a BIG post planned!  Until then, have a wonderful day!

Hugs,
Lea

Wednesday, February 18, 2015

Wicked Wednesday with Squigglefly

It's time for another Wicked Wednesday ATC Challenge Blog post and this week our sponsor is Squigglefly.  Sadly, Squigglefly has closed their shop but we wanted to go ahead as planned and create with the adorable images sent to us.  This is "A Good Catch Maddie" and I think she's super cute!  From what I've read, there are a couple of artists from Squigglefly moving to Sweet Pea Stamps so maybe this little cutie will become available there.  Our theme this week is Fishing Fun, show us what you've got!


Here's what I used to create this ATC:

Squigglefly™ A Good Catch Maddie
Neenah® Classic Crest™ Solar White Cover Stock
Little Yellow Bicycle® Splash 6x6 Paper Pad
Tim Holtz® Distress Inks in Tumbled Glass and Stormy Sky
Beacon® Adhesive 3-in-1 Advanced Craft Glue
Copic® Markers in:  YG00, 01, 03, 05, 93, 95; B91, 93, 95, 97; YR15, 16, 18; R14, 17, 20; E21, 41, 42, 43, 50, 51, 53
3L® Scrapbook Adhesives® 3D Foam Mounting Squares

Here's what I did to create this ATC:

Print image and color
Trim patterned paper to ATC size
Determine where you need to trim image to fit ATC as shown and trim
Adhere image to ATC base
Add distress ink with tumbled glass on upper portion and lower portion and storm sky on lower portion only
Cut out a small fish and mount onto ATC as shown

We would love for you to play along with us and show us your best fishiest, funnest ATC!  In the meantime, have a wonderfully blessed day and I'll see you again soon!  Thanks so much for stopping by!

Hugs,
Lea

Thursday, November 20, 2014

Seasonal Stamping With Stampendous and Spellbinders

If you're looking for my Dreamweavers Stencils post, please click here!  Thank you!


Welcome to the Spellbinders and Product Partners Holiday Blog Hop.
W
e are so excited to have you join us!

For the next three days Spellbinders and their Product Partners will be showcasing projects for the holidays. To view all of the great projects you’ll want to start at the Spellbinders blog. We are promoting each day of the blog hop, so we decided to share extra projects from our designers! You’ll find those here.  Here's my project for today:


Here's what I used to create this card:

Little Yellow Bicycle® Winter Twig Collection - Snowy Window
Light Blue Cardstock by Bazzill Basics Paper™
Neenah® Classic Crest™ Solar White Cover Stock
Memento™ Teal Zeal Dew Drop
Zip Dry™ Paper Glue by Beacon® Adhesives

Here's what I did to create this card:

Run dies through white and light blue cardstock
Adhere top die onto light blue die cut shape
Using VersaMarker™, apply ink to "ground," add embossing powder and heat
Sprinkle white embossing enamel on "sky" portion of die cuts and heat 
Create 5" x 5" card base with a tent fold from light blue cardstock
Trim patterned paper to fit on background as shown
Adhere die cut to patterned paper
Trim ribbon piece to fit and adhere as shown
Stamp sentiment with blue ink on white scrap, trim light blue mat and adhere the two pieces together, attach to card with 3D Foam Squares

Do you feel like there should be… Prizes? Oh yes, there are plenty of prizes. Spellbinders has compiled a fantastic giveaway package for each day consisting of three brand new Spellbinders dies/templates plus product from that day’s Featured Partners! Details and Official Rules can be found here.
We will also have a a prize package here on the Stampendous blog, and we bet other Product Partners will be doing the same, so visit them all each day!


Our prize package each day will be a Jumbo Penguin Duo stamp set and a Jumbo Perfectly Clear Handle, PLUS a set of Spellbinders greeting dies! To be eligible to win our Stampendous prize package, you need to comment on our blog that of each Stampendous designer in the list provided below. We’ll pick a winner each day (3) and announce them on Monday, November 24th. Eligible winners are those comments that provide a valid email and indicate a U.S. Mailing address. Here are the Stampendous Official Rules for all contests. So hop around and check them out!!


Thanks for stopping by today!  I hope you've enjoyed our Holiday Blog Hop with Spellbinders and Partners.  I'll see you again soon!  Have a wonderful day!

Hugs,
Lea

Thursday, September 18, 2014

Frosty the Snowman

Where did the summer go? Kids are back in school, with all the insanity that goes with it, vacations are a not-so-distant memory, and it is once again time to get busy with the important things in life...crafting for the holidays! Yay! All of September the Dream Team will be featuring all the new goodies we have for the "Most wonderful time of the year", the fall and winter holiday season. New stencil designs, new dies, and...brand new embossing folders featuring some of our top-selling designs, all to be found on-line through the Stencil with Style web-site, or your local papercrafting store.
 
Here's my holiday inspiration for this week:


Here's what I used to create this card:

Add A Little Dazzle Wondrous White Metal Sheet
Little Yellow Bicycle® Winter Twig "Ski Sweater"
Bazzill® Cardstock
Crystal Stickles®
May Arts Ribbon® Bakers Twine
Spectrum Noir™ Markers:  OR1, IG8, True Black, CR8, CR11, IB2
Copic® Markers:  E25, E27, BG01
Beacon Adhesives® Zip Dry™
Foam Mounting Squares

Of course, we have our monthly challenge for you to play along, so post your own holiday creations, and use the Inlinkz tool on the Dream It Up! blog, for a chance to win the prize at the end of the month. We also have our fabulous Guest Designer for the month of September, Wendy Price! Here's the list of our "A" Team with their links for the week:


Thanks so much for stopping by today!  I hope you enjoyed my simple little Snowman card.  It's simple but fun and I sure had a good time creating it.  I'll have another Stampendous post tomorrow so please come and check it out.  Have a blessed day!

Hugs,
Lea

Thursday, August 21, 2014

Wicked Wednesday and Time for Tea

Hey all!  It's Wicked Wednesday ATC Challenge Blog time and our sponsor this week is Time for Tea Designs.  Our theme this week is "Back to School."  My image is Apple for Teacher and she is truly adorable!  Here's my ATC:


I've colored my image with Copic markers and cut her out.  My base is Bazzill and I've used Making the Grade 6x6 paper pad from Little Yellow Bicycle as the patterned paper.  My sentiment is Stampendous.  

I do hope you'll play along with us this week.  Thanks for stopping by and I hope to see you again soon.  Have a blessed day!

Hugs,
Lea

Friday, August 8, 2014

Back to School...

...for our favorite little mice!  Yes, school is starting back soon and it's time to think about those teacher "here's to a great year" cards.  Stampendous has celebrated all week with House-Mouse Designs® as we prepare for yet another school year!  Here's my card:


This is what I used to create this card:

DecoArt® Americana™ Clear Chalkboard Coating
Bazzill® Cardstock
Little Yellow Bicycle® Making the Grade
Neenah® Classic Crest™ Cover Stock in Solar White
Tim Holtz® Distress Ink® in Pine Needles
Krylon® Workable Fixatif
Sargent Art® Chalk
Paperclips
Beacon Adhesive® Zip Dry™ 
Spectrum Noir Markers used:
  • GB2, GB4
  • FS9
  • CR2
  • TN1
  • EB1
  • IG1, IG3, IG4, IG5
  • CT2, CT4
  • TN5, TN7, TN9

Here's what I did to create this card:

Stamp image on white cs, color and trim to desired size, edge with green ink
Create card base for a 5"x5" square card with a tent fold
Trim patterned papers as shown
Coat "chalkboard" patterned paper with chalkboard coating, allow time to dry
Write on "chalkboard" paper with chalk, spray with Fixatif, allow a few minutes to dry
Arrange patterned papers as shown, add paper clip and adhere all papers to card base
Adhere paperclips in lower corner
Add burgundy fragments

Thanks for stopping by and checking out my card, I appreciate your visit.  Next week will be a busy one so please do stop by.  Dreamweaver Stencils is hopping with Woodware all week and Stampendous is featuring Authentique papers all week.  Yep, it's going to be a busy week in blogland!  Have a blessed day and I'll see you again soon!

Hugs,
Lea


Tuesday, July 29, 2014

A Little Fun in the Sun

This week Stampendous® is celebrating summer with some of the cutest little critters around!  My card today is created with Gruffies® Beachy Bears!  I absolutely love these little bears; they are adorable!  Here's my card:


Here's what I used to create this card:

Faber-Castell® Gelatos®
Ranger® Archival Ink™ in Jet Black
Canson® Watercolor Paper
Little Yellow Bicycle® Hello Spring
May Arts Ribbon®
Bazzill® Cardstock
Viva® Pearl Pen in Ice White
Beacon Adhesive® Zip Dry™
Water Brush

Here's what I did to create this card:

Stamp image on watercolor paper and color with water brush and Gelatos®
(here's a hint, I scribble my Gelatos® onto the inside of a page protector I've cut open and use that as a palette, I pick up the color with my water brush)
Trim image to desired size
Create card base and mat for image from Bazzill®
Trim patterned paper to fit as shown
Trim length of ribbon to wrap around patterned paper and create bow
Adhere ribbon to patterned paper and then adhere patterned paper to card base
Adhere image to mat and then adhere matted image to center of card base
Attach bow with a dot of glue
Squiggle on the "sunscreen" with the Pearl Pen and set aside to dry

So there you have it, a cute and simple card that's fun to create!  I hope you've enjoyed viewing my card and maybe it has inspired you to create your own!  Thanks for stopping by!  Have a blessed day!

Hugs,
Lea

Tuesday, April 8, 2014

A Little Sneak Peek

Ah, Spring Break is over for our school district and the peace and quiet in the house has returned.  LOL!  Who am I kidding?  There's always noise and if it's not the kids, it's the fur babies!  That's okay, though, because, honestly, that's the way I like it!  Now it's time to give you a little sneak peek of what's to come in the new April 2014 Stampendous® catalog!  Woohoo!  In honor of the return to school, I have an adorable little card created with the Stampendous® House-Mouse Designs® image called Stack of Books.  Is this mouse not just the cutest little thing!?


Here's what I used to create this project:

Stampendous® House-Mouse Designs® Stack of Books
Neenah® Classic Crest Solar White
Memento™ Tuxedo Black Ink Pad
Bazzill® 
Little Yellow Bicycle® “Makin’ the Grade” 6x6 Paper Pad
Tim Holtz Distress Ink™ in Antique Linen
Misc Foam Mounting Squares
Scor-Tape®
Misc Clip-on Mini Chalkboard
Copics®:
B34, 37, 93, 95
G12, 16, 19
R27, 29
Y15, 18
C4, 5
E41, 42, 43, 44, 50, 51, 53, 93
T2, 4, 6

Here's how I created this project:

Stamp image, color, trim to desired size
Edge trimmed image with distress ink
Create card base with a tent fold
Trim patterned paper and image mat (from Bazzill®)
Adhere patterned paper to card base
Adhere image to mat
Adhere matted image to card base with foam mounting squares
Write “A B C” on mini chalkboard with chalk and clip to image

So isn't he sweet?  I hope you've enjoyed viewing my project as much as I enjoyed creating it!  Please keep in mind that this image is not on the web site yet, that's why it's called a sneak peek!  When the April Catalog is released, you'll find it and a whole lot of other awesome stamps and things you're going to want!  Thanks for stopping by and I hope you'll come back soon!  Have a blessed day.

Hugs,
Lea

Saturday, March 15, 2014

Zombie, Tea or Me?

Hi there!  It's time for another friendly challenge at Desert Islands Crafters Challenge Blog and this time around our sponsor is The Stamping Boutique.  The image I've used is Zombie Girl with Tea, somewhat of a visual oxymoron, don't you think?  I love her, I think she's adorable and since I collect old teacups, this one really cracked me up.  Here's the itinerary for this challenge:


1.  polka dots
2.  make it an ATC or tag
3.  citrus colors (yellow/orange/lime green/pink)
4.  add ribbon
5.  Spring theme
6.  Add eyelets
7.  Include an animal
8.  Zombies 
9.  Washi Tape
10. Monochromatic

I've used #'s 1, 3, 4, 8 and 9 and here's my project:


Does she crack you up as much as she does me?  Every time I look at this card, I giggle, I just can't help myself.  Notice how her skin is starting to turn blue, bless her heart!  Oh, that's right, she's a zombie!  LOL!  Sorry, I'm just amused!

I hope you'll take time to create something fun and play along with us.  You could win a prize so what do you have to lose?  Thanks for stopping by and I hope to see you again soon.  If this is your first time here, take a look around, you might find something you like!  Have a blessed day!

Hugs,
Lea

Thursday, January 2, 2014

Guess what day it is!

Did you know that we're celebrating the Queen's birthday this week? Well...the Queen of Stencils, Lynell Harlow, that is. Actually, her birthday is on Saturday, but here at Dreamweaver Stencils we're surprising her by posting birthday cards in her honor today. Nothing like making you feel OLD sooner than necessary, right Lynell? You'll even see a few familiar names in our lineup, as some of the teaching team are whooping it up for her as well.

In addition to our birthday party, we are also beginning a new year and a new monthly challenge. In honor of all those resolutions we hope to achieve, our challenge is "Losing the Weight...AKA Clean and Simple (CAS)". If we all try really hard to simplify our design-work without losing our creativity, we can all say at the end of the month that we've lost some weight! Maybe not off of our waistlines, but at least off of our cards! Gotta start somewhere!


I used Dreamweaver Stencil LL 379, Tall Palm Trees, for Lynell's card as she spent a good deal of time in Hawaii and I know that's a place near and dear to her heart.  I lived there myself for four years and it's truly one of the most beautiful places on earth.  In case you're wondering, my card says Happy Birthday in Hawaiian.  I airbrushed the background with Copics and then brush stenciled my design with chalk inks.  I went back in with a flat brush and added a little more detail on the trees.  I kept my card very simple as that's our new challenge this month.  My papers are Neenah, Bazzill and Little Yellow Bicycle's Splash.  Be sure to leave Lynell some birthday love!  Here's the hop list so you don't miss a thing:


Lynell, I wish you the happiest of birthdays and I hope you enjoy your special day!  Thanks for stopping by today and I'll see you again soon!

Hugs,
Lea

Tuesday, September 24, 2013

Fall Is Here,,,

,,,and Stampendous has some great fall stamps to help you celebrate the season!  My card today uses Leaf Boy Kiddo and Trees and Leaves.  He is such a cutie!  I love the Kiddos line of stamps, they're one of my favorites!


I stamped my Leaf Boy Kiddo image with Memento Tuxedo Black on Neenah Classic Crest and colored it with Copic markers.  I trimmed it down to the size I wanted and inked it all over with Tim Holtz Distress Ink in Antique Linen.  Next, I created my card base from Bazzill cardstock and my pattered paper is from Little Yellow Bicycle's Hello Fall Collection.  I cut two pieces of my patterned paper, one for the base and one to mat the image on.  I adhered all layers with Beacon Zip Dry.  I then stamped, colored and cut out three leaves from the Trees and Leaves Perfectly Clear™ Stamp Set and using pop dots, I adhered them to the card.  A really simple but cute fall card perfect for family, teachers or friends!

Thanks bunches for stopping by for a peak today!  I'll see you again real soon!

Hugs,
Lea

Friday, August 16, 2013

Woodware Fun


Welcome to the annual Dreamweaver and Woodware Christmas in August extravaganza week! Monday through Saturday we will be knocking your Christmas stockings off with fun and inspirational ideas for the upcoming holidays. All that you need to do is hop back and forth across the "pond" on each day, oohing and aaahhhing as you go, and leaving us plenty of holiday love. In return, you'll be entered to randomly win one prize package for a UK commenter, and a second prize package for a US commenter, featuring products distributed in the UK by Woodware...including Dreamweaver and Stampendous!

Prize includes four stencils, one die, and two stamps, selection may vary.

Today I have a cute little card for you using Dreamweaver Stencil LL 459 Village.  I love this snowy little village as it reminds me of the time I lived in Germany.  Using Dreamweaver's White Embossing Paste, I paste embossed the stencil on a piece of Neenah Natural White cardstock.  Once it was dry, I colored the houses with my Copic markers.  I trimmed it down to the size I wanted and colored the background with my Prismacolor Mediterranean Blue pencil and blended it in with Gamsol. Next I added snow to the houses and the ground with Copic Opaque White and a teeny paintbrush.  Did I stop there?  Nope!  I decided to make it a very snowy day and using a Ranger Inkssentials Cut-n-dry pen nib brush tip, I added more snow just dotting it all over.  Once I finished my stenciled piece, I created my card base from Bazzill, added Little Yellow Bicycle's Winter Twig paper to the base.  I trimmed a piece of LYB's Winterings to mount behind my stenciled piece and adhered both to the card.  Using Stampendous Perfectly Clear Stamp sets Snowman Banners and Holly Bird I stamped my sentiments using Memento Tuxedo Black ink onto Neenah White cardstock.  I trimmed the sentiments down, edged them with Tim Holtz distress ink in pumice stone and adhered them to the card, the top one with Beacon Zip Dry and the bottom one with pop dots.  


Here's a close-up of three of the houses!


Now's the time for you to leave a comment and move on to the next designer for today:

Thanks for stopping by today!  Don't forget about the big hop tomorrow!  I'll see you then!

Hugs,
Lea

Thursday, December 8, 2011

My Favorite Things - Flurry of Love

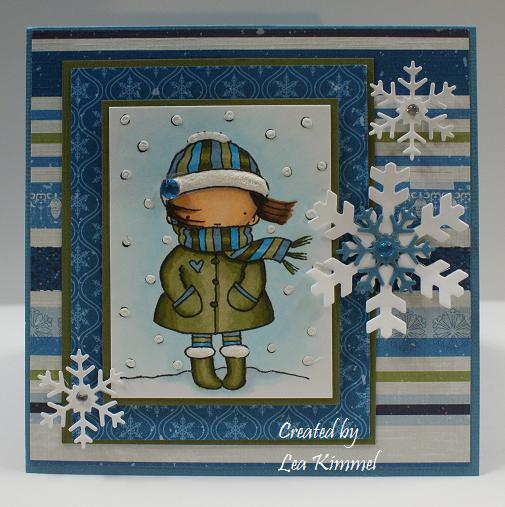
I fell in love with this cute little set the minute I laid eyes on it and had to add it to my ever growing collection of My Favorite Things stamps.  There's just something about this Pure Innocence line that really appeals to me.  This card is definitely in the Cute and Simple (CAS) category of cards.  Some days you just NEED cute and simple!


I stamped my image with Memento's Tuxedo Black ink on Neenah Classic Crest and colored it with my Copics.  Once the image was colored, I went over the "furry" parts of her hat and boots and all of the snowflakes with my Marvy Snow Marker.  Once the "snow" dried, I heated it up with my heat gun to get that nice velvety raised look.  I layered my little cutie on Bazzill and Little Yellow Bicycle papers pop-dotting my image and the green layer right behind her.  I used my MFT snowflake die and cut my three snowflakes out in white and one little one in my blue Bazzill then pop-dotted the snowflakes.  I decided to add just a little bling from Queen & Co. and that really polished the card off without going overboard.  So there you have it!  One CAS card coming right up!  Thanks for stopping by to take a look and if you have time, let me know what you think.