Showing posts with label Offray. Show all posts

Wednesday, January 1, 2014

Whimsical Bird

It's the 1st and that means it's time for another Desert Islands Crafters Challenge.  Our sponsor for this challenge is The Stamping Boutique.  She has some super cute digital stamps and the one I've used today is called Whimsical Bird.  It reminded me of a partridge in a pear tree so I thought it was perfect for this time of year.  Here's the itinerary for this challenge:

1.  Glitter
2.  Ribbon
3.  Die Cut
4.  Airbrushing or Spray (Perfect Pearls Mists, Memories Mists, Dylusions)
5.  Snowflakes
6.  Winter theme with Summer colors
7.  Stencil
8.  Three Layers
9.  Pocket
10. Distressing

Remember, you need to use at least three from this list.  Here's my card:


I've used #'s 1, 2, 3, 4, 6 & 8

Here's a close-up showing the sparkle from the Clear Spica pen I used to add a little glittery goodness:


Now it's your turn to show us what you've created!  Link your card here!  I look forward to seeing what you've come up with.  Have fun!

Hugs,
Lea


Friday, December 27, 2013

Brrrr....

Baby it's cold outside!  That's okay, though!  Stampendous® has some great stamps that are sure to warm your heart!  Just look at how sweet this little Snow Girl is!  She can be found exclusively at Michaels but don't wait too long, she's so cute she's sure to go fast!


For this card I used these products:

Stampendous!® Snow Girl
Michaels Recollections™ Jolly Holiday 6x6 Paper Pad
Bazzill® Green Cardstock
Neenah Classic Crest® Solar White
Copic® Markers
Memento™ Tuxedo Black
Tim Holtz™ Distress™ Ink in Tumbled Glass
Offray® Grosgrain Ribbon
Zip Dry™ Adhesive

To create this card, here's what you do:

Stamp the image on white cs, color, trim to desired size, add distress ink
Create card base with a tent fold
Trim patterned papers as shown
Create bow, wrap tails around blue patterned paper and adhere
Adhere all layers

This was a super easy card to create, I hope you like it.  She's such a cute Snow Girl!  Thanks for stopping by today and I'll see you again soon!

Hugs,
Lea


Tuesday, December 3, 2013

Angels Are Among Us!

And, some of the cutest angels can be found at Michaels for Stampendous® Stamps!  This little cutie is part of a set that's sold exclusively at Michaels this year.  The sentiment and background stamp are also part of the same set.  Here's my card:


 Here's how you can make your own:


Create your card base with Bazzill® red card stock
Trim green patterned paper small enough to leave a 1/8” edge of red showing
Ink scroll work stamp with Boss Gloss™, stamp twice on green paper, add silver ep and heat emboss
Stamp image on white card stock and color with Copic® markers
Trim stamped image closely and edge with Iced Spruce distress ink
Stamp sentiment stamp using Boss Gloss™, add silver ep and heat emboss
Cut out sentiment with Spellbinders® circle die, edge with Iced Spruce distress ink™
Add white ribbon across middle of green paper and adhere on back side
Adhere green paper to red card base
Trim a mat of patterned paper for stamped image and adhere the image to the mat
Adhere matted image to card base
Using foam mounting dots, adhere sentiment to lower right corner of card base

Here's the list of supplies and tools I used:


Stampendous® Angel Stamp Set
Stampendous® Boss Gloss™
Recollections™ Silver Detail Embossing Powder
Bazzill® Red Card stock
My Mind’s Eye® ‘Tis The Season 6x6 Designer Paper Pad
White Card stock
Zip Dry Adhesive™
Pop Dots
Tim Holtz® Distress Ink™ in Iced Spruce
Spellbinders® Circle Die Cuts
Offray® White Satin Ribbon 5/8”
Copic® Markers
E40, 41, 50, 51, 53, 93; YG03; R24, 27; BG0000, 000, 70, 72; B0000; C00, 0, 1
0 (Colorless Blender)
Paper Trimmer
Heat Embossing Tool
Color Duster Brush

Cuttlebug Die Cutting Machine

That's it for today, I'll have another project for you tomorrow.  Thanks for stopping by!

Hugs,
Lea

Thursday, July 26, 2012

Blooming Christmas

Well, it isn't December 12, National Poinsettia Day, but it is another day in our reveal week for Stampendous!  Today I'm sharing with you a card I made using Cling Jumbo Poinsettia.  The papers I used are Bazzill for my base, Reminisce for the patterned paper and Bo Bunny for the accent paper.  I also used a little Offray ribbon I picked up at Michael's.  My flower is pop dotted on and I bent the flower petals just a little for some added dimension.  Here's my card:
I have to say, I love how this card came out!  Here's a close up:

Don't forget I have secret surprise blog candy this week.  To be eligible, you must comment on my blog at least three days this week. A few of my teammates are showing off new products from Stampendous as well! Not only do some of them have their own blog candy, Stampendous will be drawing a winner for this great prize pack.


How do you win it? It's easy! One of the featured bloggers today will be choosing a random commenter from her blog, and that lucky person will be announced on the Stampendous blog tomorrow. The more places you leave a comment, the better your chances are to win! Below is the list of team members who are sharing inspiration today:

Stampendous Impressions
Jennifer Ingle
Kristine Reynolds
Jennifer Dove 
Lynn Mercurio
Taylor Usry (has additional blog candy)
Jan Garber
Susie Moore
Lea Kimmel
Rhea Weigand
Wendy Price
Janelle Stollfus
Suzanne Czosek 
Tenia Nelson 

Be sure to back tomorrow for another little peek!  Thanks for stopping by!

Hugs,
Lea

Sunday, July 1, 2012

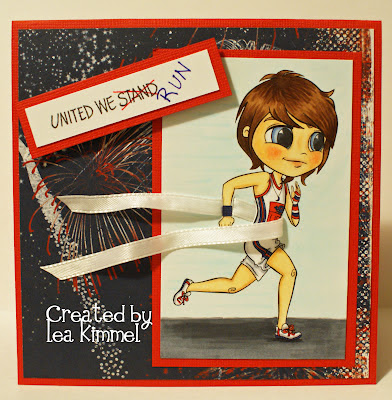
United We Run!

Welcome to our Sweet Gothic Kids Olympians Blog Hop Kick off!

Today we open with an awesome Blog Hop, and every day there after until Friday Simply B Stamps is previewing a new SGK Olympian!   You should have landed here from Katrina's blog.
Are you all ready to cheer?  Betty has some special guests on this hop to help "run" it!  I'm one of them!  I was so excited when Betty asked me to help out with this blog hop since I'm a huge fan of her awesome images so, of course, I said yes!  Here's my take on Track Alex, I hope you like him!


I kept it pretty clean and simple.  My base is Bazzill and my patterned paper is Bo Bunny's Liberty line from last year.  Of course my image is on Neenah and colored with Copics.  The sentiment is actually from Stampendous but I "modified" it for the play on words.  I took my craft knife and cut a few places to slide the ribbon through to create my "Finish Line."  A couple of pop dots later and a little layering and here you have it!


Leave a comment on each of the blogs (ya never know where the winner will be chosen from) for a chance to win today's Sneak Peek guy, Track Alex!!  Isn't he a cutie!  From here you should be headed to Kathy's blog.

Here's the complete blog hop list for your hopping convenience!


Lea  (Me!)


Thanks for stopping by!
Hugs!
Lea

Saturday, June 30, 2012

Let's Hop with Clear Scraps!

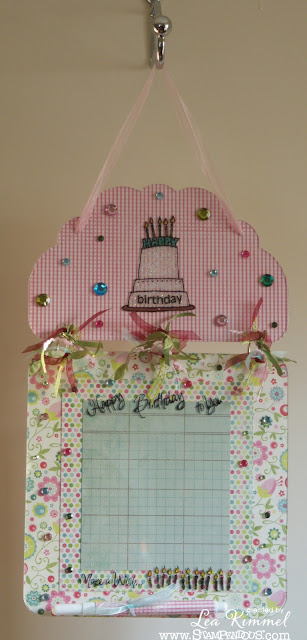
Hey everybody!  All week long Stampendous and Clear Scraps have been collaborating to bring you some awesome eye candy.  Today we are having a blog hop for your enjoyment and to give you the opportunity to win an amazing prize package from Stampendous, Clear Scrap and Tsukeniko.  Each of us on the Stampendous Design Team were given an acrylic and chipboard album from Clear Scraps and some awesome inks from Tsukeniko.  I decided that rather than do an album I wanted to do something a little more simple and will also help me keep track of birthdays each month.  Here's my dry erase birthday board with plenty of room to write dates and names.

These are really a lot of fun as you are only limited by your own imagination.  As I was looking at the pieces of my album, I thought the piece I used as my top looked a lot like the top of a cupcake.  That got me thinking and this is the result!  I used papers from My Mind's Eye Quite Contrary collection, stamps were Party Invite and 15 Candles from Stampendous and stamped with Staz-On Jet Black Ink from Tsukeniko.  I used a variety of Stickles, Ribbons and Rhinestones for bling and the cuteness factor! 

I cut my paper to match my pieces and layered the bottom pieces.  I stamped my images prior to actually attaching the paper to the acrylic so I could flip each piece over and fill in the stamped image with Stickles.  Once the Stickles dry attach the paper to the acrylic with glue dots.  Cover your glue dots that are visible with rhinestones.  Attach the two pieces with large rings and decorate with ribbons.  Using a Crop-A-Dile, punch two holes for the ribbon to hang it, add ribbon and voila!  For the final touch, cover a dry erase marker with paper that matches (I also added a bit of ribbon), add some velcro to the pen and your board to hold it and you never have to look for your marker, it's right where it needs to be!  Simple, right!?

Here's another view that shows the top.


And another view that shows the bottom.


Here's a shot of the main board.


Here's the hop list for the rest of the designers that are playing.  Be sure to comment on each blog and increase your chances of winning!


Here's how to win!

Comment on the Stampendous Blog- all week - we'll choose one winner from the Mon - Fri Comments
  • Check us out on Facebook! We'll keep our Clear Scraps collaboration posts at the top. Click SHARE and share them on your wall. We'll draw a winner from all the folks who SHARE our posts this week (through Saturday's hop)
  • Comment on our Hop! Saturday will be our big Blog Hop - comment on the blogs and we'll enter you once for each comment!
Plus - ClearScraps has a passel of prizes as well. You can win them by visiting and commenting on their blog!


Good luck!  Thanks for stopping by and I'll see you again soon!

Hugs,
Lea

Sunday, April 22, 2012

Who wants cake?

It's time for another new release at Simply B Stamps and boy do we have cute kids for you!  Jude and the Rockers are back in a new collection called Just for Fun.  All the little darlings are trying out future careers or just playing dress up.  All those fun things we used to do as kids!  First up is Chef Ariel.  She's adorable as always and has baked a gorgeous cake.  I'm actually going to a birthday party today and I'm hoping they have cake because coloring this image has brought out that craving for some yummy cake and ice cream!  Keep your fingers crossed for me!


Products used:

Simply B Stamps Chef Ariel
Bazzill Paper
Best Creation's Mom's Kitchen Paper
Bo Bunny Orange Citrus Dot Paper
Neenah Classic Crest Paper
Copic Markers
Memory Box Die
Offray Ribbon
Glossy Accents
Diamond Stickles

Instructions:

1.  Cut Bazzill card base to size desired
2.  Cut patterned papers for layers and set aside
3.  Cut colored image to size and layer on cut Dot paper
4.  Create bow with peg bowmaker leaving tails long enough to wrap around edges of patterned paper bottom layer
5.  Using Memory Box die, cut piece of Bazzill and adhere to patterned paper for bottom layer
6.  Adhere ribbon with bow to patterned paper over the center of die cut
7.  Add pop dotted image to card base
I hope you like Ariel and will come back tomorrow to see who's next.  I could tell you but it's a secret!  Be sure to stop by the blog and check out the other cool cards made by the rest of the team.  Thanks for stopping by!

Hugs,
Lea