Tuesday, December 30, 2014

Happy Birthday to You, Too!

Now, how could we say "Happy Birthday" to Corinne without saying "Happy Birthday" to Irene, too?  After all, they are twins!!  The fact is, Betty, owner of Simply B Stamps, wanted to give each wonderful lady their very own birthday hop so each one can feel all the love!  Here's my card for Irene:


Here's what I used to create this card:

My Mind's Eye™ Fine and Dandy™ 6x6 Paper Pad
Flamingo Cardstock by Bazzill Basics Paper®
Neenah® Classic Crest™ Solar White Cover Stock
Copic® Markers - E000, 00, 04, 11, 15, 18, 19, 21, 25, 27, 29, 51, 53; YR14, 15, 18, 21, 24, 27, 30, 31; YG11, 13, 93, 95, 97; R20, 24, 29, 30, 32, 35; BG53, 57; B0000; C0, 1
atyouSpica Glitter Pens - Blossom, Orange, Melon, Turquoise
Tim Holtz® Distress Ink - Antique Linen
Ranger® Stickles™ - Firefly, Fruit Punch, Mermaid, Orange Peel
Beacon® 3-in-1 Paper Glue

Here's what I did to create this card:

Print main image and sentiment, color main image and trim each as shown
Once both are trimmed, add distress ink
Create A2 card base with a tent fold
Trim patterned papers as shown
Adhere all layers as shown
Add Stickles™randomly on both image and sentiment, set aside to dry

You should have landed here from Darcy's blog and next up is Nadine's blog.  Thanks for stopping by and I'll see you again, soon.  In the meantime, have a blessed day!  Happy birthday, Corinne and Irene!  Hope your day was awesome, Ladies!

Hugs,
Lea

Monday, December 29, 2014

It's Somebody's Birthday!!!

Corinne Jones, Betty's right-hand at Simply B Stamps, is having a birthday today and the SBS fans wanted to get together for a birthday blog hop in her honor.  Corinne keeps Betty in line and that's a mighty big pair of shoes she fills so we want to show her lots of love.  Betty even created a special digi just for Corinne!  Here's my card:


Here's what I used to create this card:

Simply B Stamps© Big Birthday Cake Corinne
Simply B Stamps© Fire Candles
Crate Paper® Farmhouse 6x6 Paper Pad
Neenah® Classic Crest™ Solar White Cover Stock
Chiffon Cardstock by Bazzill Basics Paper®
Copic® Markers - YR12, 15, 18, 21, 24, 27, 30, 31; BG11, 13, 18; YG91, 93, 95, 97; Y13; E25, 27, 29, 50, 51, 53, 93; R02, 05; BV02; C0
Tim Holtz® Distress Ink - Antique Linen
atyouSpica™ Glitter Pens - Turquoise, Lemon, Silver, Clear and Sand
May Arts Ribbon® - Baker's Twine
Miscellaneous Sequins
Zip Dry™ Paper Glue by Beacon® Adhesives
3L® Scrapbook Adhesives™ 3D Foam Squares

Here's what I did to create this card:

Print main image, color, trim to desired size and add distress ink
Print sentiment, trim and add distress ink
Create A2 card base with a tent fold
Trim patterned papers as shown
Layer and adhere as shown
Freehand cut the bunting pieces, adhere layers
Add foam squares to back of bunting, attach to card
Using glue, adhere twine to top of bunting
Adhere matted sentiment to card with foam squares
Glue sequins onto card randomly

So you should have landed here from Erin's blog and from here you will hop along to Nadine's blog!  Thanks so much for hopping along with us and celebrating Corinne's special day.  I'll see you again soon!  Have a wonderful day!

Hugs, 
Lea

Wednesday, December 24, 2014

Wicked Wednesday with DRS Designs

That's right, peeps, it's not JUST Christmas Eve but Wicked Wednesday ATC Challenge Blog time, too!!  This week our sponsor is DRS Designs and the theme is Happy Holidays or Silver and Gold, your choice.  I decided to go with Happy Holidays and a little twinkle of glitter and used their Glittering Twinkling Christmas Greeting.  Here's my ATC:


Here's what I used to create this ATC:

Neenah® Classic Crest™ Solar White Cover Stock
Core'dinations® Kraft Core Cardstock
Copic® Markers - B91, 93, 95, 97; BV02; R83; E74; YG93, 95, 97
atyouSpica™ Glitter Pens in Buttermilk and Lemon
Micron™ Pen in Black
Zip Dry™ Paper Glue by Beacon® Adhesives
Copic® Airbrush System

Here's what I did to create this ATC:

I printed my image and trimmed it to the appropriate size
Next up was airbrushing my sky with the blues, pink and lavender
Using the brown and green markers, draw the tree branches 
Go over the stars with the glitter pens and add a few extra "stars"
Trim ATC base and adhere ATC image

That's it for me today.  Thanks for stopping by and taking a look.  I hope you all have the merriest of Christmases!  Have a blessed day.

Hugs,
Lea

Friday, December 19, 2014

PenPattern Snowman

Stampendous has celebrated PenPattern images all week long and for my card today, I've used PenPattern Snowman, one of my favs!  I'm in love with snowmen of all sorts but Stampendous has THE best selection I've ever seen and I love every single one of them!  Here's my card for today:

I love the new Stampendous Spoonfuls!  The one I used here is the Spoonful of Snow.  I like that it's not just white and has other little bits of color in the mix.  The handy container you keep it in is pretty darn nifty, too!  I saw somewhere a cool way to store a spoon for a different type of container; now I can't find the blog where I got the idea.  Anyway, I'm going to pass along my slightly different version.  I bought some Command mini clips and put them on the side of my containers.  I had already gone to an ice cream parlor and begged for some sample spoons.  They were kind enough to give me quite a few and I thanked them profusely.  Here's pictures to show you exactly what I'm doing.


Here's what I used to create this card:

Nordic Holiday Patterned Paper by Basic Grey®
Zip Dry™ Paper Glue by Beacon Adhesives®
Cardstock by Bazill Basics Paper®
Classic Crest™ Solar White Cover Stock by Neenah®
Copic Markers

Here's what I did to create this card:

  1. Stamp image and color, trim to desired size
  2. Create standard A-2 card base with a tent fold
  3. Trim patterned papers as shown
  4. Adhere all layers
  5. Add snow mix and heat emboss from below

So today, you got a two-for-one!  LOL!  Hopefully you were a little inspired and you received a fun and easy tip for attaching and always having a spoon for your Spoonfuls!  Thanks for stopping by, I'll see you again real soon!  Have a wonderful day!

Hugs,
Lea

Thursday, December 18, 2014

Quick and Cute with Dreamweaver

In a flurry of a hurry? This month the Dream Team is all about the Quick and Cute...whether that be cards, gifts, wrapping, or tags...we have sleigh-loads of ideas! Play along by posting your creations using the Inlinkz tool on the Dream It Up! blog, for a chance to win the stencil of your choice, and a possible bonus stencil for using Dreamweaver products in your Quick and Cute project! Here's what fun I've been up to this week:


Here's what I used to create this ornament:

Neenah® Classic Crest™ Solar White Cover Stock
Copic® Markers - R05, R46, YG13, G09
May Arts Ribbon® - Cotton Twine
Miscellaneous Buttons
Hole Punch

Here's what I did to create this ornament:

  1. Tape stencil down and add color with Copic® markers
  2. Remove stencil and trim around edges leaving a white margin at top and bottom
  3. Cut stenciled piece into strips as shown
  4. Punch holes in both ends of each strip
  5. Using twine, thread a button onto twine and then thread both ends through holes on strips as shown
  6. Thread three buttons on top, push strips and buttons down and tie a knot and bow on top
  7. Create a loop with remaining twine to use for hanging 
  8. Fan strips out to create ornament shape
It really doesn't get much quicker or cuter than that!!  These ornaments are so fun to make and it's an easy way to get the kiddos involved in some fun holiday decorating.

I'd love to receive a comment from you before you head on to the rest of the "A" team:
 

Thanks for stopping by today.  I'll have another post tomorrow so please stop back for a visit. Have a wonderful day!

Hugs,
Lea

Wednesday, December 17, 2014

Wicked Wednesday and Smeared Ink

It's Wicked Wednesday ATC Challenge Blog time and this week we have two sponsors, Smeared Ink and Delicious Doodles.  I chose to use Smeared Inks Drinking Buddy Elfette for our Happy Creepy Holidays theme.  She just made me laugh when I first saw her so that's why I picked her.


Here's what I used to create this ATC:

Smeared Ink Drinking Buddy Elfette
Stampendous® Tiny Alphabet Perfectly Clear Stamp Set
Neenah® Classic Crest™ Solar White Cover Stock
Red Cardstock Scrap by Bazzill Basics Paper™
Basic Grey® Patterned Paper Scraps
Memento™ Tuxedo Black Ink by Tsukineko®
Tim Holtz® Distress Ink - Mowed Lawn
Zip Dry™ Paper Glue by Beacon® Adhesives
Copic® Markers - R24, 27, 29, 89; E50, 51, 53, 93, 41, 42, 44; BG70, 72; YG61, 63, 67; C00, 0, 1, 3

Here's what I did to create this ATC:

Stamp main image, color and fussy cut out
Stamp sentiment, cut out words and edge with distress ink
Create card base trimming paper to ATC size, 2.5"x3.5"
Trim patterned papers as shown and adhere to base
Adhere main image as shown
Adhere sentiment as shown

Easy peasy ATC but fun to create!  I hope it gives you a smile or two!  Thanks for stopping by to take a look.  I do hope you will play along with our challenge this week, ya just gotta love a "happy creepy holiday!"  See you again soon!

Hugs,
Lea

Friday, December 12, 2014

Art Anthology Hop

Today is the last day of our hop with our new friends at Art Anthology! We are in love with their cool paints and sprays, they’re just the perfect combo for the great mixed media projects our Stampendous Design Team has been making!
There are three amazing prize packages this week consisting of a Stampendous Creative Palette Monoprinting Plate, a $20 Stampendous Reward Card to spend on the Stampendous website, an Art Anthology Stencil, and one each Dimensional CrystalColorations Spray, and Dimensional Paint from Art Anthology (colors are random). Wow!! Now that’s something to slip under the tree for yourself! (PLUS – a little reindeer told us that Art Anthology will be giving away EVEN MORE paints and goodies over on their blog!!)
AND we’re celebrating the man in red! He’s checking the harnesses for those magic reindeer! It would sure be great if you found this prize package under your tree, wouldn’t it??!! Our Art Anthology hop has featured Santa in many posts this week. We’ve been the hardest working Design Team in show business!!  Thanks for joining us for some great fun and inspiration this week, oh, and a chance to win one of the great prizes!  Have you been leaving comments along the way?  
My card from yesterday was definitely NOT Christmas or winter themed so today's card is all about winter!  Here's my project:


Here's what I used to create this card:

Stampendous® Snowflake Tree Rubber Stamp
Stampendous® Chunky White Embossing Enamel
VersaMark™ Watermark Ink Pad by Tsukineko®
Art Anthology Sorbet Dimensional Paint - Buttercream
Art Anthology Dimensional Crystal Glaze - Mermaid
Art Anthology Colorations Spray - Grape Soda
Liquitex® Professional Acrylic Ink - Transparent Burnt Umber
Strathmore® Mixed Media Paper
Turquoise and Brown Cardstock by Bazzill Basics Paper™ 
Ranger® Archival Ink - Coffee
Ranger® Archival Ink - Aquamarine
Zip Dry™ Paper Glue by Beacon® Adhesives

Here's what I did to create this card:

  1. Stamp tree onto mixed media paper with coffee ink and another with aquamarine ink
  2. Mix Mermaid glaze with a bit of Grape Soda spray to create a slightly more blue color and paint a sky for the background
  3. Mix Buttercream paint with a bit of Grape Soda spray along with a tiny amount of burnt umber ink to create a brown paint and go over main trunk of tree to darken it
  4. Trim painted piece to card size
  5. Cut out snowflake circles from aquamarine tree and edge each circle with aquamarine ink
  6. Adhere circles to corresponding circles on painted tree
  7. Rub VersaMark pad across bottom of trimmed piece, add chunky white embossing enamel and heat from underneath until enamel melts
  8. Trim brown cardstock as a mat for stamped and painted image
  9. Create an A-2 card base with a tent fold
  10. Adhere all layers as shown


This was probably one of the fastest cards I've ever created!  I love the simple design.  It's really neat how easily the various paints, glazes and sprays mix together and expand your color repertoire.  All it takes is some very basic color mixing.  I do want to say that I absolutely love the shimmer in these paints.  They're truly very lovely!  Here's the rest of the team's links for today:

Stampendous Blog

Jamie Martin

Kristine Reynolds

Lea Kimmel (me!)

Asia King

Janelle Stollfus

Pam Hornschu

Wendy Price

Amy Hurley-Purdie

Tenia Nelson

Art Anthology Blog


Thanks so much for stopping by today.  I hope you found plenty of inspiration this week and left comments along the way; you might just win a prize!  I'll see you again soon.  Have a wonderful day!

Hugs,
Lea


Thursday, December 11, 2014

Let Get Dirty!

With lots of painty goodness!


We're hopping with our new friends at Art Anthology! We are in love with their cool paints and sprays, they’re just the perfect combo for the great mixed media projects our Stampendous Design Team has been making!
There are three amazing prize packages this week consisting of a Stampendous Creative Palette Monoprinting Plate, a $20 Stampendous Reward Card to spend on the Stampendous website, an Art Anthology Stencil, and one each Dimensional CrystalColorations Spray, and Dimensional Paint from Art Anthology (colors are random). Wow!! Now that’s something to slip under the tree for yourself! (PLUS – a little reindeer told us that Art Anthology will be giving away EVEN MORE paints and goodies over on their blog!!)
AND we’re celebrating the man in red! He’s checking the harnesses for those magic reindeer! It would sure be great if you found this prize package under your tree, wouldn’t it??!! Our Art Anthology hop will feature Santa in many posts this week. We’ve got the hardest working Design Team in show business!!  Join us for some great fun, inspiration and prizes!  
I have to admit, my project today isn't Christmas inspired or even winter, for that matter.  It's the first card I saw in my mind when I received my paints and spray.  Funny how those things happen!  So here's my project:


Here's what I used to create this card:

Stampendous® Blossom Bunch Rubber Stamp
Stampendous® Royal Heart Quotes Perfectly Clear™ Stamps Set
Stampendous® Dream Text Stamp
Art Anthology Sorbet Dimensional Paint - Buttercream
Art Anthology Sorbet Dimensional Paint - Viridian
Art Anthology Dimensional Crystal Glaze - Mermaid
Art Anthology Colorations Spray - Grape Soda
Liquitex® Professional Acrylic Ink - Transparent Burnt Umber
Strathmore® Mixed Media Paper
Worldwin® Papers - Chamois
Ranger® Archival Ink™ - Jet Black
May Arts Ribbon® - 1/4" Sheer Ribbon
Miscellaneous Tag
Zip Dry™ Paper Glue by Beacon® Adhesives
Scrapbook Adhesives™ 3D Foam Squares 

Here's what I did to create this card:

  1. Stamp the Dream Text stamp onto mixed media paper and stamp flowers over text
  2. Stamp flowers a second time also on mixed media paper
  3. Paint flowers on text with Dimensional Crystal Glaze
  4. Paint area around flowers on text as shown with Buttercream Sorbet Dimensional Paint
  5. Paint second set of flowers with glaze and Sorbet Dimensional Paint in Viridian
  6. Add just a small dot of Buttercream Sorbet Dimensional Paint in center of flowers
  7. Mix Buttercream paint and Mermaid glaze with a small dot of burnt umber ink to make green paint for stems on the flowers on the text stamp
  8. Allow all paint to dry, it dries very quickly
  9. Once paint is dry, remove sprayer from Colorations Spray and add purple ink onto text by tapping sprayer with a paint brush, this creates random drops of ink spatter
  10. Trim stamped text image closely and lightly distress edges of paper
  11. Using a craft knife, cut a small slit on each side of the stems wide enough to slip ribbon through
  12. Create a bow and slide ends through slits and adhere ends to back of paper
  13. Stamp sentiment on tag and then cover with Buttercream Sorbet, tap some Grape Soda over it,  allow to dry and then attach to bow with a small piece of ribbon
  14. Adhere tag to stamped image
  15. Create an A-2 card base with a vertical tent fold and adhere text image to base
  16. Cut out second set of flowers (blooms only) and attach to card with foam squares being sure to offset the top flowers so that part of the bottom flower shows, this gives the illusion of fullness

I really love how this card came out!  Mixed media is so much fun to create with!  The designers at Art Anthology have made several amazing projects to share throughout each day this week and we wouldn't want you to miss them, so please check back often throughout the day on the Art Anthology blog so you can see them all!

Stampendous Blog

Lea Kimmel

Tenia Nelson

Wendy Price

Art Anthology Blog

That's all for me today.  I'll be back tomorrow with one final post this week for our Stampendous and Art Anthology hop.  Thanks for stopping by today.  Have a blessed day!

Hugs,
Lea

Wednesday, December 10, 2014

Wicked Wednesday and A Day for Daisies

Hey everybody!  It's Wicked Wednesday ATC Challenge Blog time and this week our sponsor is A Day for Daisies.  The image I've used today is Vintage Tree Party and our theme this week is "Happy Holidays."  This was such a sweet image and I really loved bringing it to life.


Here's what I used to create this ATC:

A Muse® Cozy Christmas
Memento™ Tuxedo Black Ink by Tsukineko®
Neenah® Classic Crest™ Solar White Cover Stock
Recollections® Sugar Plums 6x6 Paper Pad
Zip Dry™ Paper Glue by Beacon® Adhesives
atyouSpica™ Glitter Pens - Variety of Colors
Copic® Markers - 
  • E23, 25, 27, 31, 34, 37, 42, 43, 44, 49, 50, 51, 53, 57, 59, 93
  • R24, 27, 29, 59
  • BV00, 01, 02, 04
  • G05, 21, 24, 28, 99
  • C0, 1, 3

Here's what I did to create this ATC:

Print digital image and color, trim to fit on ATC size (2.4" x 3.5") base with a small border
Trim ATC base and adhere image to base
On a scrap, stamp sentiment, cut in half, edge with red and adhere to ATC

Pretty simple and straight forward!  This image really didn't need much beyond a sweet sentiment.  I hope you feel inspired to play along with our challenge this week.  Thanks for stopping by and I'll see you again soon!  Have a wonderful day!

Hugs,
Lea


Tuesday, December 9, 2014

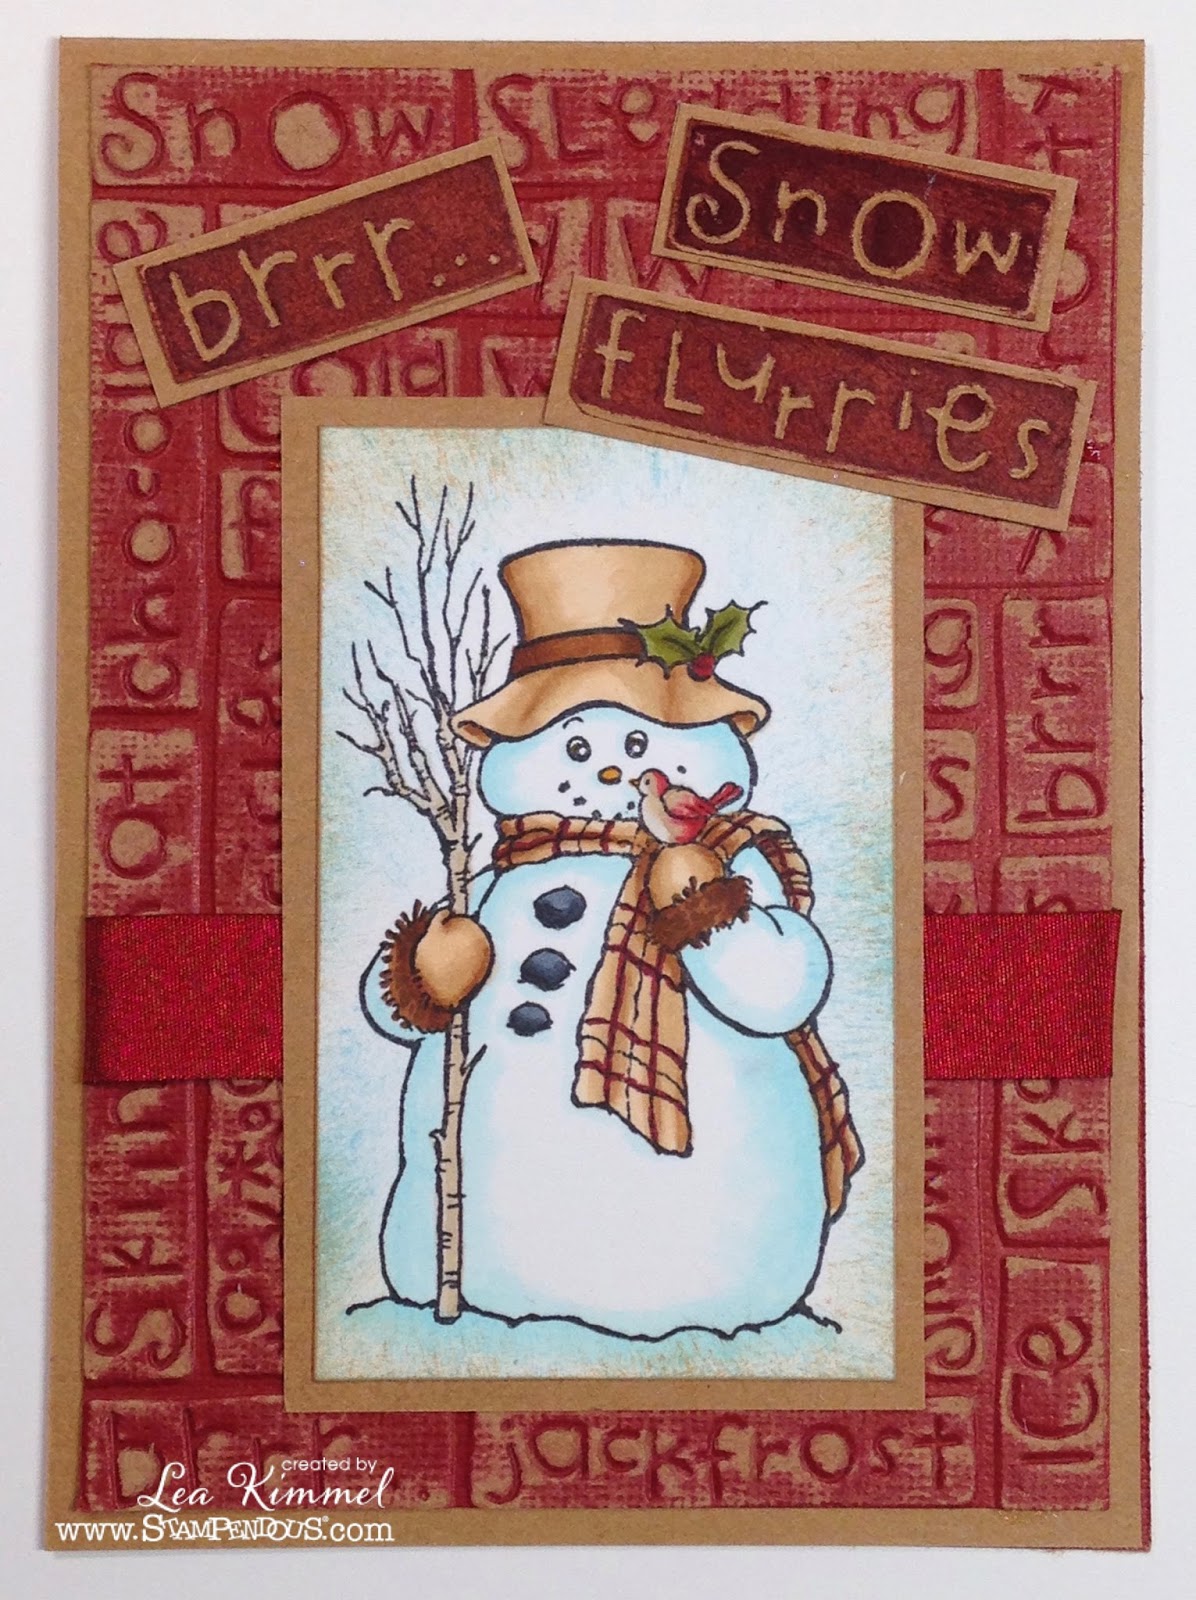
Core'dinations Christmas!

It's Christmas time at Stampendous and we're celebrating with Core'dinations!

 
Yes, the Stampendous team are breaking out their sanding blocks once again as they get to the Core of their creativity with wonderful Core'dinations' cardstock. Three days of awesomeness, and yes, there will be prizes. 
 
  
Check the Stampendous blog for all the details. Meanwhile, here's my creation for day two:


Here's what I used to create this card:

ProvoCraft® Cuttlebug™Sledding Embossing Folder
May Arts Ribbon®
Tim Holtz® Distress Inks - Aged Mahogany, Tumbled Glass, Tea Dye by Ranger®
Zip Dry™Paper Glue by Beacon® Adhesives
Copic® Markers - YG93, 95, 97; R27, 59; B0000, 000; C5, 6, 7; YR24; 
E30, 31, 34, 35, 37, 39, 40, 41, 42, 59

Here's what I did to create this card:

Trim a piece of cardstock to fit the embossing folder and run through machine to emboss
Lightly sand the raised areas of the embossed piece leaving plenty of red areas unsanded
Create an A-2 card base with a tent fold with the kraft on the outside
Stamp image and color with markers, trim closely, add distress inks around edges as shown
Trim a mat for the image and adhere the two pieces
Emboss a reversed piece of cardstock with the same folder and trim out the three words as shown, run them across aged mahogany pad to color raised areas dark red, trim mats for each and adhere
Trim a piece of ribbon and adhere to embossed piece as shown
Adhere matted image to card base and then adhere the three words

Be sure to leave me a comment before moving on the team members that are playing today:


We'd love for you to play with our challenge for December. You can find all of the info HERE.  Thanks so much for stopping by!  I won't be posting for Stampendous tomorrow but I will be posting for Wicked Wednesday ATC Challenge Blog.  I'll see you tomorrow!  Have a great day!

Hugs,
Lea


Monday, December 8, 2014

Stampendous and Core'dinations...

...a perfect pair for celebrating the holidays!  

Yes, the Stampendous team are breaking out their sanding blocks once again as they get to the Core of their creativity with wonderful Core'dinations' cardstock. Three days of awesomeness, and yes, there will be prizes. 
  
Check the Stampendous blog for all the details. Meanwhile, here's my creation for day one:


Here's what I used to create this card:

ProvoCraft® Cuttlebug™Snowflake Embossing Folder
Light Blue Cardstock by Bazzill Basics Paper™
May Arts Ribbon® - Silk
Memento™Danube Blue Ink by Tsukineko®
Copic® atyouSpica™ Pen in Sky Blue
Zip Dry™ Paper Glue by Beacon® Adhesives
Scrapbook Adhesives™ 3D Foam Squares

Here's what I did to create this card:

Trim Core paper to fit embossing folder and run through embossing machine
Sand embossed paper
Die cut snowflakes and add micro glitter to each flake
Stamp sentiment in center of snowflake
Create A-2 card base with a tent fold
Add ribbon to embossed piece and adhere piece to card base
Add snowflakes with 3D squares to card
Adhere glass glitter randomly around card


Be sure to leave me a comment before moving on the team members that are playing today:

We'd love for you to play with our challenge for December. You can find all of the info HERE.  Thanks for stopping by and I'll see you again tomorrow with another fun Stampendous and Core'dinations card.  Have a wonderful day!

Hugs,
Lea

Thursday, December 4, 2014

Countdown to Christmas

In a flurry of a hurry? This month the Dream Team is all about the Quick and Cute...whether that be cards, gifts, wrapping, or tags...we have sleigh-loads of ideas! Play along by posting your creations using the Inlinkz tool on the Dream It Up! blog, for a chance to win the stencil of your choice, and a possible bonus stencil for using Dreamweaver products in your Quick and Cute project! Here's what fun I've been up to this week and I have the pictures to prove it!

 I started out with a plain wooden plaque I've had sitting around for awhile.

 Using DecoArt® Gesso, I covered the entire front of the plaque.

 Once the gesso dried I added two coats of Americana® Navy Blue acrylic paint and two coats of Americana® Multi-Surface Satin™ in Cottonball making sure to leave a little texture in the white.

 Next, I added a small paper mask to keep that area clear of paste and then I pasted my stencil, LG645 Snowman, and additional snowflakes around the snowman with white paste.  Once pasted, I removed the mask and set it aside to dry.  After it dried, I applied a coat of Americana® Clear Chalkboard Coating™ and set it aside to dry one more time.


Once it was dry, using a piece of chalk, I wrote the number 21 and some other "snowflakes" for my countdown to Christmas day!  A fun and easy project, just be sure you have drying time between layers!


I'd love to receive a comment from you before you head on to the rest of the "A" team:
 
 
Thank you for stopping by and taking a look at my project for today.  I hope it has given you a little inspiration for an easy gift you can make for teachers, neighbors, friends or for yourself!  Have a wonderful day!

Hugs,
Lea


Wednesday, December 3, 2014

Wicked Wednesday with KennyK

Hello there!  That's right, it's Wicked Wednesday ATC Challenge Blog time and this week our sponsor is KennyK!  Our theme this week is "You're A Star" and the image is City Star Christmas Digital Image.  She's a sweet one to color!  I decided to use some non-traditional colors for this one, just needed a break from the traditional red and green.


My papers are all from the scrap pile and unfortunately, I don't have a clue who made these but they just seemed perfect for the direction I wanted this to go.  So, I apologize for not knowing the maker for this one.  She's colored with Copics listed here:
  • Skin:  E00, 11, 33, 93
  • Eyes:  YG93, 95, 97
  • Lips:  R35, 37, 39
  • Hair:  E40, 41, 42, 43
  • Hat:  B95, 97, 99; W0, 1, 4
  • Background:  YG61, 63, 67; C0, 1, 3, 5; B91, 93, 95; W0, 1; 0

I also used an EK Success punch for the additional stars, which I then rounded the points of with scissors.  My sentiment is from A Muse.

Thanks so much for stopping by!  You're greatly appreciated and in my eyes, you're a star!  We would love for you to play along with our challenge.  We even have a new fb page for you to visit. Wicked Wednesday ATC Challenge.  Stop by and join in on the fun!  I'll see you again soon!  Have a great day!

Hugs,
Lea