Friday, September 26, 2014

Got Skulls?

If you don't, Stampendous does!  We've got an amazing assortment of Halloween stamps; there's something for everyone!  This week we're showcasing our awesome selection of skull stamps.  Here's my "ghoulish greeting" that's sure to treat even the scariest of tricksters!


This is what I used to create this card:

BasicGrey® Eerie 6x6 Paper Pad
Bazzill® Cardstock
Neenah® Classic Crest™ Solar White Cover Stock
Spectrum Noir™ Markers - True Black and CG2
May Arts Ribbon®
Tim Holtz® Distress Inks® - Black Soot and Shabby Shutters
Beacon® Adhesive Zip Dry™

This is what I did to create this card:

Using Boss Gloss, ink Skull Stack stamp and stamp onto white cs, add embossing powder and heat
Repeat this process for the Lady and Jack stamp and the sentiment
Inking just a corner of the Skull Stack stamp, repeat above process using Lettuce embossing powder
Add distress inks around edges of sentiment, skull background and fussy cut skulls
Fussy cut Lady and Jack stamp and remove pumpkin
Fussy cut green skulls as shown
Add green ink to dress pieces
Layer sentiment and skulls as shown
Create card base with a tent fold
Trim patterned paper as shown
Trim skull image edges and adhere to patterned paper
Trim away some of the ribbon so that it's somewhat wavy, adhere to patterned paper layers as shown
Adhere all pieces as shown

That's it for me today!  I hope you've enjoyed all the fun skull inspired cards this week.  They're perfect for making the coolest, creepiest Halloween cards ever!  Thanks for stopping by and I'll see you again soon.  Have a blessed day!

Hugs,
Lea


Wednesday, September 24, 2014

Wicked Wednesday Supports...

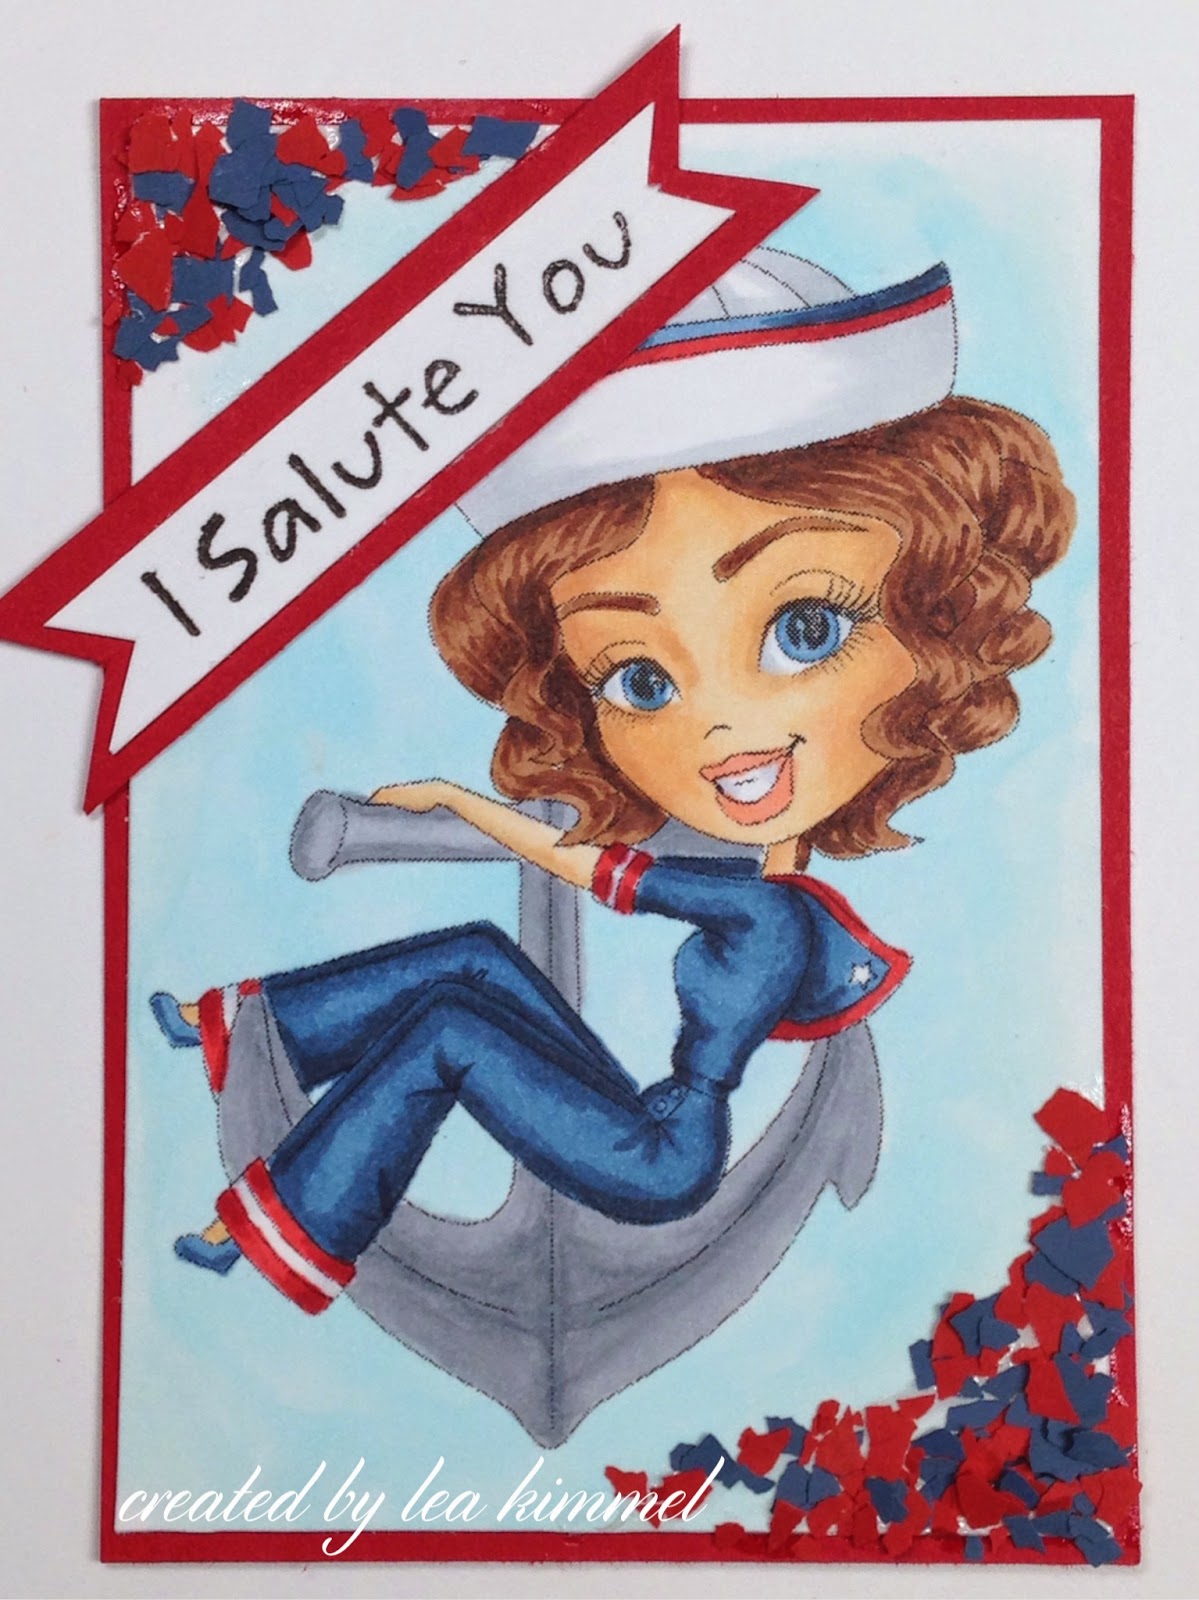
...our Troops!  Our sponsor for this week's Wicked Wednesday ATC Challenge is Sassy Studio and I've used Sailor Honey.  I spent 9 years in the Army on active duty and my Dad retired after 21 years of service in the Navy.  This ATC is in honor of my Daddy!  Anchors Away!


This is what I used to create this ATC:

MFT PI-Soldier Girl (Sentiment)
Bazzill® - Red
Neenah® Classic Crest™ Solar White
Beacon® Adhesive Zip Dry™
Copic® Markers:
  • Skin - E50, 51, 21, 53
  • Hair - E23, 25, 27
  • Suit/Hat - B91, 95, 97, 99; R24, 27, 29; C1
  • Anchor - C1, 3, 4
  • Background - B0000, 000


Here's what I did to create this ATC:

Print image, color and trim to desired size
Trim red cardstock to ATC size
Stamp sentiment on scrap of white, fishtail ends, layer on scrap of red, fishtail red ends
Adhere all layers as shown
Using Zip Dry adhere mixed color fragments

This was a fun one to create but I have to admit I shed a few tears thinking about my Dad.  He passed away on 9/11 two  years ago and life just hasn't been the same without him.  Anyway, I hope you like my little Sailor Honey.  Have a blessed day and I'll see you again soon!

Hugs,
Lea


Friday, September 19, 2014

Add A Little Dazzle Hop


                      Blog_header_add_a_little_dazzle

Hope you're enjoying all the inspiration featuring Add a Little Dazzle Craft Metal Sheets and Stampendous Stamps and Essentials this week! We know you'd love to win some goodies to try yourself! If you missed the earlier posts, here are the links for you:  MONDAY, TUESDAY, WEDNESDAY, THURSDAY .  Here's my project for today:


Here's what I used to create this project:

Stampendous Cling PenPattern Leaves
Stampendous Leaves Die Set
Stampendous Opaque Embossing Powders - Honey, Paprika, Olive
Stampendous Boss Gloss Embossing Ink
Add A Little Dazzle Metal Sheets - Golden Glimmer
Add A Little Dazzle Metal Sheets - Brushed Bronze
DecoArt Americana Acrylic Paint - Antique Gold
DecoArt Americana Chalkboard Paint - Black Slate
DIY Bangles 14 mm Wooden Barrel Beads
May Arts Ribbon String Burlap Ribbon - Natural
Miscellaneous Baling Twine
Miscellaneous Chalk

Here's what I did to create this project:

Die cut each leaf from the metal sheets, ink each leaf, add a mix of embossing powders and heat set each one
Create bow from baling twine being sure to leave long tails to attach the leaves
Tie three knots at different levels on each twine tail
Use May Arts string to attach leaves by their stems to each tail, one over each knot
Paint wooden beads, once dry, attach one to each tail and knot ends of twine to hold beads in place
Attach twine to chalkboard for hanging and attach bow to that twine with burlap string
Take largest leaf die, turn to flat side down and trace inside with chalk, add lines
Write sentiment with chalk

If my chalkboard were not damaged, this is pretty much where the process would have stopped!  However, I found this chalkboard at Tuesday Morning in the clearance section because the chalkboard had been scratched pretty extensively.  I bought it for $10.00!  I knew I had chalkboard paint at home and this was an easy fix.  I couldn't pass it up.  So, to cover the scratches, I merely added two coats of chalkboard paint over the existing surface.  This was one of those projects that popped into my head almost as soon as I saw the chalkboard.  By the time I got home, I couldn't wait to get the paint out and get the first coat on it.  I'm so loving how it looks.  I've already decided to make a garland for each season and I can change the look as the seasons change.  Yep, I'm pretty excited!

The team over at Add a Little Dazzle has created a special featuring the metals from this blog hop for those of you who have already realized you're going to need these products. You can find it here - Add A Little Dazzle Stampendous Hop Special. Of course you might win some, too! We're giving away three prize packages this week for comments on the blogs. A nice package of Metal Sheets, Stamps and Cutting Dies!

Stampendous

Wendy Price

Vicki Dutcher

Keren Baker

Janelle Stollfus

Add a Little Dazzle

Lea Kimmel

Cathy Parlitsis

Kristine Reynolds

Lee-Anne Cross 

Graciela Chavez

Jamie Martin

Lydia Brooke-Evans

Asia King

Lee Ann Barrett

Amy Hurley-Purdie

Kate Capper

Pam Hornschu

Martha Lucia Gomez


I so hope you've enjoyed this past week.  Who knew metal sheets would be so fun to create with?!  I know I'll be doing lots more down the road!  Thanks for stopping by today, I hope to see you again soon.  Have a blessed day!

Hugs,
Lea

P.S. If you click on a blog link and receive a notice that says "this post is not here" or something similar, just click on the blog header or look for a link that says Home. That should take you to the home page of that blog and the correct post should be near the top. Thanks for your patience.

Thursday, September 18, 2014

Frosty the Snowman

Where did the summer go? Kids are back in school, with all the insanity that goes with it, vacations are a not-so-distant memory, and it is once again time to get busy with the important things in life...crafting for the holidays! Yay! All of September the Dream Team will be featuring all the new goodies we have for the "Most wonderful time of the year", the fall and winter holiday season. New stencil designs, new dies, and...brand new embossing folders featuring some of our top-selling designs, all to be found on-line through the Stencil with Style web-site, or your local papercrafting store.
 
Here's my holiday inspiration for this week:


Here's what I used to create this card:

Add A Little Dazzle Wondrous White Metal Sheet
Little Yellow Bicycle® Winter Twig "Ski Sweater"
Bazzill® Cardstock
Crystal Stickles®
May Arts Ribbon® Bakers Twine
Spectrum Noir™ Markers:  OR1, IG8, True Black, CR8, CR11, IB2
Copic® Markers:  E25, E27, BG01
Beacon Adhesives® Zip Dry™
Foam Mounting Squares

Of course, we have our monthly challenge for you to play along, so post your own holiday creations, and use the Inlinkz tool on the Dream It Up! blog, for a chance to win the prize at the end of the month. We also have our fabulous Guest Designer for the month of September, Wendy Price! Here's the list of our "A" Team with their links for the week:


Thanks so much for stopping by today!  I hope you enjoyed my simple little Snowman card.  It's simple but fun and I sure had a good time creating it.  I'll have another Stampendous post tomorrow so please come and check it out.  Have a blessed day!

Hugs,
Lea

Wednesday, September 17, 2014

Wicked Wednesday with Emerald Faeries

Hi there!  Welcome back to another Wicked Wednesday ATC Challenge Blog post.  This week our sponsor is A & T Digital Designs, Home of the Emerald Faeries Garden Digital Stamps.  I've used Jewel for my ATC, here she is:


Here's what I used to create this ATC:

Neenah Classic Crest Solar White CS
Pebbles Family Ties 6x6 Paper Pad
Martha Stewart Grass Edge Punch
Beacon Adhesive Zip Dry
Copic Markers:
  • BG000, 05, 07, 53
  • B95, 97, 99
  • E00, 11, 33, 43, 44, 47
  • BV0000, 000, 00
  • YG21, 23, 25
  • R24, 27
  • Y15, 18, 19
  • C6

Here's what I did to create this ATC:

Print image, color and trim to desired size
Trim patterned paper to standard ATC size
Punch strip of green dot paper with grass punch
Fussy cut flowers from the patterned paper 
Adhere all layers as shown

She's a cutie, don't you think?  I certainly had fun coloring her up!  Hope you'll stop by again tomorrow for my Dreamweaver post and Friday I'll have my final post for the Stampendous and Add A Little Dazzle blog collaboration.  See you again soon!  Have a blessed day!

Hugs,
Lea

Tuesday, September 16, 2014

Bling it On!

With Add A Little Dazzle and Stampendous, you can bling it on your favorite projects!

                        Blog_header_add_a_little_dazzle

The team over at Add a Little Dazzle has created a special featuring the metals from this blog hop for those of you who have already realized you're going to need these products. You can find it here - Add A Little Dazzle Stampendous Hop Special. Of course you might win some, too! We're giving away three prize packages this week for comments on the blogs. A nice package of Metal Sheets, Stamps and Cutting Dies!

  Prize Package from Add a Little Dazzle

I had a lot of fun with this blog collaboration!  It's always cool to have a new product to play with.  I love to create mixed media pieces and their metal sheets combined with Stampendous Stamps and Dies are perfect for just that.  Here's my project:


Here's a close-up of some of the snowflakes showing the details of heat embossing with some great embossing powders from Stampendous!

Here's what I used to create this canvas:

Misc. 8 x10" Stretched Canvas

Here's what I did to create this canvas:

Using all three dies, cut out several snowflakes in all three colors of metal listed, set three small snowflakes aside
With the matching stamps, ink stamps with Boss Gloss™ and add embossing powders, heat emboss
Hand cut a strip of white metal to use across bottom of canvas
Add Gelatos® to canvas with darkest colors along outer edges, lighter colors in the center and blend with water and brush
Adhere white metal piece to bottom of canvas
Using Boss Gloss™, add ink across edge of metal, add embossing enamel and heat
Use Boss Gloss™ to add ink around canvas, add Stardust embossing powder and heat
Stamp words onto the three snowflakes set aside earlier
Arrange and adhere snowflakes onto canvas

We love to hop and here are today’s featured blogs with Stampendous and Add A Little Dazzle:

Stampendous

Lea Kimmel (me!)

Add a Little Dazzle

Pam Hornschu

Cathy Parlitsis

Vicki Dutcher

Kate Capper

Amy Hurley-Purdie

I hope you like my canvas and have been inspired to try these fun metal sheets!  They're so easy to use!  Be sure to stop back by tomorrow for a little Wicked Wednesday fun!  Thanks for stopping by.  Have a blessed day!

Hugs,
Lea

PS. If you get to a blog and it says something like "that post isn't here", just click on the blog header or look for a link that says Home near the top. That will take you to the blog home, and the blog hop post should be somewhere near the top. Thanks for your patience!

Friday, September 12, 2014

I Vant Candy!

Okay, so for the past few days I've been singing "I want candy," but, I've been singing it like The Count on Sesame Street.  "I vant candy!"  Yeah, I'm a dork, but, at least I'm a crafty dork!  LOL!  I absolutely LOVE Halloween!  It is my favorite holiday.  It's so much fun and for a whole day you can be whoever or whatever you want to be.  Now how fun is that?!  It's almost as much fun as this card and these wonderful Stampendous Stamps and Essentials I've used.  Here's my card:


This cute little guy has already been hitting the chocolate, can you tell?  LOL!  I couldn't resist adding a little chocolate-ty goodness around his mouth.

Here's what I've used to create this card:

Memento™ Grape Jelly Dew Drop Ink Pad
Memento™ Tangelo Dew Drop Ink Pad
Spectrum Noir™ Markers:
  • GB1, 2, 3
  • BG2, 3, 4, 5
  • FS1, 3, 4
  • HB1, 3
  • LV2
  • OR1 
  • IG1
  • EB6
  • CT3

Bazzill® - Purple Cardstock
Bazzill® Bling - Orange Cardstock
Neenah® Classic Crest™ Solar White
May Arts Ribbon® Satin String Striped Ribbon
Beacon Adhesives® Zip Dry™

Here's what I did to create this card:

Cover background stamp with embossing ink and stamp onto white cardstock
Add the two embossing powders and embossing enamel over stamped image and heat emboss
Stamp mouse image, color, trim and ink edges
Stamp sentiment, trim and ink edges
Add orange and purple ink to background image
Create card base from purple cardstock
Trim orange cardstock to fit as shown
Adhere all layers as shown
Attach color fragments with glue as shown
Tie ribbon into knot around top of card

It's hard to not have fun when you're creating with such great products!  I do hope you like my card and that it's given you a little fright night inspiration!  Thanks for stopping by and I'll see you again, soon.

Hugs,
Lea

Wednesday, September 10, 2014

Wicked Wednesday and All Dressed Up

Hello there!  It's Wicked Wednesday ATC Challenge Blog time and this week our sponsor is All Dressed Up Stamps with a theme of our favorite color combo.  The little cutie I've used today is called Fairy Magic and I absolutely love her!  Every All Dressed Up image is just as cute as this one.  Here's my ATC:


Here's what I used to create this ATC:

All Dressed Up Stamps Fairy Magic
Making Memories® MM Kids™ Collection - Emma (Green Gingham)
MemoryBox® Viola Collection
Bazzill® Cardstock
EK Success® Scallop Edge Punch
Stampendous® Lavender Micro Glitter
VersaFine™ Onyx Black Ink Pad
Beacon Adhesives® Zip Dry™
Spectrum Noir™ Markers:

  • FS1, 2, 9
  • CR3
  • GB2, 8, 10
  • EB1, 2
  • TB1
  • HB1, 2, 3
  • LV2
  • LG1, 2, 3, 4, 5, 


Here's what I did to create this ATC:

Print digital image and color girl and butterflies
Fussy cut girl and three butterflies
Trim ATC base to size
Trim patterned papers to fit as shown
Edge punch purple paper
Adhere patterned papers as shown
Adhere girl
Attach butterflies leaving one side of wings unglued
Add a trail of glue behind each butterfly and add glitter
Stamp sentiment in lower right corner

I have to say, I loved, loved, LOVED creating this ATC.  It was so much fun to use my favorite colors, too.  You really should play along with us this week and share your favorite color combo, too!

Thanks for stopping by today.  I'll see you again soon.  Have a blessed day!

Hugs,
Lea

Thursday, September 4, 2014

Christmas Cards Already?

Where did the summer go? Kids are back in school, with all the insanity that goes with it, vacations are a not-so-distant memory, and it is once again time to get busy with the important things in life...crafting for the holidays! Yay! If you don't get started now, you might not get them done in time for Christmas!  So, to inspire you, all of September the Dream Team will be featuring all the new goodies we have for the "Most wonderful time of the year", the fall and winter holiday season. New stencil designs, and new dies, are found on-line through the Stencil with Style web-site, or your local papercrafting store.  
Here's my holiday inspiration for this week:


Here's what I used to create this card:

Dreamweaver Stencils© DG674 Nested Ornaments Die Set
Dreamweaver Stencils© LG674 Oval Ornament
Dreamweaver Stencils© LJ891 Holly Swirl
Dreamweaver Stencils© LJ896 Large Flourish
Dreamweaver Stencils© Regular Embossing Paste
Americana® Antique Gold Acrylic Paint
Americana® Gloss Enamels® Metallic Glorious Gold Acrylic Paint
Translucent Gold Glass Beads
Clearsnap® ColorBox® Fluid Chalk Ink in Dark Moss and Lipstick Red
Tim Holtz® Distress® Ink in Tea Dye
Tsukineko® Delicata™ Golden Glitz Pigment Ink
BasicGrey® Fruitcake™ Collection Nutcracker/Pine and Vintage Ornaments/Pine
Gold Metallic Cord
Beacon® Adhesives Zip Dry™
Scrapbook Adhesives™ 3D Foam Squares
Glue Dots

Here's what I did to create this card:

Mix paste and paint to achieve gold color, add beads (optional to add beads but was my effort to mimic spots on ornaments printed on patterned paper and to age it)
Trim patterned paper to size for card
Create 5"x5" card base with a tent fold
Paste-stencil bottom ornament directly onto ornament paper
Using chalk inks, brush-stencil holly and berries onto bottom ornament
Die cut one large and one small ornament from double-sided stripe paper
Brush-stencil gold swirl onto solid side of small ornament
Add distress ink to the edges of all three ornaments to give a more "vintage" look
Attach die cut ornaments to patterned paper as shown
Create three gold cord bows and trim three pieces of cord to "hang" ornaments
Adhere gold "hanging" cords to ornaments and wrap other end to back of patterned paper and adhere
Attach patterned paper with ornaments to card base
Using small glue dots, attach bows to ornament tops

You can make the ornaments as simple or as detailed as you wish, either way, it's a relatively fast card to create.  If you have a lot to do, this would be an easy design to duplicate!

Of course, we have our monthly challenge for you to play along, so post your own holiday creations, and use the Inlinkz tool on the Dream It Up! blog, for a chance to win the prize at the end of the month. We also have our fabulous Guest Designer for the month of September, Wendy Price! Here's the list of our "A" Team with their links for the week:


That's it for me today!  I do hope I've given you a little inspiration to start your Christmas card creating!  Thanks for stopping by and I'll see you again soon.  Have a blessed day!

Hugs,
Lea


Wednesday, September 3, 2014

Wicked Wednesday with Lacy Sunshine Stamps

It's Wicked Wednesday ATC Challenge Blog time and this week our sponsor is Lacy Sunshine Stamps with a Fall Fun theme.  The image I've used is Kenna Wicked Witch.  Here's my ATC:


Here's what I used to create this ATC:

Neenah® Classic Crest® Solar White Cover Stock
Graphic 45® Haunting Halloween
Bazzill® Cardstock
Beacon® Adhesives Zip Dry®

Here's what I did to create this ATC:

Print image, trim to desired size and color
Trim patterned paper and ATC base
Adhere all layers as shown
Stamp sentiment onto image as shown
Attach fragments with glue

That's it for this Wednesday!  Hope you like my cute little image!  Be sure to check in with me on Thursday for my Dreamweaver Stencils post!  Have a blessed day!

Hugs,
Lea