Friday, December 15, 2017

Peace Moon


Today is the last day of our week celebrating the holidays at Stampendous with Laurel Burch stamps.  If you love to color as much as I love to color, these stamps are perfect.  This particular stamp is called Peace Moon, I seriously love this one!


Here's what I used to create this card:

Stampendous Products - 


Other Products - 

Firecracker Cardstock by My Colors®
Parrot Cardstock by My Colors®
Gold Sharpie® Marker
Delicata™ Golden Glitz Ink Pad by Tsukineko®
White Gel Pen by Sakura®
E-Z Runner® Adhesive by Scrapbook Adhesives™

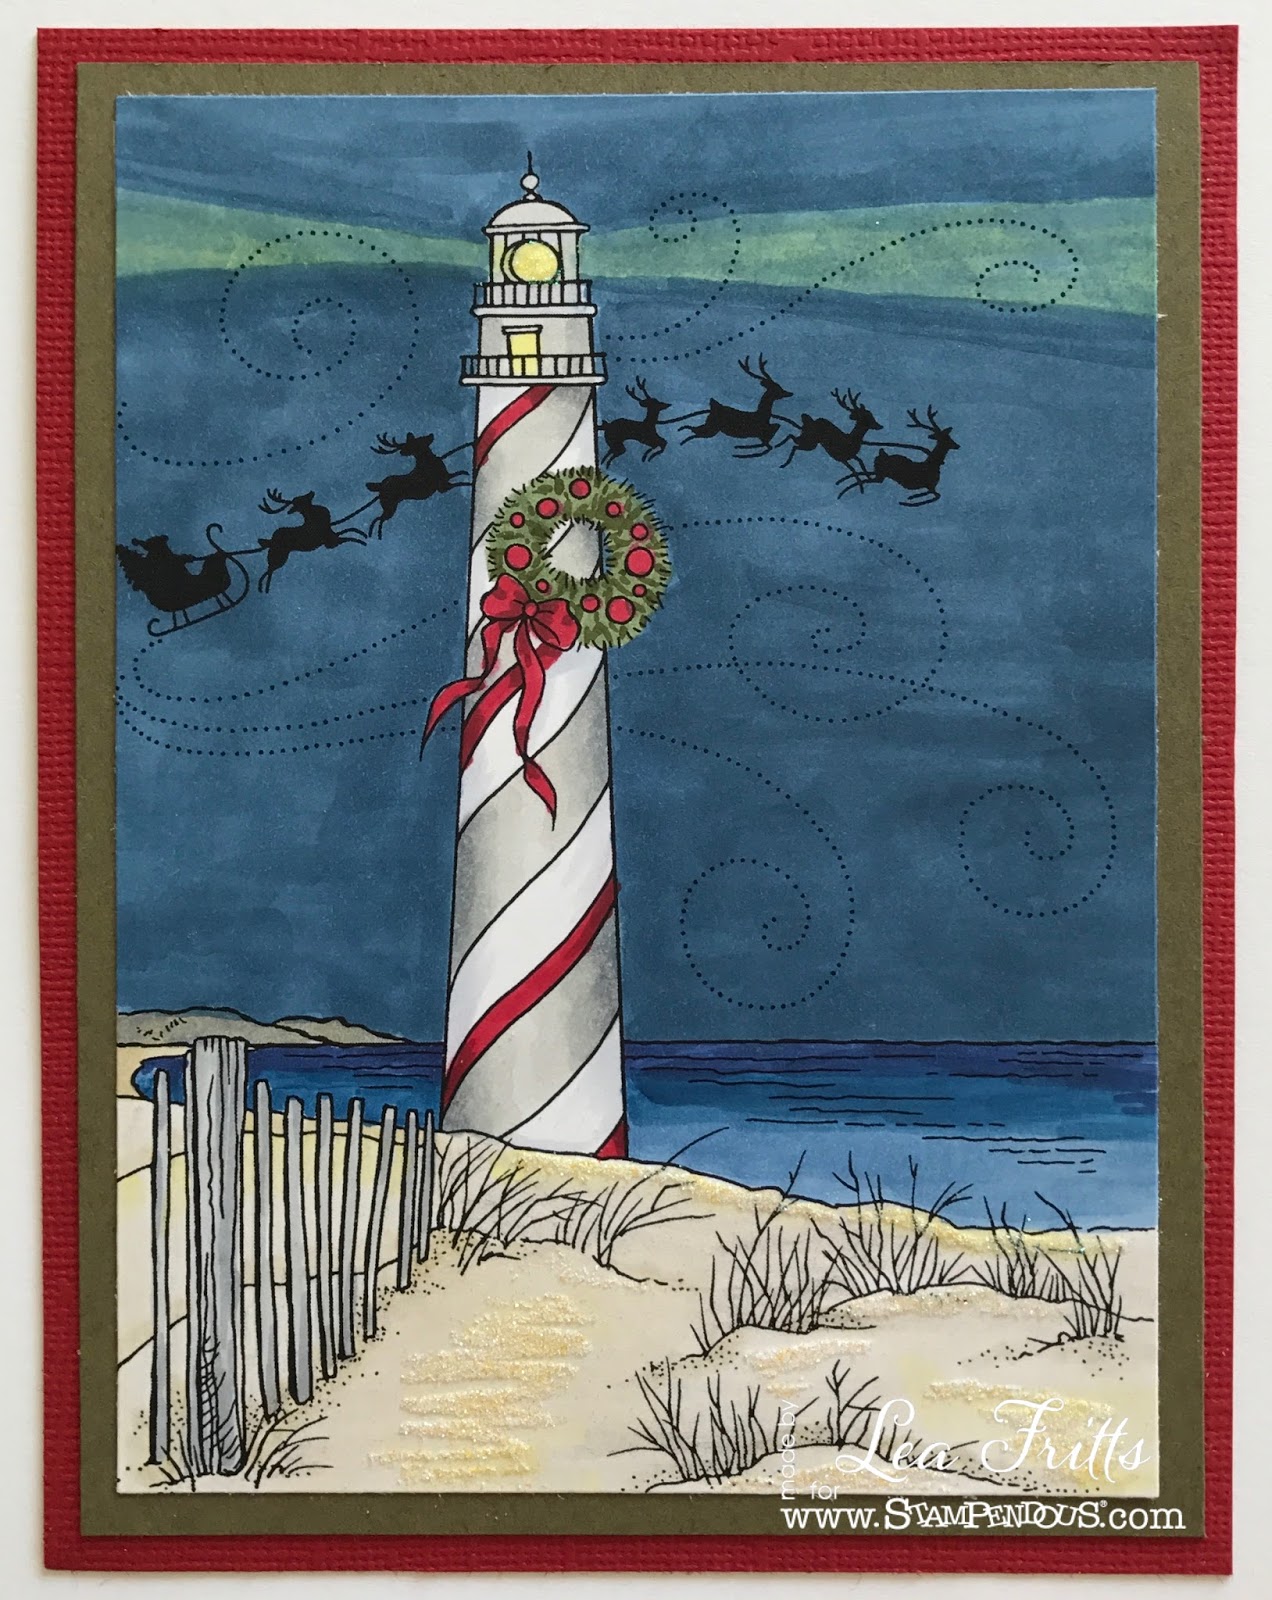
Copic® Markers (YR07, YR09, YR23, YR68, R02, R14, R27, R29, R56, R59, R89, B24, B37, B39, G03, G07, Y17)

Here's what I did to create this card:
  1. Stamp image with black ink on white paper
  2. Color image with markers
  3. Trim image closely
  4. Trim red cardstock in a vertical A2 size with a tent fold
  5. Trim a mat for image in green cardstock
  6. Adhere layers as shown
Thanks so much for stopping by today.  I hope you have a wonderful weekend and I'll see you again next week!

Hugs,
Lea

Wednesday, December 13, 2017

Heavenly Holiday


For unto us this day, in the city of Anaheim, Laura Weed was born; we shall sing and rejoice!  

Happy Birthday, Laura!

For those of you who don't know, Laura wears many hats at Stampendous.  Her favorite, of course, is her cowgirl hat she wears when she has to round up this herd (a.k.a. Design Team).  Well, that's just my opinion so, for now, we'll just go with it!  Laura, I hope you have a wonderful birthday, please know you are loved and appreciated by many!

My card today features the Stampendous Laurel Burch Heavenly Holiday Set.  This is such a pretty stamp set with some lovely sentiments to go with the beautiful images.  They're a lot of fun to color, too!


Here's what I used to create this card:

Red Cardstock by Bazzill Basics Paper®
Copic® Markers
Zip Dry Paper Glue by Beacon Adhesives®
3D Foam Squares by Scrapbook Adhesives®

Here's what I did to create this card:
  1. Trim white piece of paper to 4"w x 5 1/4"h, stamp ribbon image as shown and color
  2. On a separate piece of white paper, stamp birds and color
  3. Die cut birds and set aside
  4. Create your A2 card base with a tent fold from red cardstock
  5. Adhere colored panel to card base and stamp sentiment as shown
  6. Using foam squares, attach birds


This is such an easy card to create if you're looking for something to mass produce.  I had fun making my birds colorful in the Laurel Burch style that I love!  Color does make my soul happy!

Thanks so much for stopping by today.  I appreciate you're taking a look and really appreciate any and all feedback.  I'll see you again on Friday with some more Laurel Burch inspiration.  In the meantime, enjoy your week.

Hugs,
Lea


Friday, December 8, 2017

Polar Bears


...May your days be merry and bright
And may all your Christmases be white...

Today is the final day of the Stampendous week of Merry and Bright.  I opted to use the Polar Bear Stamp and Die Set for my card today.  I love this set!  Bears of all types are a favorite of mine.  This was also my first time attempting to recreate the Northern Lights in ink, so much fun!


Here's what I used to create this card:

Salty Ocean Distress Ink™ by Ranger®
Wilted Violet Distress Ink™ by Ranger®
Mowed Lawn Distress Ink™ by Ranger®
Faded Jeans Distress Ink™ by Ranger®
Copic® Markers
Sharpie® White Paint Marker
Blue Shimmer Paper
Zip Dry™ Paper Glue by Beacon
3D Foam Squares by Scrapbook Adhesives®

I have to admit, I'm pretty pleased with how this card turned out!  I wasn't sure I was going to like how the sky came together but, once I had it completed, I really liked it!  It's "merry and bright!"  Have a wonderful weekend and I'll see you again next week!

Hugs,
Lea

Wednesday, December 6, 2017

Winter White

My Stampendous Winter White is really more like a case of Moody Winter Blues!  I don’t know about you, but I love the Moody Blues and I was listening to their music this weekend.  It really puts me in a relaxed creative mindset.  I love this stamp and die set!  It’s so convenient to have both in one set!  Even though I didn’t use one of the sentiments that comes with the set, it does have some great ones you can check out here.


Here’s what I used to create this card:

Dylusions™ Ink Spray in London Blue, Bubblegum Pink and After Midnight
Delicata™ Silvery Shimmer Ink Pad by Tsukineko®
Strathmore® Watercolor Paper
Purple Cardstock by Bazzill Basics Paper®
Zip Dry™ Paper Glue by Beacon
3D Foam Squares by Scrapbook Adhesives®

Here’s what I did to create this card:
  1. Trim watercolor paper to desired size
  2. Spray inks onto watercolor paper, allow to dry
  3. Stamp snowflakes randomly onto inked paper with silver ink
  4. Stamp largest snowflake onto purple cardstock and die cut
  5. Adhere ribbon to stamped paper as shown
  6. Trim a piece of purple cardstock for card base with a tent fold
  7. Adhere stamped piece to base and add snowflake with foam squares

Thanks so much for stopping by today.  I do apologize for my post being tardy, however, I'm having internet connection problems at home.  Thankfully they're coming in the morning to try to fix whatever is going on.  Keeping my fingers and toes crossed!  See you again on Friday!

Hugs,

Lea

Friday, December 1, 2017

Wisemen Seek Him


It's the last day for this week's theme The Reason for the Season at Stampendous and I'm finishing off my week with our beautiful Wisemen Seek Him rubber stamp.  This card is so simple but it has a certain elegance, in my opinion, at least!  This card design would certainly make some super fast Christmas cards if you're like me and pressed for time.


Here's what I used to create this card:

Stampendous® Wisemen Seek Him Rubber Stamp
Stampendous® Detail Silver Embossing Powder
VersaMark™ Watermark Ink Pad by Tsukineko
Delicata™ Silvery Shimmer Pigment Ink Pad by Tsukineko
Hug Snug® White Seam Binding
Arctic Blue Cardstock by Bazzill Basics Paper®
3D Foam Mounting Squares by Scrapbook Adhesives®
E-Z Runner® by Scrapbook Adhesives™

I didn't have any silver ribbon to use for my project so, being the clever girl I am, I ran my silver Delicata™ pad over my white seam binding.  I wish the photo showed the shimmer you can see in real life.  So pretty!

Thank you for joining us this week and for stopping by my blog.  I'll see you again next week for another week of Stampendous inspiration.  In the meantime, I hope you have a wonderful weekend.

Hugs,
Lea
SaveSave

Wednesday, November 29, 2017

Blessed Nativity


This week at Stampendous, we're celebrating "The Reason for the Season!"  For my card, I used Blessed Nativity Perfectly Clear Stamps Set.  This is such a sweet stamp set!  It's an adorable nativity scene and has multiple sentiments to choose from.  I thought it would be fun to try out my new Mermaid Markers from Jane Davenport's line of products.  They were pretty cool and very vibrant.


Here's what I used to create this card:

Stampendous Products - 


Other Products - 

Jane Davenport Mermaid Markers
Canson Watercolor Paper Pad
Green Cardstock by Bazzill Basics Paper
Yellow Cardstock by Bazzill Basics Paper
E-Z Runner by Scrapbook Adhesives

Thanks so much for stopping by today!  I'll be back on Friday with another card celebrating "The Reason for the Season!"  See you soon!

Blessings,
Lea


Friday, November 24, 2017

Nap By Candle

It's the day after Thanksgiving and what's a mouse to do but take a nap!  At Stampendous, we've been celebrating a week of House-Mouse® Designs and I'm wrapping up the week with Nap By Candle!  Isn't this just the sweetest stamp? 


Here's what I used to create this card:

Stampendous Products - 


Other Products - 

Firecracker Cardstock by My Colors®
Merry Mistletoe Cardstock by Graphic45®
Creative Impressions Ribbon
E-Z Runner® Adhesive by Scrapbook Adhesives™
Copic® Markers (Y04, Y08, Y26, Y28, R20, R27, R29, R89, YR09, E50, E51, E53, C1, C5)

Here's what I did to create this card: 
  1. Stamp image with black ink on white paper
  2. Color image with markers
  3. Trim image closely
  4. Trim red cardstock in a horizontal A2 size with a tent fold
  5. Trim a mat for image and sentiment from red cardstock
  6. Trim patterned cardstock for background as shown
  7. Adhere gold ribbon to patterned cardstock as shown and adhere to card front
  8. Adhere sentiment to mat and set aside
  9. Adhere layers as shown
Thanks so much for stopping by today!  I hope you have a wonderful weekend and I'll see you again next week.  Enjoy the rest of the holiday weekend!

Blessings,
Lea

Wednesday, November 22, 2017

Gift Giving

This week at Stampendous® , we're showcasing our adorable House-Mouse® Designs!  My card today is the Stampendous® House-Mouse® Designs stamp named Gift Giving.   It's a favorite of mine because I always enjoyed being the Santa for my kids when they were growing up.  It did my heart good to watch them open their gifts and know they are so pleased and thankful for what they received.  


Here's what I used to create this card:

Stampendous Products -


Additional Products -

Caribbean Sea Cardstock by My Colors®
Island Mist Vintage Double Dot Cardstock by BoBunny®
May Arts Ribbon®
Gold Sharpie® Marker
E-Z Runner® Adhesive by Scrapbook Adhesives™
3D Foam Squares by Scrapbook Adhesives®
Spectrum Noir™ Markers (GB1, DR1, DR3, DR5, LG3, LG4, LG5)
Copic® Markers (E50, E51, E53, R20, R27, R29, RV91, RV93, Y11, Y13, BV02, BV04, C1, YG13, YG17, BG45, BG49)

Here's what I did to create this card:

  1. Stamp image with black ink on white paper
  2. Color image with markers
  3. Trim image closely
  4. Stamp sentiment with black ink on white paper
  5. Trim sentiment closely
  6. Trim teal cardstock in a horizontal A2 size with a tent fold
  7. Trim dot cardstock as shown
  8. Trim a mat for image and sentiment from teal cardstock
  9. Adhere red ribbon with teal ribbon on top as shown and adhere to mat
  10. Adhere sentiment to mat and set aside
  11. Adhere layers as shown
  12. Adhere sentiment as shown to card front with foam squares
Thanks so much for stopping by today!  I'll see you again with another sweet House-Mouse® Designs card for Stampendous.  In the meantime, enjoy the holiday if you're in the U.S., if not, enjoy your week!

Blessings,
Lea

Friday, November 17, 2017

Seated Elf


Santa's elves have been busy at Stampendous!  They've been working extra hard to create all sorts of stamps, dies and embellishments to make your Christmas merrier.  Here's a couple of cuties that were super fast to create.


Here's what I used to create this card:

Stampendous Products - 


Other Products - 

Wasabi Vintage Double Dot Cardstock by BoBunny®
Firecracker Cardstock by My Colors®
Mint Julep Cardstock by My Colors®
Pine Forest Cardstock by My Colors®
E-Z Runner® Adhesive by Scrapbook Adhesives™
Zip Dry™ Paper Glue by Beacon Adhesives
3D Foam Squares by Scrapbook Adhesives®
May Arts Ribbon®
Spectrum Noir™ Markers 
Copic® Markers

Thanks so much for stopping by today.  I hope you have a wonderful weekend and I'll see you again next week.

Hugs,
Lea

Wednesday, November 15, 2017

Lighthouse Christmas


"You better watch out, you better not cry
Better not pout, I'm telling you why
Santa Claus is comin' to town..."


In the meantime, Santa has been hanging out with Stampendous and we have some awesome stamps featuring jolly old St. Nick and his travels.  My card today features Lighthouse Christmas.  Apparently Rudolph is MIA but this lighthouse is showing Santa the way. 


Here's what I used to create this card:

Stampendous Products -


Other Products -

Firecracker Cardstock by My Colors
Olive Green Cardstock
E-Z Runner® Adhesive by Scrapbook Adhesives™
Zip Dry™ Paper Glue by Beacon Adhesives
Copic® Markers (B34, B39, B37, B95, B97, B99, R46, R59, Y11, C1, C5, G94, G99)
Spectrum Noir™ Markers (EB1, EB2, IG1, IG2, IG4)

Here's what I did to create this card:
  1. Stamp image with black ink on white paper
  2. Color image with markers
  3. Trim image closely
  4. Trim red cardstock in a vertical A2 size with a tent fold
  5. Trim a mat for image in olive cardstock
  6. Adhere layers as shown
  7. Using glue, adhere glitter where desired
Thanks so much for stopping by today.  I'm a firm believer that you can balance a little naughty in with the nice!  Heeheehee!  

Hugs!
Lea


Friday, November 10, 2017

Gift Wrapping


Welcome to the last day of Pink Your Christmas with Stampendous as we celebrate the adorable holiday stamps from Pink Your Life designer, Nicoletta Zanella. These sweet stamps are the perfect way to celebrate a cozy Whisper Friends Christmas!  So, put on the kettle, relax, and enjoy the inspiration!  My card today features the adorable Whisper Friends Gift Wrapping rubber stamp.  As you can see, I separated the two parts of the image to suit my card.


Here's what I used to create this card:

Stampendous Products -


Other Products -

Island Mist Vintage Double Dot Cardstock by BoBunny®
Wasabi Vintage Double Dot Cardstock by BoBunny®
Firecracker Cardstock by My Colors®
Gesso by DecoArt®
E-Z Runner® Adhesive by Scrapbook Adhesives™
Zip Dry™ Paper Glue by Beacon Adhesives
Copic® Markers (BG0000, BG01, BG13, BG15, BG18, E23, E25, E27, E50, E51, E53, R27, R46, R59, RV55, RV63, RV66, YG03, YG13, YG17, C1)

Here's what I did to create this card:
  1. Stamp image with black ink on white paper 
  2. Cut images out and set aside
  3. Trim red cardstock in a 5.5” square with a tent fold
  4. Trim blue dot paper as shown
  5. Trim green dot paper into 3 long triangles for trees
  6. Paint gesso across bottom of blue dot paper as snow
  7. Adhere background to card front
  8. Adhere trees to background and apply glitter to trees
  9. Adhere stamped images as shown
  10. Adhere crystal glitter to wings
  11. Adhere Twinkle Glitter as shown
Thanks so much for stopping by!  If you go here, you can find out about the fun prizes Stampendous is offering this week.  Also, you'll find the links to everyone's projects from the week.  If you missed something, it's easy to go back and check it out now.  I appreciate each and every comment so I hope you'll leave me a little love!  Have a wonderful weekend and, to my fellow Vets, Happy Veteran's Day!  I salute you and thank you for your service.  Give me a little shout out and let me know what branch you served in, I spent 9 years in the Army!

Blessings!
Lea


Wednesday, November 8, 2017

Ice Skater


Welcome to a Pink Week with Stampendous as we celebrate the adorable holiday stamps from Pink Your Life designer, Nicoletta Zanella. These adorable characters are celebrating a Whisper Friends Christmas!  What could be sweeter?  My card today features the Pink Your Life Whisper Friends Ice Skater, isn't she just the cutest!?


Here's what I used to create this card:

Stampendous Products:


Other Products:

Island Mist Vintage Double Dot Cardstock by BoBunny®
Pink Punch Vintage Double Dot Cardstock by BoBunny®
Grasshopper Cardstock by My Colors®
E-Z Runner® Adhesive by Scrapbook Adhesives™
Zip Dry™ Paper Glue by Beacon Adhesives
Copic® Markers (YG11, YG13, YG17, C1, C5, BG0000, BG01, BG02, BG13, BG15, BG18, BG70, BG72, G94, G99, E50, E51, E53, R20, B0000, RV17, RV19, RV55, RV63, RV66)

Here's what I did to create this card:

  1. Stamp image with black ink on white paper
  2. Color image with markers
  3. Trim image closely
  4. Trim green cardstock in a 5” square with a tent fold
  5. Trim vintage dot patterned papers as shown
  6. Adhere all layers as shown
  7. Mix flock and glitter and adhere as desired


Thanks so much for stopping by!  If you go here, you can find out about the fun prizes Stampendous is offering this week just for commenting on our blogs.  You could be our next winner!  See you again on Friday with more Pink Your Life cuteness!

Hugs,
Lea

Friday, November 3, 2017

Fall Arrangement


I love Fall!  Pumpkin pies and Pumpkin Spice Lattes abound!  This is MY season!  I count my blessings every day but they seem a little sweeter this time of year.  One of the things I'm especially grateful for is my opportunity to design for Stampendous and share my creations with all of you.  Thank you for following along in my creative journey and leaving me such lovely comments.  It really means the world to me!  Mwah!!


Here's what I used to create this card:

Prismacolor Pencils
BoBunny Vintage Dot Paper in Orange Citrus
My Colors Cardstock in Wildflowers
My Colors Cardstock in Sweet Potato
May Arts Ribbon
3D Foam Mounting Squares by Scrapbook Adhesives
Zip Dry Paper Glue from Beacon Adhesives

Here's what I did to create this card:

Stamp image on white paper with Memento ink and color.
Trim image and set aside.
Stamp sentiment with VersaFine ink and trim.
Create mats from purple cardstock and adhere both stamped images.
Trim BoBunny paper as shown.
Create card base from purple cardstock.
Adhere ribbon and layers as shown.

This card is dedicated to all of you!  Thank you for stopping by, leaving me some love and sharing in my journey.  I appreciate each and every one of you!  

Big hugs!
Lea


Tuesday, October 31, 2017

Happy Halloween


Trick or Treat!!


It's finally here!  It's Halloween!!  Of course, that also means it's the last day of the 31 Days of Halloween.  It's been fun playing along throughout the month and I'm already looking forward to next year.  For my final card, I've used the Stampendous Frida Cat.  I am so in love with this stamp!


Here's what I used to create this card:

Copic Markers
Sweet Potato Cardstock by My Colors
Poolside Cardstock by My Colors
Zip Dry Paper Glue

Here's what I did to create this card:

Stamp image on white paper with black ink
Color image and trim along edges
Create card base from orange paper
Trim turquoise paper as mat for image
Adhere all layers as shown

Such a simple card and easy to create but I do love the impact Frida provides.  The cat is pretty darn cute, too!  Thanks so much for following along with our 31 Days of Halloween.  

HAPPY HALLOWEEN!


Boo!
Lea


Tuesday, October 24, 2017

Fang-tastic!


It's Day 24 of the 31 Days of Halloween and I have another fun Stampendous creation to treat you with!  If you've missed some days, stop by the special page on the Stampendous blog DAILY so you don't miss any inspiration and PRIZES. There are details that you'll want to read that were shared on the first day here.  Today's card stars your favorite mice from House-Mouse Designs®,  Monster Mouse!  Enjoy!


Here's what I used to create this card:

Stampendous Product - 


Other Product - 

Mint Julep Cardstock by My Colors®
Kiwi Vintage Double Dot Cardstock by BoBunny®
Memento™ New Sprout Ink Pad by Tsukineko®
Black PITT Pen by Faber-Castell
May Arts Ribbon®
E-Z Runner® Adhesive by Scrapbook Adhesives™
3D Foam Squares by Scrapbook Adhesives®
Zip Dry™ Paper Glue by Beacon Adhesives
Spectrum Noir™ Markers (TN3, TN4, TN5)
Copic® Markers (C1, C5, YG01, YG13, YG21, E50, E51, E53, R20)

Here's what I did to create this card:

Stamp image with black ink on white paper
Color image with markers
Trim image closely
Stamp sentiment with green ink on white paper and go over “fang-tastic” with black pen
Trim sentiment closely
Trim green cardstock in a horizontal A2 size with a tent fold
Trim a mat for image and sentiment from green cardstock
Trim patterned cardstock as shown
Adhere green ribbon to patterned cardstock as shown and adhere to card front
Adhere sentiment to mat and set aside
Adhere layers as shown
Adhere sentiment as shown to card front with foam squares
Using glue, adhere glitter and fragments where desired

Thanks so much for stopping by today!  I so hope you're enjoying the 31 Days of Halloween as much as I am.  I'll see you again in a few days with another fun Halloween project, be it trick or treat?  Bwahahahaha!  Have fun!

Boo!
Lea