Showing posts with label Bo Bunny. Show all posts

Thursday, August 6, 2015

Festive Fall

Hi there!  It's Stampendous Dreamweaver Thursday and this week we're celebrating Fall.  My card today uses The Great Pumpkin stencil, one of my favorite fall Dreamweaver Stencils.  I also used one of my favorite techniques, airbrushing onto a glittered sticky panel.  I'm a complete sucker for anything sparkly and there's nothing with more sparkle than the Multi Fine Crystal Glitter from Stampendous.  I love that glitter in all it's forms, Fine, Ultra Fine, Medium and Micro; it's simply stunning!  Here's my card for this week, I apologize in advance for the slight shadowing on the right side but it's hard to get a good picture with so much sparkle going on.


Here's what I used to create this card:

Bo Bunny Apple Cider Collection
Light Orange Cardstock by Bazzill Basics Paper
May Arts Ribbon
Zip Dry Paper Glue by Beacon Adhesives

Here's what I did to create this card:

Cut a piece of sticky panel to fit the stencil and cover with crystal glitter
Place stencil on panel and airbrush by masking off sections and doing the smaller sections first
Once airbrushing is complete, go back and add detail and shading with markers (you must use quick flicks and strokes as the alcohol can affect the adhesion of the glitter)
Trim other layers of patterned paper as shown
Create a card base and a mat for the stenciled piece from solid cardstock
Adhere layers as shown
Create bow and attach to front of card

Here's a list of my teammates that are playing along today:


That's it for me today.  I hope you enjoy the card I created and hopefully it will inspire you to create a little fall of your own.  I'll see you again tomorrow with some more fun fall inspiration.  Have a wonderful day!

Hugs,
Lea

Monday, March 16, 2015

Just Hatched!


Easter is right around the corner and we have some super cute stamps at Stampendous to help you celebrate the season!  Today I'm sharing a card with one of those stamps and it is adorable!  


This is what I used to create this card:

Blue Oasis Cardstock by Bazill Basics Paper®
C’est La Vie Collection by Bo Bunny®
Latest & Greatest 6×6 Paper Pad by Authentique®
Copic® Markers  (E40, E41, E42; Y11, Y13, Y15, Y18, YR24)
Tim Holtz® Antique Linen Distress Ink™ by Ranger®
Ribbon by May Arts
Zip Dry™ Paper Glue by Beacon Adhesives

This is what I did to create this card:
  1. Stamp image, color and trim to desired size, add distress ink all around white space.
  2. Create A-2 card base with tent fold.
  3. Trim patterned papers as shown.
  4. Stamp sentiment, trim and add distress ink.
  5. Create mats for both stamped images.
  6. Adhere all layers but do not attach to card base.
  7. Create bow with tails and attach to card as shown.
  8. Adhere all to card base.
Some of my teammates have projects to share with you as well, so, be sure to check them out:


I do hope my little chick has put a smile on your face.  Thanks for stopping by today.  I'll have another project for you on Wednesday so do come back by!  Have a blessed day!

Hugs,
Lea

Thursday, February 5, 2015

Key to My Heart

Break out the froufrou! For the month of February, the Dream Team is going Frilly and Fabulous! Vintage, retro, or modern, adding extra charm with fun Fran•táge products from Stampendous, ribbons and lace from May Arts, buttons, crystals, charms, or even creating your own dimensional decor! A snippet or a pile, whatever your creative heart desires! Remember to link your creations using the Inlinkz tool on the Dream It Up! blog for a chance to win the stencil of your choice! Bonus points for using Dreamweaver and/or Stampendous product in your work of heart.

Here's what I've been playing with:


Here's what I used to create this card:

Bo Bunny® Love Letters 6x6 Collection
Key Charm from Stampin' Up!®
Miscellaneous Brads

Here's what I did to create this card:

  • Die cut heart from Bo Bunny® paper
  • Add a thin layer of gesso over entire die cut heart
  • Tape stencil in center of heart and paste emboss with silver paste
  • Set aside heart to dry
  • Create 5x5 square card base with a tent fold
  • Trim wood grain paper to fit in background as shown
  • Once paste is almost dry, heat with heat gun allowing some areas to bubble up, this gives a rough, worn look
  • Once paste has cooled, replace stencil over paste and buff on Metallic Lustre™ all over 
  • Using PITT pen, outline the entire pasted design and color the keyhole
  • Punch three holes and add brads
  • Adhere heart to background paper
  • Stamp sentiment on wood grain paper and layer onto green mat as shown
  • Trim ribbon to fit across the front of background paper, wrap ends under each side
  • Loop twine through top of key charm and attach to ribbon as shown with knot on back of ribbon
  • Attach sentiment with foam squares as shown
  • Using PITT pen, ink key to reduce shine and age key slightly

I love the shabby chic feel of my card.  For more frilly fun, visit the rest of the "A" team: 
Thanks for stopping by!  I hope you like my card and found a little inspiration here today.  If so, I would love for you to leave me a comment and tell me what you think.  If you're not one of my followers, I would love for you to consider following my blog.  I love sharing my creations!  As a matter of fact, I'll have another card on my blog tomorrow.  Hope to see you again soon!

Hugs,
Lea

Thursday, October 30, 2014

Twas the Night Before...

Can you tell that sometimes Dream Team's "Fearless Leader", Pam Hornschu, has a hard time deciding on monthly challenges?  The team has been taking turns all month with the Smeared and Smudged 31 Days of Halloween, and we have done a Christmas collaboration with Stampendous and Core'dinations, so, the confusion should be understandable. Therefore...Happy HallowThanksMas! 

Here's my creation for today:


Here's what I used to create my card:

Neenah® Classic Crest™ Natural White Cover Stock
Bo Bunny® Mistletoe Collection 6x6 Paper Pad
Red Cardstock
Copic® Markers: W1, W4, E43, E99
Gold Gel Pen
Red Mini Brad
May Arts Ribbon® Red/White Bakers Twine
Zip Dry™ Paper Glue by Beacon Adhesives®


Here's what to do to create my card:

Paste emboss stone wall, set aside to dry
Die cut medium stocking with two different pattered papers
Create card base for an A-2 card with a tent fold
Trim striped patterned paper for background
Once paste is dry, color with markers then trim edges of pasted piece
Set pasted piece on green patterned paper and write lines from poem around edges
Trim green patterned paper as shown
Adhere stocking pieces together and attach twine to stocking
Punch hole for brad in pasted piece, put brad through, attach stocking to brad
Adhere all layers as shown

As a note, when I pasted the stencil, I used my palette knife and tapped paste onto the layer I initially spread.  I wanted it to have a rough surface since a stone wall would not be smooth. I love how it turned out!

Here's the list of Dream Team players for today, please leave us some love as you go along:

As usual, we hope you've played along with the challenge and linked your creations to the Inlinkz tool on the Dream It Up! blog.  Just in case you are wondering...NO, YOU DO NOT NEED TO POST SOMETHING WITH ALL THREE HOLIDAYS ON IT! However, you get bonus points for actually using Dreamweaver Stencils and product on your creations! And bonus points might actually earn you an extra stencil as our monthly winner...just sayin'!

Thanks for stopping by today!  I'll have another post for you tomorrow so be sure to come back for another visit.  Have a blessed day!

Hugs,
Lea


Thursday, October 16, 2014

Core Creations


SANDY Claus is Coming to Town!

Yes...SANDY Claus! All of this week, the Stampendous and Dreamweaver teams are playing with a mix of their products, along with some wonderful, SAND-ABLE papers from Core'dinations. Join us as we sand our way to the "core" of all things Christmas and the Holiday season. Of course, there will be prizes, and we give away the best...this time with a mix of fun Core'dinations products as well. To be one of three prize package winners, follow the posted link lists each day, leave a comment, and winners will be selected from these comments at the beginning of next week. This is what you might win:


Here's my project for today:


Here's what I used to create this card:

Bo Bunny® Powder Mountain 6x6 Paper Pad
Bazzill® Cardstock
Copic® Markers - E40, 41, 42, 43, 44, 47, 49, 93; YR12; B0000, 000, 21, 23, 26, 91, 93, 95, 97, 99; 0 (Colorless Blender)
StāzOn™ Midnight Blue Midi Ink Pad
Sharpie® Meanstreak White Marking Stick 
Zip Dry™ Paper Glue by Beacon® Adhesives

Here's what I did to create this card:

Stamp image with black ink onto white cardstock, color and cut out
Run stencil and paper through die cutting mating (I used a Big Shot), sand paper lightly to reveal inner core
Trim embossed piece and lightly go over sanded spots with white marking stick
Create card base with a tent fold
Trim patterned paper to fit card base
Add spoonful mix to bottom of stamped and cut-out image and heat
Stamp sentiment with blue ink and trim closely
Adhere all layers as shown

Here's the rest of the teams posting today, be sure to leave them some love!

Stampendous Impressions Blog

Team members with an (*) are also on the Dreamweaver Stencils Team.

Tenia Nelson

Jamie Martin *

Lea Kimmel *

Pam Hornschu *

Wendy Price


Core'dinations Designer - Suzanna Lee


Continue your blog hop at 

Dreamweaver Stencils Blog

*On Stampendous team as well 

That's it for me today!  Thanks for stopping by and I'll see you again tomorrow for the big final hop.  You know it's going to be an awesome hop.  Have an awesome day!

Hugs,
Lea

Thursday, August 21, 2014

August Splendor Canvas

As we are heading towards back-to-school again, it is only appropriate that we break out our dictionary for this month's Dreamweaver challenge..."AUGUST as an ADJECTIVE"! 
Merriam-Webster defines august as, "marked by majestic dignity or grandeur", with synonyms such as, "dignified, distinguished, imposing, portly, solemn, staid, and stately". Now, I don't know just how dignified and stately the Dream Team can become for an entire month, but we are all going to give it a try! How about trying along with us, and linking YOUR creations to the inlinkz tool below for a chance to win the wildest stencil design your little heart is screaming for. 

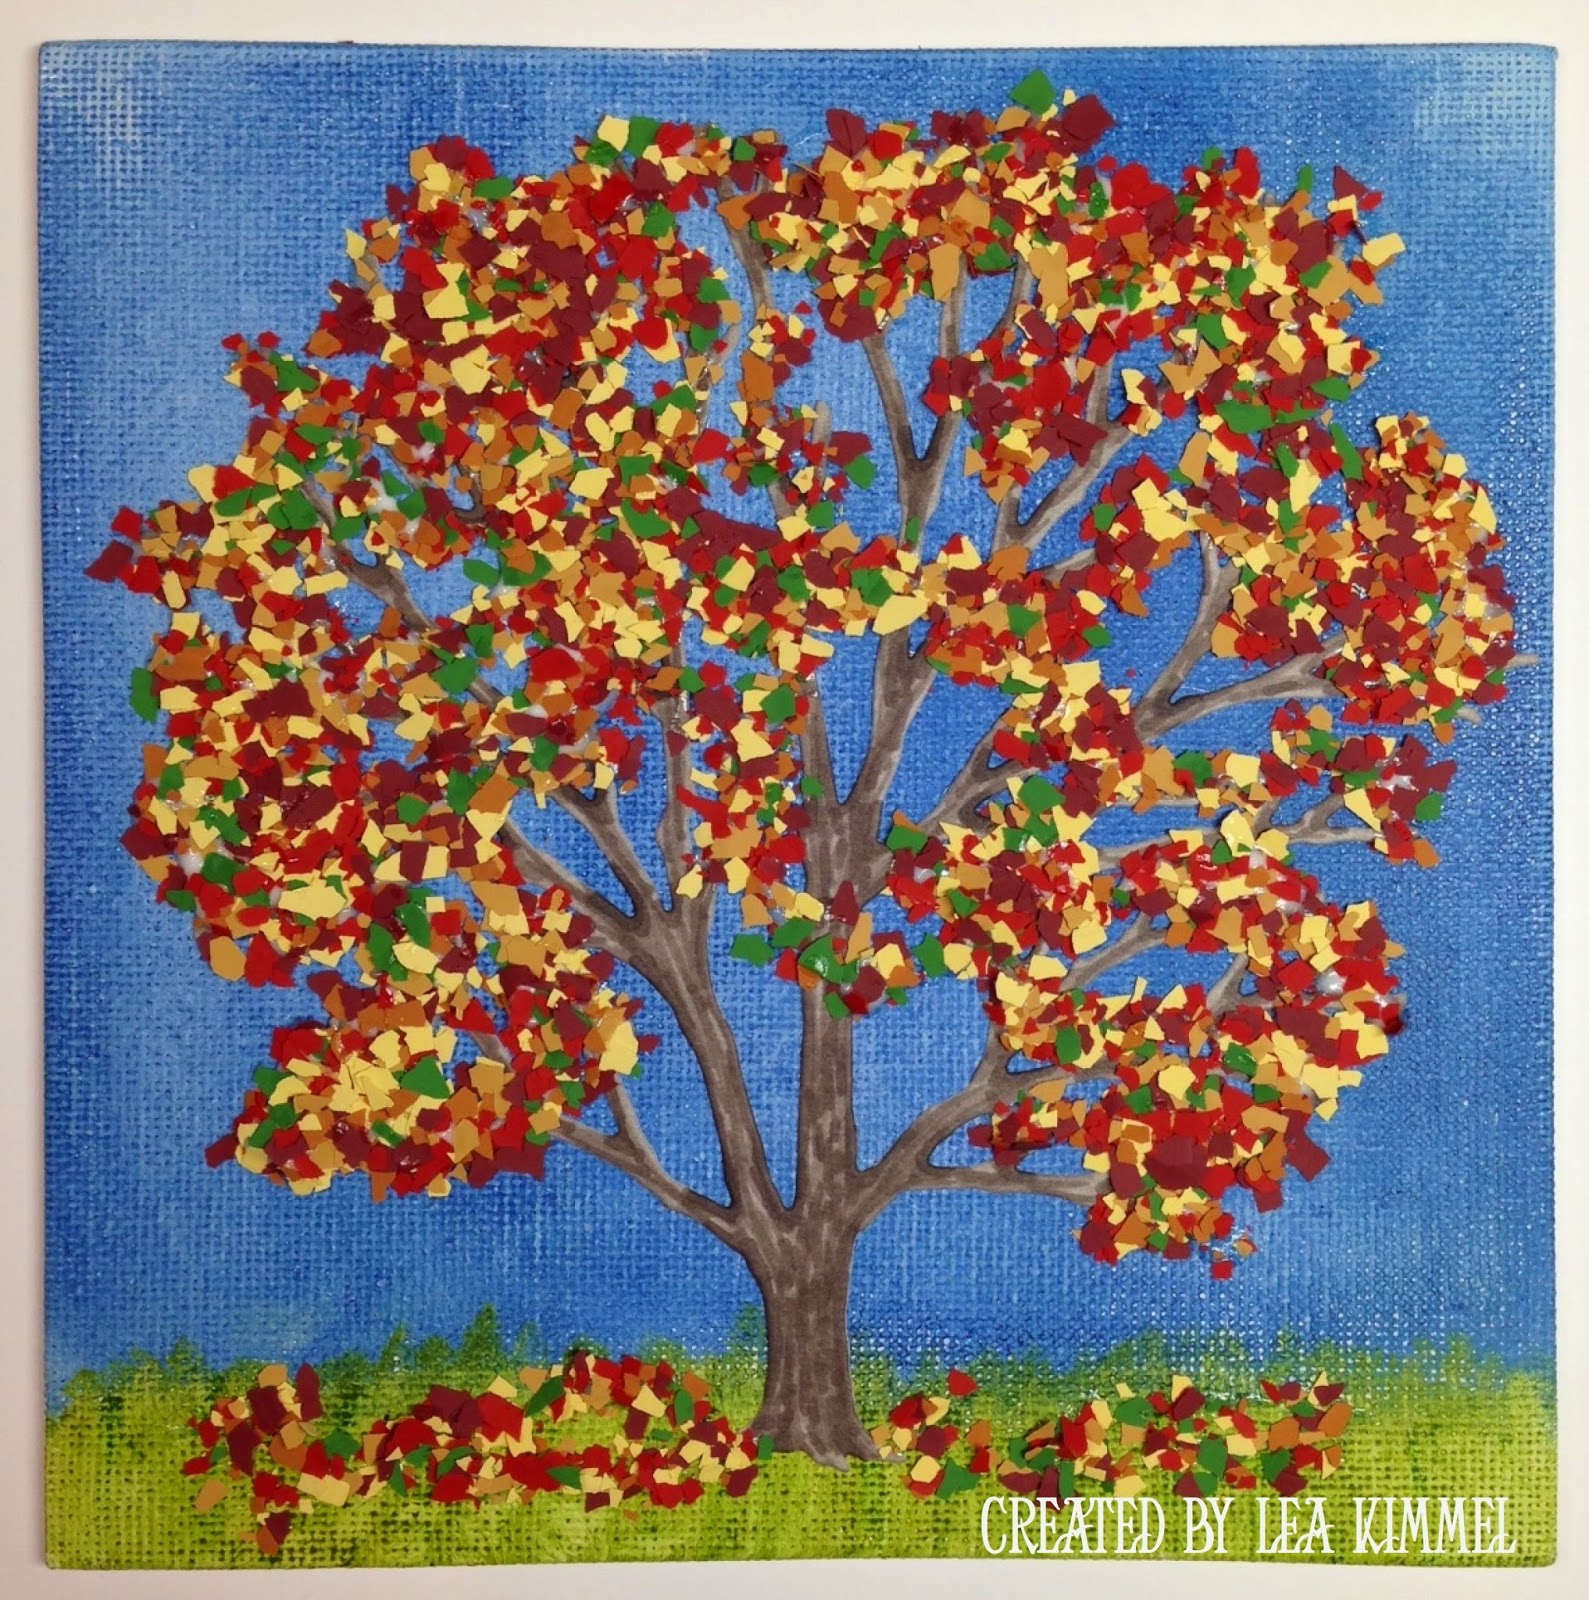
So, my question to you, is there anything more majestic or grand than a huge tree?  I don't believe there is!  Yes, I have a thing for trees, I've confessed that previously!  LOL!  I'm really fascinated with their beauty and resilience.  I've done a Spring and Summer Tree before and, now, here's my Fall:


Here's what I used to create this canvas:

Dreamweaver Stencils© DX 7020 Leafless Tree Die
Dreamweaver Stencils© Memories Mists™ - Stormy Water
Faber-Castell® Gelatos™ in Pistachio and Green Tea
Stampendous® Color Fragments in Leaf Green, Canary, Caramel, Ochre, Burgundy and Scarlet
Bo Bunny® Dots in Gray
Spectrum Noir™ markers BG4, BG5 & BG6
Beacon Adhesive® Gem-Tac™
Beacon Adhesive® Zip Dry™
Artist's Loft™ 6x6 Canvas Board

Here's what I did to create this canvas:

Run gray paper and die through cutter
Add marks to tree with markers
Spritz mist onto canvas and rub in
Add Gelatos™ to bottom and mix with water
Adhere tree to canvas with Zip Dry™
Mix color fragments in a separate container
Add Gem-Tac™ glue to canvas where you want "leaves"
Add fragments to canvas, shake off excess

Here's the rest of the team posting today:


That's it for me today.  Thanks for stopping by and I hope to see you again soon.  Have a blessed day!

Hugs,
Lea

Tuesday, August 19, 2014

I've Been Framed!

This week's Stampendous theme is Wedding Wishes and I've opted to create a wedding thank you card.  After all, you'll need plenty of thank you cards for all those shower and wedding gifts!  For my card today, I've used Ribbon Rose Frame and Loving Messages.  They're a perfect pair!


Here's what I used to create this card:

Derwent® Inktense™ Pencils
Neenah® Classic Crest Solar White
Bo Bunny® Dots Cardstock
Bazzill® Cardstock
Martha Stewart® Edge Punch
May Arts® Ribbon
Beacon Adhesive® Zip Dry™

Here's what I did to create this card:

Stamp image, color and trim closely
Create 5x5 square card base with a tent fold and image mat from purple cardstock
Trim green paper to fit as shown and punch edge
Create bow from purple ribbon
Adhere all layers as shown
Add a dot of adhesive on front of card and attach bow

It's a really simple card and fast to create.  When you need several cards, the easier, the better!  Of course, you could easily substitute colors to match your specific wedding colors.  Purple and green just happen to be MY favorites!

Thanks for stopping by, I'll see you again soon.  Have a very blessed day!

Hugs, 
Lea

Friday, July 4, 2014

Happy Fourth!!

It's a star spangled Stampendous® with Star Spangled Mice from House-Mouse Designs®!  What a perfect stamp to create cards for this special day!  It would also be perfect for Veteran's Day, Memorial Day, cards for our soldiers that are stationed all over the world or returning home.  If you've got a patriotic bone in your body, you NEED this stamp!  Isn't it totally adorable?!  I love it!


What I used to create this project:

Bo Bunny's® Liberty Collection Patterned Paper
Bazzill® Cardstock
Neenah® Classic Crest™ Solar White Cover Stock
Memento™ Tuxedo Black Ink Pad
EK Success® Star Punch
UniBall White Gel Pen
Copic® Markers
Beacon Adhesive® Zip Dry™
Foam Mounting Squares

What I did to create this project:

I stamped my image, colored it with Copics® and trimmed it to the desired size
Created card base with a tent fold and trimmed a mat to fit my stamped image
Trimmed patterned paper to fit card base
Adhere all layers as shown with Zip Dry™
Punch out stars, write USA on them and attach to card with foam mounting squares

A simple card with a nice, patriotic feel!  Right up this girl's alley!  That's it for today.  Thanks for stopping by and I hope to see you again soon!  Have a blessed Fourth of July!

Hugs,
Lea


Thursday, July 3, 2014

The Dies Have It!

Welcome to July...the Dreamweaver Stencils© month to DIE for! Yep. All of this month, the Dream Team is featuring our newest toys...our DIES! You'd be surprised at how many we have, and what fun things you can do with them...especially when used in conjunction with many of their stencil counterparts. They are such a simple way to create an effective card. Here's mine for this week:


I didn't use the stencil that corresponds with the Pear Dies, instead I chose to go more of an artsy route and use a totally different stencil to accent my die cut pears.  I really like the final result.

Here's what I used to create this card:

Dreamweaver Stencils© Stencil LJ 927 Floral w/Dots
Dreamweaver Stencils© DL563 Pears Die Set
ColorBox® Chalk Inks from Autumn Pastels and Primary Pastels
Tim Holtz® Distress Ink™ in Vintage Photo and Shabby Shutters
Bazzill® Cardstock
Bo Bunny® Mint Dots paper
Basic Grey® “Picadilly - Farm Fresh Eggs” paper collection
Zip Dry™
Misc. Pop Dots

Here's what I did to create this card:

I cut my pears and stems out first with the dies
I lined up the Floral w/Dots stencil with each die cut pear and ran them through separately to dry emboss the design onto the pears
I lined the stencil back up on each pear and inked it with the various chalk inks
Add distress inks to each pear for shading
Create your card base in a tent fold
Trim patterned papers for layers as shown
Create sentiment on computer and print out, trim down as shown and ink edges
Adhere all layers for card
Using pop dots, attach pears and leaves

I'm sure that our "A" team is just DIE-ing to show you their creations, as well as our Guest Designer for the month of July...

and

Thanks for stopping by today, I'll see you again soon.  Have a blessed day!

Hugs,
Lea

Saturday, May 31, 2014

Wicked Wednesday on Saturday...

...yeah, that's how things roll sometimes!  For me anyway, I don't know about the rest of you.  So the Wicked Wednesday ATC Challenge blog sponsor for this last week was The Greeting Farm using the Cheeky Fairy digi!  This is an adorable fairy!


I colored her with Copics, cut her out and mounted her on a card base of Bo Bunny Dots and a scrap of miscellaneous patterned paper.  I used the new Radiant Neon inks in Electric Blue and Electric Yellow to create the Amuse sentiment.  She's a cutie!

Thanks for stopping by and I'll see you again soon!  Have a blessed day!

Hugs,
Lea

Tuesday, April 15, 2014

DICC Time!

It's time for another Desert Islands Crafters Challenge!  This time around our sponsor is The Stamping Chef and my image of choice is Tabitha.  She's so soft and girly looking that I had to find papers that matched her femininity.  Instead of a card, I chose to create a tag.  I'm thinking I might just use the finished tag on the cover of a journal; I really like the completed project!  Our itinerary for this week is as follows:

1.  Lots of pink
2.  Sugar skulls
3.  Suckers or sweets (lollipops or candy)
4.  Hearts
5.  Add a feather or wings
6.  Pearls or gemstones
7.  Add a banner or bunting
8.  Stitching (real or faux)
9.  Anything but a card
10.  Spritzes or sprays

For my project, I've used #'s 1, 4, 6, 7 and 9:


Here's what I used to create this project:

The Stamping Chef - Tabitha Digital Image
Neenah® Classic Crest™ Solar White
Bo Bunny® Little Miss Collection
Bazzill®
#10 Shipping Tag
Copic® Markers:  E13, 15, 17, 18, 19, 50, 51, 53; C0, C1, C3
Spectrum Noir™ Markers:  CR2, 3, 4; PP3, 5; TB2, 4
Tim Holtz® Distress Ink™ in Antique Linen and Pumice Stone
Smooch™ in Siren and Silverfox
DecoArt® Acrylic Gesso
Copic® Multiliner - Black
May Arts® Twine and Ribbon
Celebrate It™ Paper Flowers
Queen & Co.® Pearls
SU!® Punch
EK Success® Hole Punch
Tim Holtz® Paper Distresser™ Tool
Glue Dots™
Zip Dry™
Foam Mounting Square

Here's how I created this project:

Print image and color with markers, trim to desired size
Trim patterned papers to fit width of tag
Gesso top and bottom of exposed portion of tag 
Distress edges of patterned papers and image
Add distress ink to image and edges of patterned paper
Adhere papers to tag as shown
Punch out pieces for bunting and write "hello"
Fold bunting pieces over twine and adhere with glue dots
Punch two holes, one on each angled part of top of tag
Thread bunting twine through holes and adhere punch pieces with glue dots
Add pearls over each letter as shown
Cut out heart from scrap paper and attach with foam square
Color roses with markers and attach to bottom of tag with glue dots
With scissors, trim around each rose forming a scalloped edge
Attach ribbon through hole at top of tag

That's it for today!  I do hope you like my somewhat shabby chic tag!  Thanks for stopping by and I hope to see you again soon!  

Blessings,
Lea

Wednesday, April 2, 2014

Bunny Luv

Do you know what day it is?  It's Wicked Wednesday ATC Challenge Blog day!  I have the sweetest little image for you today from A Day for Daisies called Bunny In A Rose.  I have a special affection for bunnies so I really love this image, I hope you do, too!  Here's my project:


Here's what I used to create this project:

Neenah® Classic Crest
Copic® Markers
Bo Bunny® - Isabella Collection
Bazzill®
Queen & Co.® Pretty in Pink Rhinestones
Zip Dry™

That's it for today!  I hope you like my little project.  I'll have a Stampendous project for you on Friday.  Thanks for stopping by and see you again soon!

Hugs,
Lea


Thursday, March 20, 2014

Time for Tombow!


And a Toadal Makeover!  This week has been all about Stampendous® Stamps and TombowUSA and lots of wonderful creations designed to inspire you!  I love it when the Stampendous Design Team does a blog collaboration with a fantastic company like TombowUSA; it's just so much fun!  Of course, as you can see, there are prizes to win, too!  However, if you want to win a prize, you have to comment on our blogs, the more blogs you leave comments on, the better your chance of winning!  Pretty darn simple, right!?  So, without further ado, here's my project for today:


These were the colors I received, the Jewel set of 6!  I also received one of their new Blending Kits, which includes the Blending Palette I've shown you here, a Blender Pen and a Compact Spray Mister.    I wanted to show you my blending palette with colors still mixed on it so you could get an idea of how easy it is to get the color you need even from the Jewel set of 6 markers.  There's a super cute coloring chart for all the House-Mouse mice that can be found here, however, since I wasn't sent any of those colors, I had to mix my own! By combining purple and golden yellow, I was able to get my brown for the mouse fur, combining the golden yellow and red gave me the peachy tones I needed for his skin.  As you can see here, I mixed a few other colors, too, I wouldn't want you to think you are limited to just these six colors.  I used the Indirect Blending technique for this card.

Here's what I used to create this project:

Stampendous® HMM04 Toadal Makeover
Tombow Dual Brush Pens - Jewel
Tombow Blender Kit
Archival Ink™ - Jet Black
Bazzill® - Ruby Slipper
Canson® Watercolor Paper
Bo Bunny® Mistletoe 6x6 Paper Pad (Wonky Squares)
Crate Paper® Party Day 6x6 Paper Pad (Stars)
May Arts Ribbon®
Mono Adhesive Power Bond
Foam Mounting Squares

Here's how I created this project:

Stamp image and color; trim to desired size
Create card base and image mat from Bazzill
Trim patterned papers as shown
Adhere patterned papers and attach ribbon as shown
Adhere patterned papers with ribbon to card base as shown
Adhere image to mat and attach to card base with foam mounting squares

This was a very easy card to create and I have to tell you, I really enjoyed mixing my colors and applying them with the Blender.  I know my colors are a little Christmas-y but when you have a green toad and red lipstick, you just have to go with what looks good, no matter what the season may be!

Thanks for stopping by today and don't forget to comment if you wish to be entered to win a prize.  Don't forget that tomorrow is the BIG HOP!!  You don't want to miss it and I'll have two projects to share tomorrow!  Have a blessed day and I'll see you again soon!

Hugs,
Lea