Thursday, January 29, 2015

Manly Kind of Birthday Card

January has been all about birthdays for Dreamweaver Stencils, the birth of a new year and the birthday celebrations of family and friends.  Such a perfect way to start a new year!  We'd love for you to play along with us, and link your creations to the Inlinkz tool at the bottom of this post, or on the Dream It Up! blog, for a chance to win the stencil of your choice...and remember, using Dreamweaver products gets you bonus points towards an extra stencil!  

For my post today, I've created a monochromatic card with a masculine feel for all those special fellas in your life.  Actually, if my dad was still living, this card would be perfect for him!  That man loved his coffee and this mug reminds me of the ones at Waffle House, his favorite place to eat breakfast.  Here's my card:


Here's what I used to create this card:


Here's what I did to create this card:


  • I started out by taping my stencil to my paper and with a brush, I inked through the stencil with frayed burlap ink
  • Once done, I trimmed my paper to the edge of the stenciled area and distressed the edges, then inked the edges with vintage photo ink
  • I stamped three "coffee rings" on the inked design and then added my spoonful of gold dust and heated it from underneath
  • I adhered a small scrap of burlap to fit behind the mug and then wrapped the card with burlap twine as shown and finished it off with a knot
  • Next I created an A2 card base with a tent fold
  • I attached this stenciled panel to the card base and lightly inked the base edges
  • I stamped the coffee mug with the sentiment and cut it out
  • I colored the "coffee" and went over the text with distress markers
  • Lastly I attached my mug to the card base


I'm really pleased with the way this card turned out.  I love it when they come together so easily.  There's lots more inspiration for you from the whole team so be sure to check it all out and leave us some love!  

Thanks for stopping by today!  I'll see you again soon, and, in the meantime, have a wonderful day!  Don't forget to play along with us!

Hugs,
Lea
An InLinkz Link-up 

Wednesday, January 28, 2015

Happy Birthday, Lynette!

Happy Birthday, Lynette


Welcome to our Surprise Birthday Blog Hop for Lynette owner of Sweet Pea Stamps.
Today we are celebrating Lynette's birthday and letting her know how much we all love her and the wonderful work she does running Sweet Pea Stamps.

So I made you a card:


Here is the full Blog Hop List so you don't miss any stops, have fun hopping and please leave some love on the Sweet Pea Stamps Blog for Lynette.

Blog Hop List
Lea Kimmel (me)
Jane
Janine

Hope you enjoy the hop and enjoy your special day!  BIG HAPPY BIRTHDAY WISHES!

Hugs,
Lea

Wicked Wednesday with Sami Stamps

It's Wicked Wednesday ATC Challenge Blog time and this week our sponsor is Sami Stamps and our theme is Snowman/Snowmen!  I've used My Snowey Friend for my ATC this week.  I love, love, love this image!  It's like pure joy!  What do you think?


I've posted two photos to show that it's on a transparency for my ATC base.

Here's what I used to create this ATC:

  • Sami Stamps My Snowey Friend
  • Sharpie Poster-Paint Opaque Paint Marker in White
  • Faber-Castell PITT Pen 0.3 Black Ink
  • Neenah Classic Crest Solar White Cover Stock
  • Highland Transparency Film
  • Copic Markers - B0000, 000, 91, 93, 95; BV20, 22, 25, 28; E21, 23, 25, 27, 50, 51, 93; Y35, 38; YG11, 13 17
  • Beacon Adhesives 3-in-1 Paper Glue


Here's what I did to create this ATC:

  • I printed my image, colored it with markers and trimmed it to the width of an ATC and made sure to trim the bottom to the desired size
  • I trimmed a piece of transparency to ATC size
  • I laid the transparent ATC over the image, lined up the bottoms of both and drew the arms on my transparency with the PITT pen and filled in the snowflakes with the white Sharpie
  • Next I fussy cut around the top portion of the image only
  • I then glued the image onto the transparent ATC and added more snowflakes


This was super easy and I think it came out really cute.  I hope I've inspired you to break out your snowmen, or go buy a new one from Sami, and create a fun ATC for our challenge.  We would love for you to play along!  You never know, you might just win!  Thanks for stopping by and I'll see you again soon!  Have a wonderful day!

Hugs,
Lea


Saturday, January 24, 2015

Grow Your Blog!

Hello and welcome to the GROW YOUR BLOG 2015 Link Party! The lovely Vicki from 2 Bags Full is the hostess.


Hi!  I'm Lea Kimmel, welcome to my blog!  Rubberstamping, art journaling, mixed media and painting are my passion and I love to share my creations with whoever I can.  I've only had my blog a few years and for the first six months or so, I posted sporadically at best.  Now I post 3 times a week on average.  I would post daily if time allowed!

I'm on the Stampendous Design Team so I post projects for them weekly.  We do a lot of blog collaborations with other craft companies so we create some pretty diverse projects.  I'm also on the Dreamweaver Stencils Dream Team.  I don't know if you've heard, but, Stampendous just purchased Dreamweaver so my two teams will become one!  Pretty exciting news!

Do you love to create ATC's?  Do you love a fun challenge?  I do!  I post weekly for the Wicked Wednesday ATC Challenge Blog with a new sponsor and theme each week.  I love to have fun with this and I find it challenging to create such a tiny piece of art!

I love art journaling.  I'm fairly new to this fun means of self-expression and, man, it is liberating!  Anything goes!  There's no right or wrong!  That's right up my alley.  I have found a side of myself I didn't know I had.  While I've only shared that side a time or two on my blog, I plan to begin sharing weekly.

If I can paint it and it doesn't run away, I'm happy!  From a card, to a canvas, to a piece of furniture, paint makes everything better!  This is another side of myself that I've not shared a whole lot of on my blog, you can expect to see more of that in the very near future, too!

Blogging started out as just a fun way to share a card or two here and there.  Then the blogging bug really bit me and I've slowly but surely increased the frequency of my posts.  Now I would love to increase my followers.  It's all about a deep desire to share my passion.  If you think you might be interested, stick around a bit and see if you've found a place to hang out on occasion.  I would love to have you as my guest!

Hugs,
Lea

Friday, January 23, 2015

Tea, Anyone?

Who, besides me, would love a spot of tea?  How about pretty Stampendous Teapot Posies?  I'm so in love with the new teapot and teacup stamps as I collect both teapots and teacups, the older the better! Here's my version of a no-line coloring Teapot Posies that's ready to greet Spring!


Here's what I used to create this card:

Stampendous Teapot Posies
Stampendous Happy Greetings Perfectly Clear™ Stamps
Stampendous Regal Bird Quotes Perfectly Clear™ Stamps
Stampendous Tuxedo Black Memento™ Ink by Tsukineko®
Stampendous Valentine Micro Glitter Kit
Zip Dry™ Paper Glue by Beacon Adhesive
Cardstock by Bazzill Basics Paper®
Neenah® Classic Crest™ Solar White Cover Stock
Memento™ Desert Sand Ink by Tsukineko®
Authentique® Latest & Greatest 6×6 Paper Pad
Copic® Markers:  YG91, YG93, YG95, YG97, YG99; R81; RV17, RV55; BG18, BG72, BG75, BG78; C0, C1


Here's what I did to create this card:
  1. Stamp teapot image with Desert Sand for no-line coloring, color image and trim to desired size
  2. Create card base for a 5×5 square card and using same paper, trim a mat for image
  3. Trim patterned paper as shown
  4. Adhere all layers as shown
  5. Stamp sentiment in upper right corner
  6. Add pink glitter to each dot on teapot
Thanks for stopping by today and I hope to see you again soon!  In the meantime, I sure hope you have a wonderful day.

Hugs,
Lea

Wednesday, January 21, 2015

Wicked Wednesday with Ppinkydolls

It's Wicked Wednesday ATC Challenge Blog time and this week our sponsor is Ppinkydolls® and our theme is a color theme, Pink, Black & White.  If you're not familiar with Ppinkydolls® images, you need to be!  They're incredibly sweet images.  The image I'm using today is Owl.  So sweet, don't you think?


Here's what I used to create this ATC:

Neenah® Class Crest™ Solar White Cover Stock
Lily Bee Designs© Victoria Park 6x6 Tiny Tablet
Prima® Flowers - Summer Mix
VersaFine™ Ink in Onyx Black by Tsukineko®
Copic® B91, 93, 95; C0, 1, 3, 4, 6, 7; E50, 51, 53; R81, 83, 85; Y23; 100
Black Diamond Stickles™ by Ranger
Beacon® 3-in-1 Paper Glue


Here's what I did to create this ATC:

Print image, trim it and color it with markers
Stamp sentiment in upper right corner
Trim patterned papers as shown
Adhere layers as shown
Attach flowers in lower left corner
Add Stickles™ to center of each flower

We would love for you to play along with us in our challenge this week.  Show us your best pink, black and white themed ATC!  You might just win our challenge!

Thanks for stopping by today to take a look!  Your visits and comments are always appreciated!  I'll see you again soon, in the meantime, have a wonderful day!

Hugs,
Lea

Friday, January 16, 2015

Hummingbird, Don't Fly Away

If I could be a bird, I would want to be a Hummingbird.  They're colorful, cute and they have a serious sweet tooth.  That's my kind of bird!!  Have you checked out all the beautiful Stampendous Hummingbird projects my teammates have posted this week?  If you haven't, you really should go check them out, lots of gorgeousness.  I chose to go very mixed media for mine.  Paints, inks, crunchy goodness, oh yeah!  Here's my card for today:


Here's an angled view of the glittery goodness I've added to my card:


Here's what I've used to create this card:

Twinkling H2O's in Key Lime, Sunflower and Pink Azalea
DecoArt® Traditions Hansa Yellow Acrylic Paint
DecoArt® Glamour Dust Glitter Paint in Aqua
Americana® Yellow Green Acrylic Paint
Americana® Hauser Light Green Acrylic Paint
Americana® Multi Surface Satin™ in Sky Blue
Liquitex® Inks in Quinacridone Magenta and Transparent Burnt Umber
Neenah® Classic Crest™ Solar White Cover Stock
Magenta Cardstock by Bazzill Basics Paper®
Jet Black Archival Ink™ by Ranger®
Beacon® 3-in-1 Paper Glue

Here's what I did to create this card:

  • I started off by adding some Sky Blue and Aqua paints to my Creative Palette, brayered it out, stamped my Mish Mesh stamps into the paint and printed my paper
  • I set the paper aside to dry but since I'm impatient, I dried it with my heat tool
  • Next I stamped my images onto the printed paper
  • I put dabs of yellow and green paints onto my paint palette and misted them with water to create a wash and added my greens and yellow paint to the images
  • In a small plastic container, I added one drop of magenta acrylic ink and added it to my flowers and bird
  • Once I had my dark pinks painted on, I spritzed the ink with water and thinned it down then added my lighter magenta to the flowers and bird as shown
  • I watered down just a tiny drop of the burnt umber and added it to the bird
  • Realizing that some Hummingbirds are somewhat iridescent, I decided to go over the bird only with the Twinkling H2O's
  • Next I created my card base with a tent fold
  • I trimmed my painted piece to fit on my card base as shown
  • I stamped my sentiment in black ink and adhered the image to the card base
  • It was time to play mad scientist and mix my glitters and fragments into a fun mix and I adhered the yumminess to my card with glue

I seriously love how this card turned out!  There's not a single element to it that I don't like.  I've been taking the Creative Jumpstart 2015 on-line workshop on Nathalie Kalbach's N*Studio blog and the various lessons have really inspired me and taught me some new tricks.  If you haven't signed up, it's not too late, you can sign up any time now.  It's so worth it! For this piece, I really think the glitter and fragment mix was the perfect finishing touch!  Here's the list with my teammates that are playing along today, I hope you'll check them out:

Lea Kimmel (me)

Thanks for stopping by today!  I hope I've inspired you to pull out some stamps, paint, ink and fun embellishments for some weekend play.  Whip out that Creative Palette and spread some paint for lots of creative fun; the possibilities are endless!  Have a wonderful day and I'll see you again soon!

Hugs,
Lea

Thursday, January 15, 2015

Who's Having a Birthday?

Dreamweaver Stencils is celebrating birthdays for the month of January.  Guess that's a good thing since I have three special ones to celebrate this month.  Yesterday was the birthday for my daughter, Rachel, and my son, Daniel.  No, they're not twins, they just happen to have been born on the same day 18 years apart!  Kinda crazy, don't you think?  The card I'm showing you today is the card I've made for my granddaughter, Emmaline Grace.  Her birthday is on Saturday and I'm hoping that she'll enjoy her special card from her Nina!  (I love it when she calls me that!)


This is what I've used to create this card:

My Mind's Eye™ Hootenanny 6x6 Paper Pad
My Mind's Eye™ Quite Contrary™ Jack & Jill
Pink Cardstock by Bazzill Basics Paper®
Brown Cardstock by Bazzill Basics Paper®
Neenah® Classic Crest™ Solar White Cover Stock
Copic® Markers E25, Y35, B41, B45
May Arts Ribbon® Burlap Twine
Beacon® 3-in-1 Paper Glue
Glue Dots®

This is what I did to create this card:

  • I picked out 4 papers that I thought would piece together nicely to form the owl and ran the die through 4 times to get the various pieces
  • Once I decided on the pieces I was using for each part of the owl, I placed them back inside the owl die and put it aside
  • I ran my frame and tree dies through my machine, setting the frame aside and trimmed a portion of the tree to use as my branch for the owl
  • I partially glued the branch to the frame 
  • I added glue dots to the back of each section of the owl die, lined my branch and frame up over the die and laid it down on top of the die, applying pressure to adhere the pieces to the framed branch then lifted it up, all pieces attached!
  • Next up I created my card base and trimmed my background paper and adhered the two
  • I adhered the framed owl to the card base
  • Using another piece of the tree, I added a small branch over the owl
  • I took a scrap of Neenah and cut out the shape of a balloon, colored it with markers and added a small piece of twine to the back of the balloon and down to the branch
  • Last, but not least, I used a brown marker to create a "head" for the owl and fill in a little between the paper pieces, and, I used the yellow marker to shade the beak


It may look like this card was labor intensive but it was actually quite fast and simple to create.  I loved the papers and just knew they would each be perfect for the various parts of the owl.  Funny how you can look at paper designs and just know in your head exactly what you want to do with them!  

Be sure to check out the rest of the team's projects:


Thanks for stopping by today!  I do hope I was able to provide you with a tiny bit of inspiration.  Leave me some love and let me know!  I'll see you again tomorrow with another project.  In the meantime, have a wonderful day!

Hugs,
Lea


Wednesday, January 14, 2015

Wicked Wednesday With Vera Lane Studios

It's Wicked Wednesday ATC Challenge Blog time and this week our sponsor is Vera Lane Studios with a fun, yet funky, "girly stuff" theme.  These images are so unique and quirky and just downright cute!  To me they scream for bright happy colors to go with their cool mix of patterns.  Here's my ATC:


Here's what I used to create this ATC:

My Mind's Eye™ Quite Contrary™ "Jack and Jill" 6x6 Paper Pad
Neenah® Classic Crest™ Solar White Cover Stock
Beacon® 3-in-1 Paper Glue
Sharpie® Poster-Paint - White
Copic® Markers - R27, 29, 59; E000, 00, 11, 21, 50, 51, 53, 93, 95; BG53, 57; YG11, 13, 17; Y11, 13, 15; B0000

Here's what I did to create this ATC:

Print images and sentiment, color images and cut out
Trim sentiment, edge with marker and set aside
Create ATC base and trim patterned paper for additional layer on top, adhere together
Adhere colored images to ATC 
Adhere sentiment

You know you want to play along this week because these are all sorts of fun!  Thanks for stopping by and having a look!  I'll have another post for you tomorrow so come on back by!  In the meantime, have a wonderful day!

Hugs,
Lea


Friday, January 9, 2015

Beautiful Butterflies

Stampendous has showcased our butterfly stamps and dies this week.  Rather than do a card, I decided to do a mixed media canvas.  I've really gotten into creating in the mixed media style as it's more of a anything goes way of creating.  There is no right or wrong, it's all a matter of taste and what makes you happy.  Here's my canvas:


Here's what I used to create this canvas:

Stampendous® Lovely Garden Die Cut Set
Stampendous® Vintage Letter Stamp
Stampendous® Vintage Contract Stamp
Stampendous® Elegant Borders Perfectly Clear Stamps
DecoArt® Traditions™ Acrylic Paint - Hansa Yellow
Americana™ Acrylic Paints - Winter Blue, Baby Blue, Pistachio Mint, Pineapple
Americana™ Multi-Surface Satin™ - Cottonball
DecoArt® Gesso
Liquitex® Ultra Matte Gel
Derwent® Inktense Blocks
LuminArte® Twinkling H2O's™ - Key Lime, Blue Grass, Sunflower, Bougainvillea, Ocean Wave, Yellow Rose
Silks Acrylic Glaze - Oyster
Ranger® Archival Inks - Jet Black, Sap Green
Staedtler® Pigment Liner 0.5
Miscellaneous Craft Wire

Needless to say, there were a bunch of different steps to this piece so I'm not going to go into detail.  It would just take too long to tell you each step.  As long as you like the outcome, that's what really matters, right?!  Suffice it to say that participating in Creative Jumpstart 2015 has taught me a trick or two!

I hope you've enjoyed checking out all of the projects this week from my teammates!  We really love having matching dies to go with some of our stamp sets.  It makes it so easy to create projects when you have great products to work with!

Thanks for stopping by today and I'll see you again soon!  In the meantime, have a blessed day.  Oh, and stay warm!

Hugs,
Lea

Wednesday, January 7, 2015

Wicked Wednesday with All Dressed Up

It's Wicked Wednesday ATC Challenge Blog time and this week our sponsor is All Dressed Up and my image is Purrrfect Together.  I love cats so this was a perfect choice for me!  Also, we're doing something a little different, we've added a color challenge!  Here's the color challenge photo:


Here's my interpretation with my ATC:


Here's what I used to create this ATC:

Memory Box® Happy Day
Neenah® Classic Crest™ Solar White Cover Stock
My Mind's Eye™ Quite Contrary™ Jack & Jill 6x6 Paper Pad
Memento™ Tuxedo Black Ink by Tsukineko®
Copic® Markers:  C0, 1, 3; R20, 27, 29; G29, 46; BG09, 97; BG53
Zip Dry™ Paper Glue by Beacon®

Here's what I did to create this ATC:

First, I printed my image, colored it and trimmed it to size
Once I had it trimmed, I went back in and created a simple background to ground my image
I trimmed my ATC base and adhered my image
Last but not least, I stamped my sentiment

A really simple but sweet ATC to hopefully brighten your day!  We would love for you to play along with us.  Show us what you've got!  Thanks for stopping by and I'll see you again soon!

Hugs,
Lea

Friday, January 2, 2015

Do You Want to Build a Snowman?

Heeheehee!  I simply could not resist that title!  Are you tired of hearing that yet?  I hope not because I have three adorable snowmen to share with you on one card and a gorgeous giant glittery gold snowflake on another.  That's right!  I have two cards for your viewing pleasure today!  The theme this past week for Stampendous has been snowmen, snowflakes, all things related to that fluffy white stuff!  Here's my first card:


Here's what I used to create this card:

Cardstock by Bazill Basics Paper®
Jolly Holiday Paper Pad by Recollections
Copic® Markers (B0000, B000, B00, B01, YR61, YR65, YR68, YG00, YG01, YG03, BG53, BG57, V12, V15, V17, BV08, BV11, BV13, BV17, RV52, RV55, RV66, R02, R05, R08, B32, B34, B37, C3, C6, C7,C9, E31, E33, E34, E35, E37)
Zip Dry™ Paper Glue by Beacon Adhesives

Here's what I did to create this card:

Stamp image and color, trim to desired size
Create standard A2 card base with a tent fold and create a mat for the image from the same paper
Trim patterned papers as shown
Add spoonful of snow to trimmed image and heat from underneath, shake off loose bits after heating
Adhere all layers as shown

And, for card number two!  I absolutely adore how this card turned out.  I think it's gorgeous!  There's a certain elegance about it that I love.  


Here's what I used to create this card:

Neenah® Classic Crest™ Natural White Cover Stock
Echo Park® Everybody Loves Christmas "Snowman" 12x12 Paper
Blue Metallic Cardstock of Unknown Origin (Sorry!)
May Arts Ribbon® Twine
Zip Dry™ Paper Glue by Beacon® Adhesives

Here's what I did to create this card:

First I created an A2 card base with a tent fold in the natural white cover stock
I trimmed my patterned paper to fit with a thin edge of the card base showing
I trimmed a piece of the metallic paper to the desired size, determined the area I wanted cut and then die cut my snowflake
Using temporary adhesive, I adhered the metallic paper to the patterned paper and stamped my snowflake through the die cut piece with the VersaMark™ ink
I removed the blue metallic paper, added my embossing powder and heat embossed the snowflake
I took a small scrap of the the natural white paper and stamped my sentiment and embossed it in the same manner as the snowflake then punched a hole in one end
Next I adhered the blue metallic paper to the patterned paper and added my twine and the sentiment by tying a simple bow
Finally, I adhere everything to the card base

Such a simple yet elegant card!  I hope you've enjoyed both cards today and, boy, are they on the different ends of the style spectrum!  The first being fun and the second being almost graceful in it's style.

Thanks for stopping by today.  I'll see you again soon with more inspiration from me to you!  Have a wonderful day!

Hugs, 
Lea

Thursday, January 1, 2015

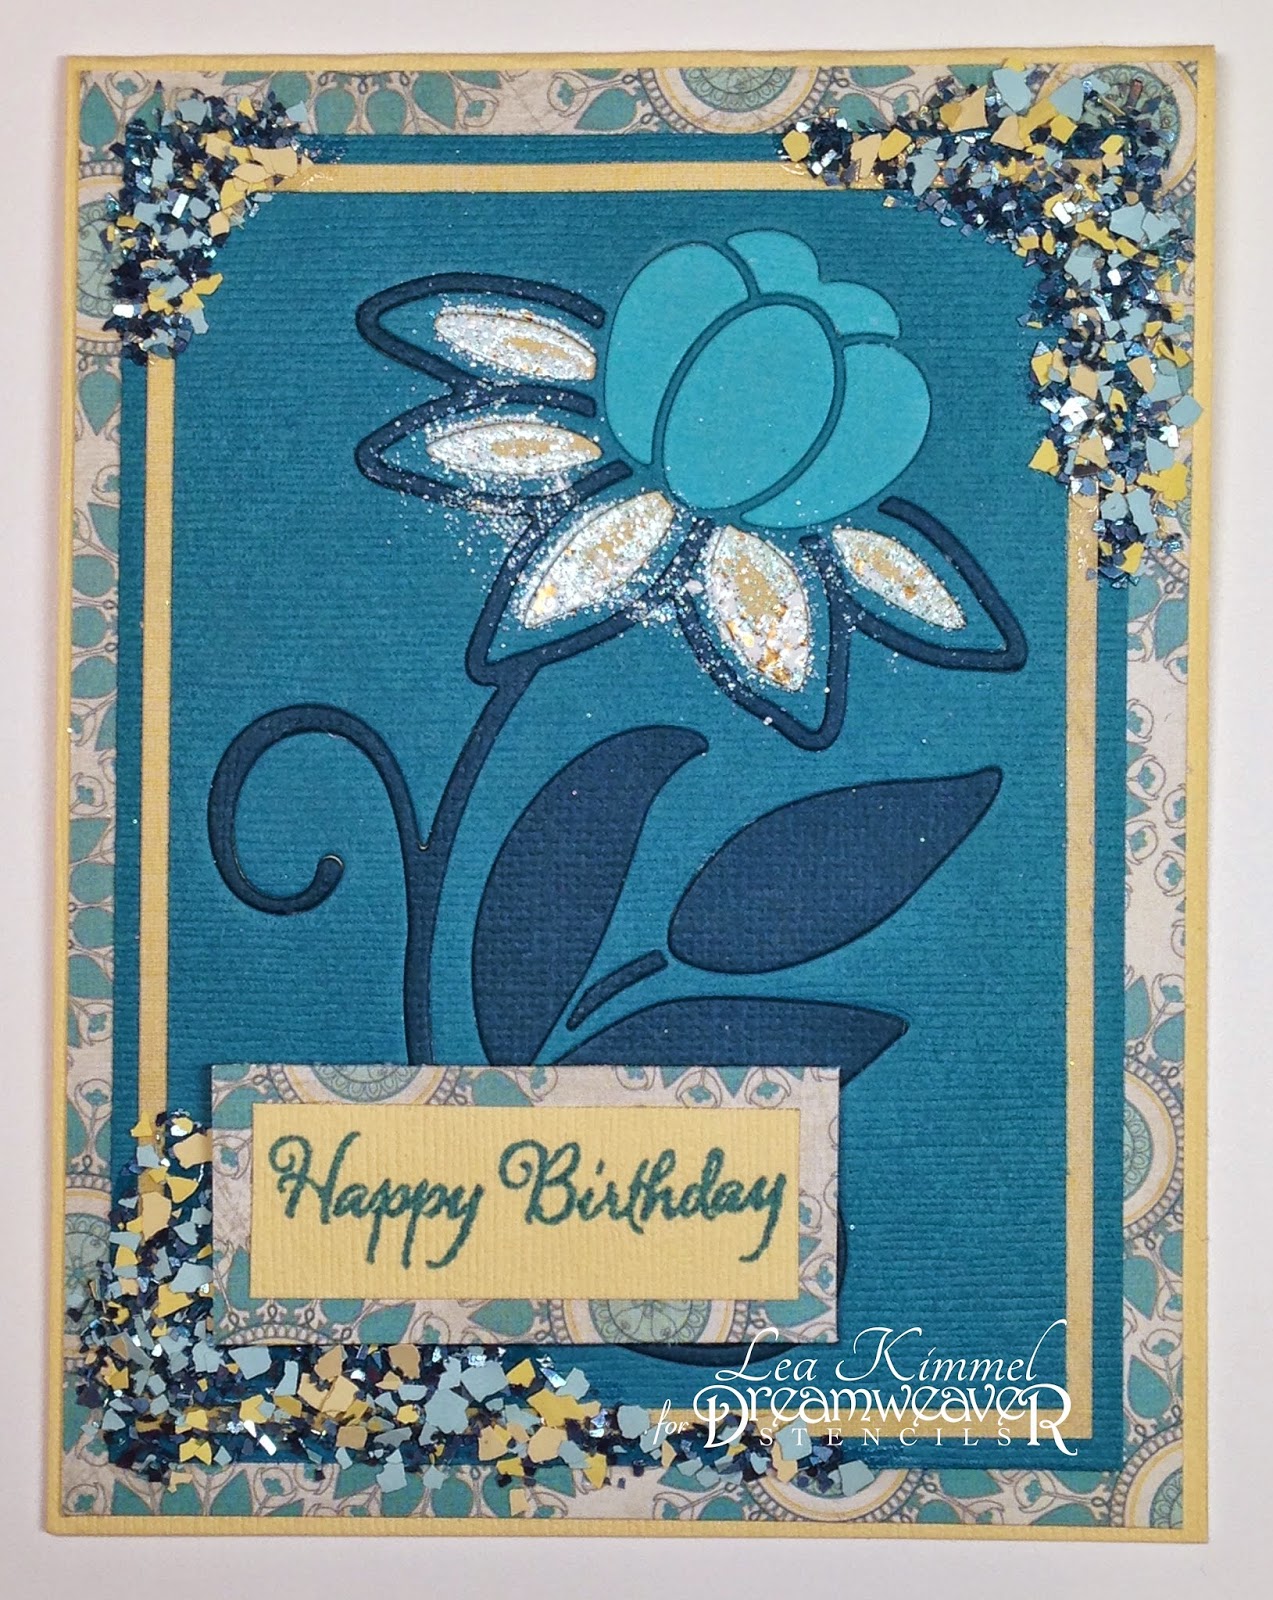
Happy Birthday to You!

Welcome to the birth of a new year...2015 to be precise! In honor of that, we've decided that our monthly challenge for January will be Birthday Wishes.  More precisely, today's post is in honor of Lynell's birthday!  So, Lynell, SURPRISE!  HAPPY BIRTHDAY!!  We'd love for you to play along with us, and link your creations to the Inlinkz tool at the bottom of this post, or on the Dream It Up! blog, for a chance to win the stencil of your choice...and remember, using Dreamweaver products gets you bonus points towards an extra stencil!

Here's my birthday wish for this week:


If I remember correctly, aqua/teal is one of Lynell's favorite colors so that's the primary color used on this card.  I sure hope I'm right!  LOL!  If not, well, it's still a lovely color!

Here's what I used to create this card:

Memento™ Teal Zeal Ink by Tsukineko®
My Mind's Eye™ Indie Chic™ "Nutmeg" 6x6 Paper Pad
3-in-1 Glue by Beacon Adhesives
3L Scrapbook Adhesives 3D Foam Squares

Here's what I did to create this card:

Die cut flower from three different shades of aqua/teal cardstock, light, medium and dark
Trim the cardstock around the medium-tone cs as this will be your base for the flower
Trim a piece of yellow cardstock to go behind the flower base
Adhere the aqua flower base to the yellow piece
Inlay the darker and lighter shaded pieces as shown
Add watermark ink to the inside of lower petals and add embossing enamel, tap off extra and return to jar 
Heat enamel from below with heat gun
Create an A2 card base with a tent fold from yellow cardstock
Trim patterned paper to fit card base
Create an aqua mat to go under the flower layers (this really pops it off the patterned paper visually)
Using a scrap of the yellow cardstock, stamp sentiment and trim closely
Using a scrap of the patterned paper, create a mat for the sentiment and adhere the two layers
Adhere the patterned paper to the card base
Adhere the matted flower layers to the card base
Attach the matted sentiment to the card 
Mix together the glitter and fragments and adhere to the card as shown

That's it for me!  Of course, there's more birthday inspirations coming your way from the Dream Team, be sure to leave some love along the way:

Lynell, I hope you have the happiest of birthdays!!  Happy New Year to everyone!  Here's to many blessings throughout the new year.  Thanks for stopping by and I'll see you again soon!

Hugs,
Lea