Showing posts with label Michaels Recollections. Show all posts

Friday, January 2, 2015

Do You Want to Build a Snowman?

Heeheehee!  I simply could not resist that title!  Are you tired of hearing that yet?  I hope not because I have three adorable snowmen to share with you on one card and a gorgeous giant glittery gold snowflake on another.  That's right!  I have two cards for your viewing pleasure today!  The theme this past week for Stampendous has been snowmen, snowflakes, all things related to that fluffy white stuff!  Here's my first card:


Here's what I used to create this card:

Cardstock by Bazill Basics Paper®
Jolly Holiday Paper Pad by Recollections
Copic® Markers (B0000, B000, B00, B01, YR61, YR65, YR68, YG00, YG01, YG03, BG53, BG57, V12, V15, V17, BV08, BV11, BV13, BV17, RV52, RV55, RV66, R02, R05, R08, B32, B34, B37, C3, C6, C7,C9, E31, E33, E34, E35, E37)
Zip Dry™ Paper Glue by Beacon Adhesives

Here's what I did to create this card:

Stamp image and color, trim to desired size
Create standard A2 card base with a tent fold and create a mat for the image from the same paper
Trim patterned papers as shown
Add spoonful of snow to trimmed image and heat from underneath, shake off loose bits after heating
Adhere all layers as shown

And, for card number two!  I absolutely adore how this card turned out.  I think it's gorgeous!  There's a certain elegance about it that I love.  


Here's what I used to create this card:

Neenah® Classic Crest™ Natural White Cover Stock
Echo Park® Everybody Loves Christmas "Snowman" 12x12 Paper
Blue Metallic Cardstock of Unknown Origin (Sorry!)
May Arts Ribbon® Twine
Zip Dry™ Paper Glue by Beacon® Adhesives

Here's what I did to create this card:

First I created an A2 card base with a tent fold in the natural white cover stock
I trimmed my patterned paper to fit with a thin edge of the card base showing
I trimmed a piece of the metallic paper to the desired size, determined the area I wanted cut and then die cut my snowflake
Using temporary adhesive, I adhered the metallic paper to the patterned paper and stamped my snowflake through the die cut piece with the VersaMark™ ink
I removed the blue metallic paper, added my embossing powder and heat embossed the snowflake
I took a small scrap of the the natural white paper and stamped my sentiment and embossed it in the same manner as the snowflake then punched a hole in one end
Next I adhered the blue metallic paper to the patterned paper and added my twine and the sentiment by tying a simple bow
Finally, I adhere everything to the card base

Such a simple yet elegant card!  I hope you've enjoyed both cards today and, boy, are they on the different ends of the style spectrum!  The first being fun and the second being almost graceful in it's style.

Thanks for stopping by today.  I'll see you again soon with more inspiration from me to you!  Have a wonderful day!

Hugs, 
Lea

Wednesday, March 12, 2014

It's Wicked Wednesday...

...and you know what that means!  Time for another Wicked Wednesday ATC Blog Challenge!  This week our sponsor is Sami Stamps and we've got the cutest little image, Leprechaun Cutie, as we celebrate Leprechauns and Luck!  Here's my ATC:


Here's what I used to create this ATC:

Sami Stamps Leprechaun Cutie Digital Stamp
Copic Markers:  YG03, 05, 09, 11, 13, 17; YR12, 14, 16, 18, 21, 23; E08, 50, 51, 53, 93
A Muse Sentiment - Sunshine & Laughter
Bazzill Cardstock
Bo Bunny Mint Dot Cardstock
Bo Bunny Wasabi Dot Cardstock
Neenah Classic Crest Solar White Cover Stock
Memento Tuxedo Black Ink Pad
Memory Box Shamrock Die
Recollections Adhesive Rhinestones - Greens
Scor-Tape
Glue Dots
Foam Mounting Squares

Here's what you need to do to recreate this card:

Print image off and color with Copic markers, trim to desired size
Create ATC base from Bazzill
Trim Mint Dot paper as shown
Stamp sentiment with black ink on Neenah and trim to desired size
Create a mat for the sentiment using Bazzill
Cut out shamrocks with Wasabi Dot paper
Adhere all layers as shown
Using glue dots, attach shamrocks as shown
Using foam mounting squares, attach matted sentiment to ATC
Add rhinestones

This was super easy and so much fun to create!  Since it fits, I think I'm going to enter it into the Sami Stamps Challenge!  So, be sure to enter your ATC in the Wicked Wednesday challenge and if it fits, enter it in Sami's challenge, too!  Thanks for stopping by and I'll see you again soon!  Take care and have a blessed day!

Hugs,
Lea


Thursday, January 23, 2014

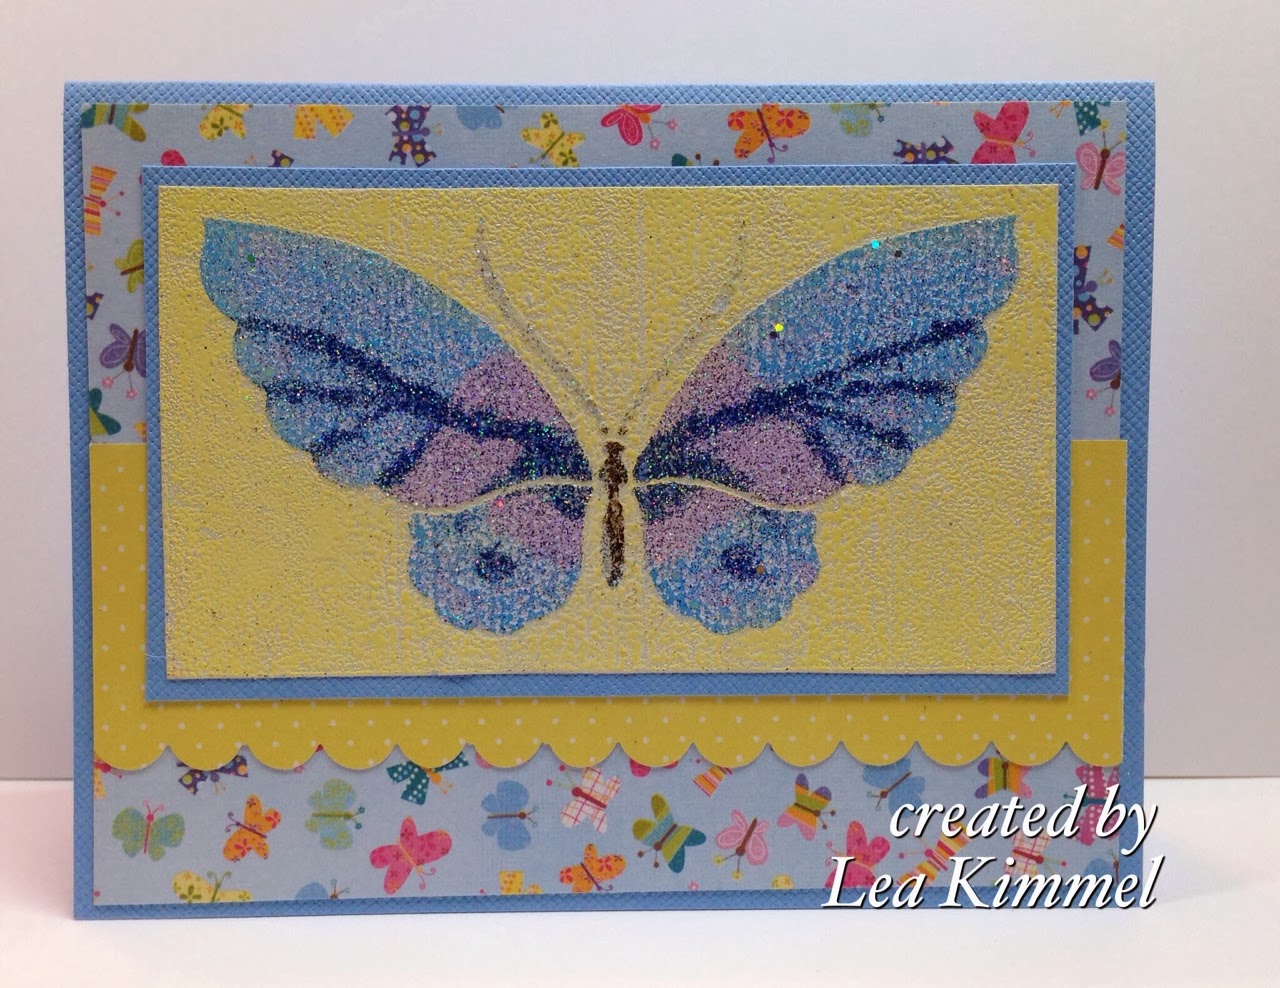
Zen Butterfly

Hello, crafty friends!  It's a new year and we've had a new challenge at Dreamweaver Stencils, Clean and Simple or Lose the Weight!  I have to admit, I like to keep most of my cards relatively simple anyway so it really wasn't too hard for me to play along with this challenge.  This is one of our fantastic new stencils, Zen Butterfly, LL 3037,  and I absolutely love it!  I think it's gorgeous and could even be used to create lovely fairy wings if you were so inclined.


The technique I used to create this card used embossing powders on double-sided sticky paper.  It's a fun technique and gives you the chance to be a little creative with the placement of your powders.  I used Recollections Embossing Powders that can be purchased at Michaels.  I would give you more details but my craft studio is in the basement and I've just had knee surgery and can't make it down to my studio just now to retrieve the information.  My apologies for this!  I'll come back and update when I can access my room!


Here's another angle to try to show you how sparkly my lovely embossing powders are!

Here's the list of my teammates that have more projects for your viewing pleasure:

Lea Kimmel (me)

Thanks for stopping by today and I'll see you again soon!  

Hugs,
Lea


Friday, December 27, 2013

Brrrr....

Baby it's cold outside!  That's okay, though!  Stampendous® has some great stamps that are sure to warm your heart!  Just look at how sweet this little Snow Girl is!  She can be found exclusively at Michaels but don't wait too long, she's so cute she's sure to go fast!


For this card I used these products:

Stampendous!® Snow Girl
Michaels Recollections™ Jolly Holiday 6x6 Paper Pad
Bazzill® Green Cardstock
Neenah Classic Crest® Solar White
Copic® Markers
Memento™ Tuxedo Black
Tim Holtz™ Distress™ Ink in Tumbled Glass
Offray® Grosgrain Ribbon
Zip Dry™ Adhesive

To create this card, here's what you do:

Stamp the image on white cs, color, trim to desired size, add distress ink
Create card base with a tent fold
Trim patterned papers as shown
Create bow, wrap tails around blue patterned paper and adhere
Adhere all layers

This was a super easy card to create, I hope you like it.  She's such a cute Snow Girl!  Thanks for stopping by today and I'll see you again soon!

Hugs,
Lea


Monday, December 23, 2013

It's Almost Christmas

Here's a really quick post to share a cute stamp from Stampendous!® that is sold exclusively at Michaels called Christmas Tree Penguin.  I love the look on his face.  It's almost like he's had one cup too many of espresso!  LOL!  He's totally adorable!


For this card I used these items:

Stampendous!® Christmas Tree Penguin
Michaels Recollections™ Jolly Holiday 6x6 Paper Pad
Bazzill® Purple Cardstock
Neenah® Classic Crest™ Solar White
Memento™ Tuxedo Black
Copic® Markers
Tim Holtz™ Distress™ Ink in Tumbled Glass
Zip Dry™ Adhesive

Here's how I created the card:

Stamp image, color and trim to desired size
Add distress ink around top and sides
Create card base with a tent fold
Trim patterned papers as shown
Using a craft knife, trim around top of middle tree
Adhere image to patterned paper and slide under tree that was cut away
Adhere all layers
Add glue and Shaved Ice, allow to dry and shake off excess to return to jar

This is just a quick share.  I hope you enjoy it!  Merry Christmas!

Hugs,
Lea


Wednesday, December 11, 2013

Snow Much Fun...

...with Stampendous® Stamps and Clearsnap®!  That's right, Stampendous® has teamed up with Clearsnap® this week to showcase their wonderful inks and other fantastic products with our awesome stamps.  Here's the card I've created for today's post using their very blendable chalk inks:


Here's what you need to create this card:

Bazzill® Card Stock
Neenah® Classic Crest™ in Solar White
Michaels Recollections™ Jolly Holiday 6x6 Paper Pad
Spellbinders® Snowflake Die
May Arts® Twine
Ranger Inkssentials™ Cut-N-Dry™ Pen Nibs (Brush)
3L® Scrapbook Adhesives™ MyStik™ Permanent

Here's how I created this card:

Stamp image with ColorBox® Pigment Ink in Black, add Stampendous® Detail Embossing Powder in
Black and heat emboss
Using Inkssentials™ Cut-N-Dry™ Pen Nibs, color in image with chalk inks
Trim image to desired size
Stamp snowflakes on background of image
Create card base with tent fold
Trim patterned papers as shown
Adhere image to patterned papers
Wrap twine from May Arts® around patterned paper as shown and adhere to card base
Die cut Spellbinders® Snowflake die with white card stock
Cover snowflake with Smooch® in Silver Fox and when it dries, pat Ice Blue chalk ink over it
Attach snowflake to twine

This was a super easy card to create but it's totally adorable!  I love these penguins!  I hope you'll check back on Friday for my next Clearsnap® and Stampendous® project!  Have a great day!

Hugs,
Lea


Wednesday, December 4, 2013

Nativity Carol

This set includes a beautiful nativity scene to warm your heart straight from Stampendous® and sold exclusively at Michaels!  The background carol and the sentiment are also included.  This is one of my favorite cards I've created this year as I love the simplicity of it.  I love how it puts the focus of the Season right where it belongs, on the birth of Christ, rather than on how many presents you can gift or get.


This was truly one of the fastest cards I created this year, too!  There wasn't much to putting it together, here's what I did:

Stamp the carol on white cs with Memento™ London Fog, trim closely on the two sides and the top, leave about 3/4" of white space at the bottom (I used gray ink to soften the background visually)
Using Stampendous® Boss Gloss™, ink the Nativity stamp and stamp at bottom center of carol image
Using Stampendous® Detail Black embossing powder, sprinkle liberally onto stamped image, tap off excess powder and heat emboss
Stamp the sentiment in Memento™ London Fog and trim to desired size
Create the card base and the mat for the stamped image as well as the sentiment from red Bazzill®
Adhere stamped images to mats with Zip Dry™
Trim patterned paper from Recollections™ Christmas 6x6 pad to fit 6x6 card base with a 1/16" edge
Trim a piece of red seam binding, wrap around bottom of patterned paper and adhere to card base
Using Zip Dry, adhere matted main image to card base
Using foam mounting square, attach sentiment to bottom center of card over the red seam binding

Supplies and tools needed to complete this card:

Stampendous® Nativity Carol Stamp Set (Exclusive to Michaels)
Stampendous® Boss Gloss™
Stampendous® Detail Black Embossing Powder
Memento™ London Fog Ink Pad
Bazzill® in Red
White Card Stock
Recollections™ Christmas 6x6 Pad
Beacon Adhesive® Zip Dry™
Red Seam Binding (or any red ribbon)
Foam Mounting Squares

Thanks for stopping by today!  I hope you've enjoyed my card and maybe it's given you a bit of inspiration for creating your own holiday cards.  I'll see you again soon!

Hugs,
Lea

Tuesday, December 3, 2013

Angels Are Among Us!

And, some of the cutest angels can be found at Michaels for Stampendous® Stamps!  This little cutie is part of a set that's sold exclusively at Michaels this year.  The sentiment and background stamp are also part of the same set.  Here's my card:


 Here's how you can make your own:


Create your card base with Bazzill® red card stock
Trim green patterned paper small enough to leave a 1/8” edge of red showing
Ink scroll work stamp with Boss Gloss™, stamp twice on green paper, add silver ep and heat emboss
Stamp image on white card stock and color with Copic® markers
Trim stamped image closely and edge with Iced Spruce distress ink
Stamp sentiment stamp using Boss Gloss™, add silver ep and heat emboss
Cut out sentiment with Spellbinders® circle die, edge with Iced Spruce distress ink™
Add white ribbon across middle of green paper and adhere on back side
Adhere green paper to red card base
Trim a mat of patterned paper for stamped image and adhere the image to the mat
Adhere matted image to card base
Using foam mounting dots, adhere sentiment to lower right corner of card base

Here's the list of supplies and tools I used:


Stampendous® Angel Stamp Set
Stampendous® Boss Gloss™
Recollections™ Silver Detail Embossing Powder
Bazzill® Red Card stock
My Mind’s Eye® ‘Tis The Season 6x6 Designer Paper Pad
White Card stock
Zip Dry Adhesive™
Pop Dots
Tim Holtz® Distress Ink™ in Iced Spruce
Spellbinders® Circle Die Cuts
Offray® White Satin Ribbon 5/8”
Copic® Markers
E40, 41, 50, 51, 53, 93; YG03; R24, 27; BG0000, 000, 70, 72; B0000; C00, 0, 1
0 (Colorless Blender)
Paper Trimmer
Heat Embossing Tool
Color Duster Brush

Cuttlebug Die Cutting Machine

That's it for today, I'll have another project for you tomorrow.  Thanks for stopping by!

Hugs,
Lea