Showing posts with label #Strathmore. Show all posts

Wednesday, October 24, 2018

Halloween Day 24


Welcome to Day 24 of the Stampendous 31 Days of Halloween!  The Stampendous Design Team loves Halloween and we love to share our creations, however, we also love to see what you make with our stamps.  Look below for instructions on how to play along with us, you just might win a prize!

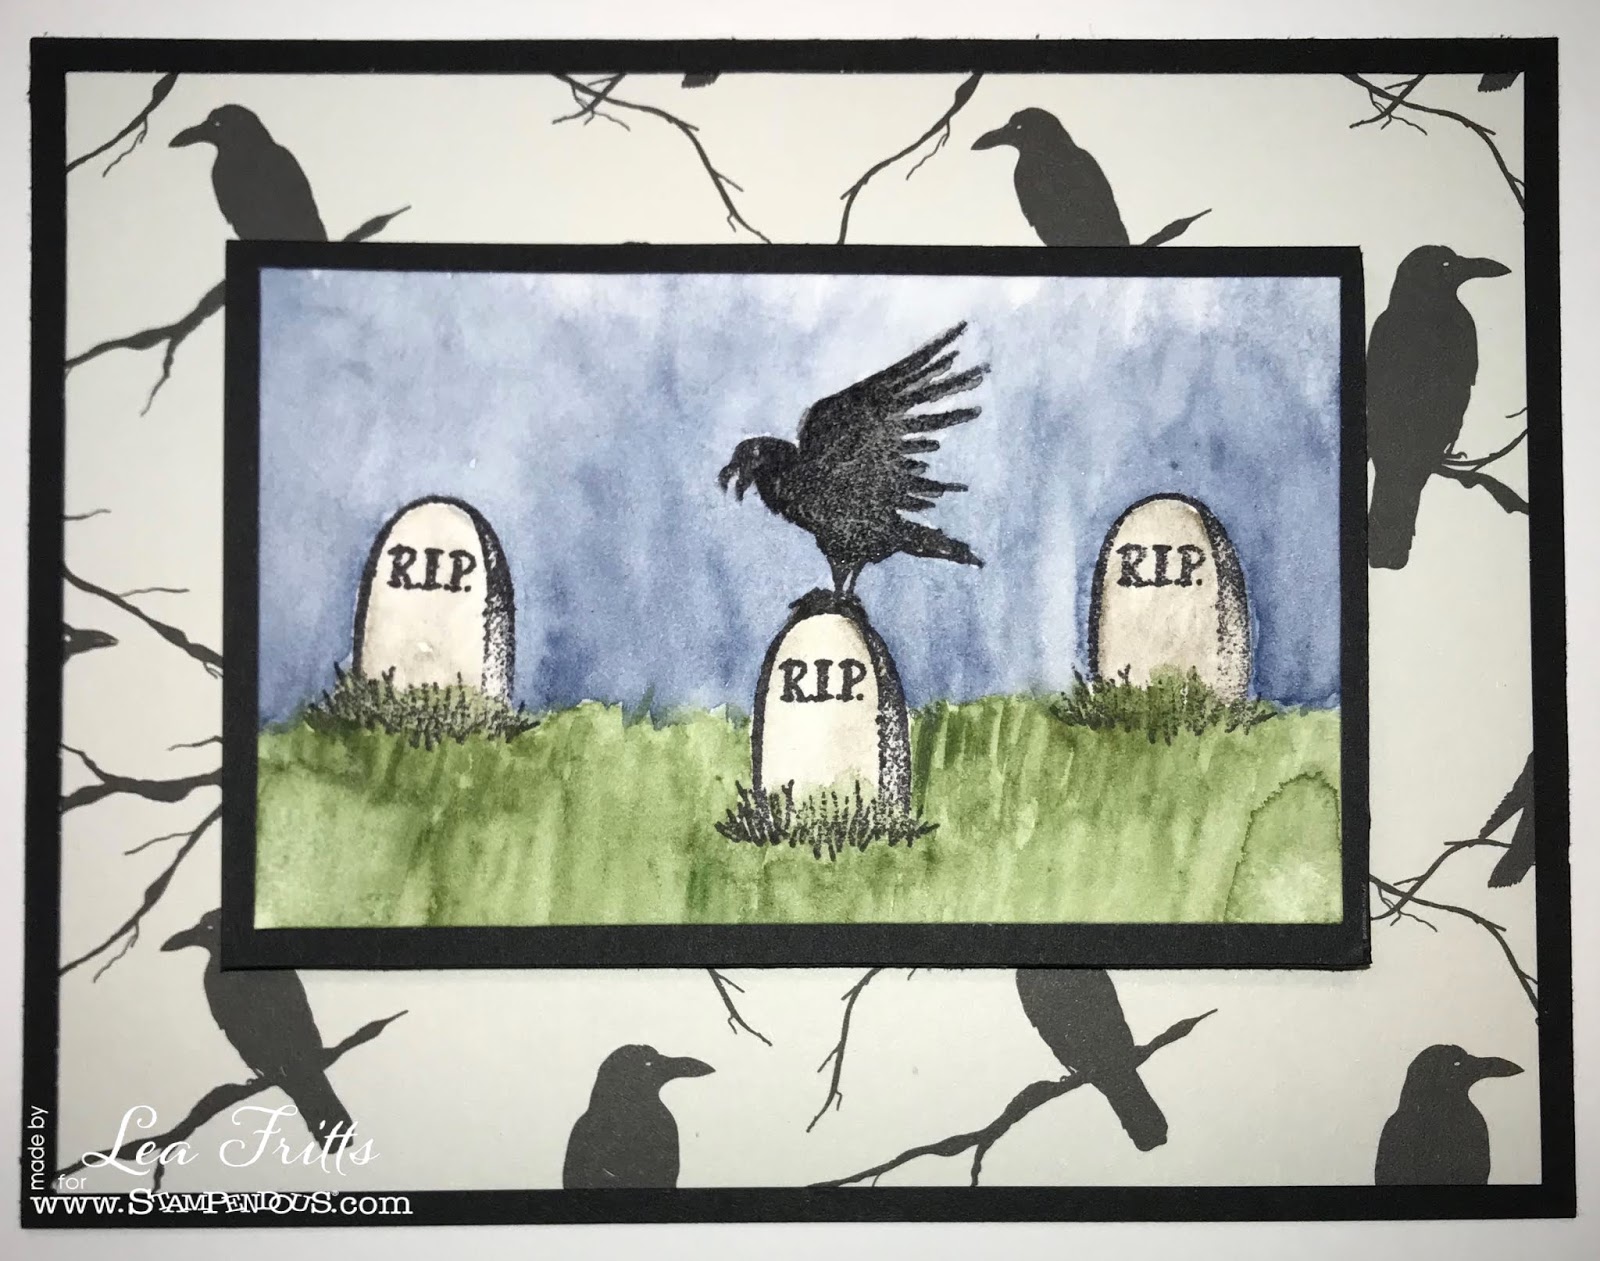
For my card today, I've used Batty Cat Cling Set and the little mouse from Skeleton Humor Perfectly Clear Stamps Set.  I decided the mouse made the perfect little friend for the the adorable Batty Cat!


Here's what I used to create this card:

Stampendous Products:


Other Products:

Black Cardstock
love Nicole™ dark shadows paper pad
E-Z Runner® by Scrapbook Adhesives™
Kuretake Gansai Tambi Watercolors
Archival Ink™ Jet Black Ink Pad by Ranger®
Archival Ink™ Shadow Grey Ink Pad by Ranger®
Strathmore® Watercolor Paper Pad


We’ve got two groups of prizes we’ll be giving away. First, you can comment on our blog and those of our designers, and we’ll randomly choose winners each week to win some Halloween product love. Second, you can enter your own creation in our Challenge Link.  It will be at the bottom of every post and in our sidebar.  It looks like this:


Click here to link your project
To enter, your project needs to be online somewhere, blog, flickr, Instagram, Pinterest, etc. Just click on the picture or words above to enter the link. If you can’t make a link to your project, email it to submissions@stampendous.com and we’ll host it for you. We will choose a winner each week from the links, winners must have a US mailing address to win, but anyone can share their projects with us.
Thanks so much for stopping by!  I'll keep an eye out for you!
Creeping it real,
Lea

Friday, October 19, 2018

Halloween Day 19


Welcome to Day 19 of the Stampendous 31 Days of Halloween!  The Stampendous Design Team loves Halloween and we love to share our creations, however, we also love to see what you make with our stamps.  Look below for instructions on how to play along with us, you just might win a prize!

For my card today, I've used one of my favorite new Halloween stamp sets, Skeleton Humor Perfectly Clear Stamps Set.   Yep, it's another card that I was inspired to create when I was flipping through the patterned paper pad.  I love how this one turned out, simple and kinda creepy!


Here's what I used to create this card:

Stampendous Products:


Other Products:

Black Cardstock
love Nicole™ dark shadows paper pad
Strathmore® Watercolor Paper Pad
3D Foam Squares by Scrapbook Adhesives®
E-Z Runner® by Scrapbook Adhesives™
Kuretake Gansai Tambi Watercolors
Archival Ink™ Jet Black Ink Pad by Ranger®
We’ve got two groups of prizes we’ll be giving away. First, you can comment on our blog and those of our designers, and we’ll randomly choose winners each week to win some Halloween product love.  Second, you can enter your own creation in our Challenge Link.  It will be at the bottom of every post and in our sidebar.  It looks like this:


Click here to link your project
To enter, your project needs to be online somewhere, blog, flickr, Instagram, Pinterest, etc. Just click on the picture or words above to enter the link. If you can’t make a link to your project, email it to submissions@stampendous.com and we’ll host it for you. We will choose a winner each week from the links, winners must have a US mailing address to win, but anyone can share their projects with us.
Thanks so much for stopping by!  I'll see you again soon!  
Creeping it real,
Lea

Wednesday, December 6, 2017

Winter White

My Stampendous Winter White is really more like a case of Moody Winter Blues!  I don’t know about you, but I love the Moody Blues and I was listening to their music this weekend.  It really puts me in a relaxed creative mindset.  I love this stamp and die set!  It’s so convenient to have both in one set!  Even though I didn’t use one of the sentiments that comes with the set, it does have some great ones you can check out here.


Here’s what I used to create this card:

Dylusions™ Ink Spray in London Blue, Bubblegum Pink and After Midnight
Delicata™ Silvery Shimmer Ink Pad by Tsukineko®
Strathmore® Watercolor Paper
Purple Cardstock by Bazzill Basics Paper®
Zip Dry™ Paper Glue by Beacon
3D Foam Squares by Scrapbook Adhesives®

Here’s what I did to create this card:
  1. Trim watercolor paper to desired size
  2. Spray inks onto watercolor paper, allow to dry
  3. Stamp snowflakes randomly onto inked paper with silver ink
  4. Stamp largest snowflake onto purple cardstock and die cut
  5. Adhere ribbon to stamped paper as shown
  6. Trim a piece of purple cardstock for card base with a tent fold
  7. Adhere stamped piece to base and add snowflake with foam squares

Thanks so much for stopping by today.  I do apologize for my post being tardy, however, I'm having internet connection problems at home.  Thankfully they're coming in the morning to try to fix whatever is going on.  Keeping my fingers and toes crossed!  See you again on Friday!

Hugs,

Lea

Monday, July 31, 2017

Summery Sister Sun

It's the last day of July and I thought it would be fun to create a card with my favorite Tsukineko® inks for the Imagine Color Challenge that ends today.  Yeah, I kind of procrastinated on this one since I lost all of my ink pads in my house fire.  Good friends and teammates had kindly provided me with some new pads, but, alas, there were no yellows!  So, I had to force myself to go shopping and buy some yellow pads.  I'm sure you know how difficult that was! Bwahahahahaha!  The challenge color is yellow, a happy color that warms my soul!  Something else that warms my soul, Stampendous® Stamps!  It just seemed right to combine my favorite Tsukineko® inks with my favorite stamps.  So, without further ado, here's my card made with Stampendous® Laurel Burch Sister Sun and Scrolled Sunshine:


Here's a close-up showing some of the glittery goodness from the Delicata™ Golden Glitz pad:

Here's what I used to create this card:

Metallic Gold Prismacolor® Pencil
Strathmore® Watercolor Paper
Pebbles Family Ties Paper Pad
Blue Cardstock by Love Nicole™
E-Z Runner® by Scrapbook Adhesives™
3D Foam Squares by Scrapbook Adhesives®

Here's what I did to create this card:

Using the Delicata™ Golden Glitz ink pad, I stamped the sun onto watercolor paper and trimmed to the size I wanted for my card.
I pressed some ink from all three Memento™ pads onto an acrylic block to use as my palette.
With a watercolor brush, I picked up ink from the block and watercolored the image, blending colors as needed.
Once the image was completed, I went back over some of the detail with a metallic gold pencil to define the features and lines that had lightened in the watercoloring process.
I edged the stamped image with the gold ink and set it aside to completely dry.
I stamped the sentiment onto a scrap of the watercolor paper, first in the Delicata™ Golden Glitz and then with the VersaFine™ Onyx Black, which created a bit of a drop shadow effect.  
I trimmed the sentiment down, watercolored the background and edged it with gold ink.
I created a 5" x 5" card base with a tent fold from blue cardstock and then created mats for my sentiment and my main image from the same cardstock.
I trimmed my patterned paper for the background and then layered all the pieces together as shown.  
I used thin foam squares to attach the sentiment and, card complete!

I hope you enjoyed your visit today and I'll see you again soon!  In the meantime, enjoy your summer days, and, if you're in the southern hemisphere, may you dream of warm summer days ahead.

Hugs,
Lea


Tuesday, December 13, 2016

Happy, Happy Birthday, Laura!

Today is a special day!  Today is Laura's birthday!  "Laura who?" you might ask.  Well, allow me to tell you!  Laura is our friend as well as the fearless leader of the Stampendous Design Team, she's lovingly referred to as our Fairy Stampmother and, bless her heart, she has to herd the lot of us creatives!  She wears many other hats at Stampendous, but, for me, she wears a crown.  


Happy Birthday, Laura!!


Here's what I used to create this card:

Archival Ink in Jet Black by Ranger®
Derwent® Inktense™ Pencils
Strathmore® Mixed Media Paper
Ruby Red Cardstock by Bazzill Basics Paper®
E-Z Runner® by Scrapbook Adhesives®

Here's a list of my team mates that are hopping with us:


Laura, I hope you have a wonderfully happy birthday with many more!  Love you bunches!

Hugs,
Lea

Friday, May 6, 2016

Stampendous and Whisker Graphics


Today is the last day of the Stampendous and Whisker Graphics blog hop.  I hope you’ve  enjoyed the mix of Whisker Graphics goodies with stamps, stencils and Essentials. It’s a perfect ingredient list for party decor and gifts, right?  

For my project today, I’ve used Cling Daisy Mix once again, this time in honor of Mother’s Day.  I’ve created a very simple card along with a sweet gift bag.  I love the end result and I hope you do, too!


Here’s what I used to create this card and tag:

StāzOn™ Jet Black Ink Pad by Tsukineko®/Imagine Crafts®
Memento™ Tuxedo Black Ink Pad by Tsukineko®/Imagine Crafts®
Spectrum Aqua™ Markers - Peacock Blue, Heather, Moss, Bud Green, Sunflower
Yellow Cardstock by Bazzill Basics Paper®
Little Yellow Bicycle® Hello Spring 6”x6” Paper Pad
Strathmore® Mixed Media Paper
E-Z Runner® from Scrapbook Adhesives® by 3L™
3D Foam Mounting Squares from Scrapbook Adhesives® by 3L™

Here’s what I did to create this card and bag:

Stamp 4 flowers onto mixed media paper, watercolor and die cut.
Trim a piece of patterned paper to 4” x 5 1/4”.
Create an A2 card base with a tent fold from yellow cardstock.
Adhere patterned paper to card base.
Add foam squares to backs of three flowers and adhere to card.
Add adhesive to leaves and adhere to card front.
Create a bow from twine and adhere to card front.
Stamp the word Mom onto end of tag with black ink.
Fold top of bag over and punch two holes in the middle of folded section.
Trim a piece of twine and thread through holes, then thread one end through hole on tag, tie a bow.
Adhere leaves to back side of flower and then attach the flower with a foam square to tag.

Some of our lucky commenters during the hop will want to have a party of their own because there are PRIZES! All you need to do to be entered is comment on the blog posts for hop with Whisker Graphics and winners are randomly selected and announced Monday, May 9th.


Three prize packages consisting of one each –

  Divine Twine Diva – Crushed Lavender Solid
Divine Twine Diva – Crushed Lavender Stripe
Divine Twine Diva – Dried Celadon Solid
Divine Twine Diva – Dried Celadon Stripe
An assortment of bags in a variety of sizes and patterns
Winners choice of a Stampendous Cling Rubber Stamp Set and Matching Dies (from available stock)

These three winners MUST have a US mailing address (or territories or military). See Official Contest RulesBut wait! Additionally, we will give away one prize to an Australian winner courtesy of our distributor – The Stencil Specialist – which will consist of distributor’s choice of one stamp, one stencil and a surprise goodie.

Here are the designers participating in the hop today and then stop on over at Whisker Graphics!

Lea Fritts (me!)

Thanks so much for stopping by today.  I hope you've enjoyed our hop, I know I had fun creating my projects to share with you.  Don't forget to leave a comment if you want to be eligible to win a prize.  Have a wonderful weekend.  I'll be back next week with more projects to share!

Hugs,

Lea

Thursday, May 5, 2016

The Twine is Divine


The Stampendous DT is having a great time with Whisker Graphics this week, enjoying the mix of Whisker Graphics goodies with stamps, stencils and Essentials. It’s a perfect ingredient list for party decor and gifts, right?  

For my project today, everything’s coming up daisies!  I’ve had this idea in my head since our supplies arrived, I’m so glad it’s finally out.  Now I have room for something new!  LOL!


Here’s what I used to create this card and tag:

Copic® Markers - Y00, Y02, Y06, Y08, B0000, B12
Spectrum Aqua™ Markers - Peacock Blue, Meadow, Moss
Yellow Cardstock by Bazzill Basics Paper®
Strathmore® Mixed Media Paper
E-Z Runner® from Scrapbook Adhesives® by 3L™
3D Foam Mounting Squares from Scrapbook Adhesives® by 3L™
Glue Pen from Tombow®

Here’s what I did to create this card and tag:

Stamp 3 flowers, color and die cut.
Trim a piece of mixed media paper to 4” x 5 1/4”.
Add some ink from blue aqua marker onto an acrylic block, using a water brush, pick up ink and brush onto paper.
Add ink from yellow aqua marker and green aqua marker onto acrylic block, mix and paint onto paper.
Create an A2 card base with a tent fold from yellow cardstock.
Adhere painted paper to card base.
Trim two pieces of solid twine to use as flower stems, using glue pen, adhere to card front.
Add foam squares to backs of two flowers and adhere to card.
Paint the front of the tag in the same manner as the card front.
Trim a piece of solid twine for flower stem on tag and adhere with glue pen.
Using a foam square, mount flower to front of tag.
Create a tassel from striped twine and add to tag.
Card is ready to go inside of bag and tag is ready to adhere to front of bag!

Some of our lucky commenters during the hop will want to have a party of their own because there are PRIZES! All you need to do to be entered is comment on the blog posts for hop with Whisker Graphics and winners are randomly selected and announced Monday, May 9th.


Three prize packages consisting of one each –

  Divine Twine Diva – Crushed Lavender Solid
Divine Twine Diva – Crushed Lavender Stripe
Divine Twine Diva – Dried Celadon Solid
Divine Twine Diva – Dried Celadon Stripe
An assortment of bags in a variety of sizes and patterns
Winners choice of a Stampendous Cling Rubber Stamp Set and Matching Dies (from available stock)

These three winners MUST have a US mailing address (or territories or military). See Official Contest RulesBut wait! Additionally, we will give away one prize to an Australian winner courtesy of our distributor – The Stencil Specialist – which will consist of distributor’s choice of one stamp, one stencil and a surprise goodie.

Here are the designers participating in the hop today and then stop on over at Whisker Graphics!


Thanks so much for stopping by today.  I’ll have another post for you tomorrow so please stop back by and have a look.  Enjoy the rest of your day!

Hugs,

Lea

Friday, April 29, 2016

Elegant Elephant


Today’s the last day of the Stampendous blog hop showcasing our stamps designed by Nathalie Kalbach, mixed media artist extraordinaire.  For the January release this year, Nat designed 3 new and innovative mixed media sets that include a 2-sided foam stamp, a cling rubber stamp and a coordinating stencil, all of which create great options for the paper crafter and mixed media artist.  

For today’s project, I’ve used Elephant.  My daughter, Erin, loves elephants and this project is for her.  I’m going to have it framed so she can hang it in her bedroom.


Here’s what I’ve used for this project:

Delicata™ Gold Glitz Ink Pad by Tsukineko®/Imagine Crafts®
VersaMark™ Watermark Stamp Pad by Tsukineko®/Imagine Crafts®
Memento™ Tangelo Ink Pad by Tsukineko®/Imagine Crafts®
Memento™ Love Letter Ink Pad by Tsukineko®/Imagine Crafts®
VersaMarker™ Watermark Pen by Tsukineko®/Imagine Crafts®
Memories Mist™ in Fruit Punch, Mango Lemonade, Pink Lemonade, Cherry Smoothie and  Bright Gold
Strathmore® Mixed Media Paper
Zip Dry™ Paper Glue by Beacon Adhesives

Here’s what I did for this project:

Trim mixed media paper to 8” x 8”.
Spritz paper with fruit punch, pink lemonade, mango lemonade and cherry smoothie mists.
Using stencil from Elephant set, spritz with bright gold mist, move and repeat as desired.
Using damask stencil, sponge on Golden Glitz ink in random areas.
Ink stamp from Mish Mesh set with Love Letter ink and stamp randomly.
Ink stamp from Wired set (retired) with Tangelo ink and stamp randomly.
Using VersaMark ink pad, stamp border, add embossing powder and heat.
On a separate piece of mixed media paper, stamp elephant, add embossing powder and heat.
Using VersaMarker pen, add ink inside embossed elephant, add embossing powder and heat.
Cut out elephant and adhere to inked and stamped piece.

Here’s a list of my teammates playing along today:

Lea Fritts (me!)

One of the things I love about embossing the elephant twice, you get the great texture from the design but you have full coverage with the gold embossing powder.  I think this is going to look amazing framed!


We are mixing it up for three commenters during the hop. Each prize package includes all three of Nathalie Kalbach’s Foam, Cling Rubber and Stencil Stamp sets. But WAIT! This is open to everyone!  Comment on each blog post at Stampendous and that of each designer’s post on the hop this week. We’ll announce winners on Monday May 2nd.

Thanks so much for stopping by!  I'll be posting this weekend if you want to come back by and check it out.  See you soon!

Hugs,
Lea