Showing posts with label VersaMark. Show all posts

Friday, September 4, 2015

Fast and Easy Christmas Cards

Hello!  We meet again!  Today I have a another Stampendous post featuring our "All in One" stamps. I chose to showcase two stamps, Love Was Born and Santa Paws, with two cards each.  These are fast and easy Christmas cards, perfect for when you have a larger number to create.  Each card took less than 10 minutes to create.  When time is limited, why not keep it simple!  Plus, I've used two of our  new powders, Real Red Opaque Embossing Powder and Rose Gold Fran•táge Specialty Embossing Enamel.

Here's all four cards!


Here's what I used to create this card:  


Recollections® Holly Day Wishes 6x6 Paper Pad
Kraft Cardstock
May Arts Ribbon®
Zip Dry™ Paper Glue by Beacon Adhesives
3D Foam Mounting Squares by 3L®

Here's what I did to create this card:

Stamp image with VersaMark™ ink pad, add embossing powder, tap off excess powder and heat image
Trim embossed image close to edge
Create an A2 card base with a tent fold
Trim patterned paper to fit as shown
Cut a piece of ribbon to fit across
Wrap ends of ribbon around to back of patterned paper and adhere
Adhere layer of patterned paper to card base
Using foam mounting squares, attach embossed image to card front


Here's what I used to create this card:

My Mind's Eye® 'Tis the Season 6x6 Designer Paper Pad
Parakeet Cardstock by Bazzill Basics Paper®
May Arts Ribbon®
Zip Dry™ Paper Glue by Beacon Adhesives
3D Foam Mounting Squares by 3L®

Here's what I did to create this card:

Stamp image with VersaMark™ ink pad, add embossing powder, tap off excess powder and heat image
Trim embossed image close to edge
Create an A2 card base with a tent fold
Trim patterned paper to fit as shown
Cut a piece of ribbon to fit across
Wrap ends of ribbon around to back of patterned paper and adhere
Adhere layer of patterned paper to card base
Using foam mounting squares, attach embossed image to card front


Here's what I used to create this card:

Crate Paper™ Bundled Up 6x6 Paper Pad
Peach Cardstock by Bazzill Basics Paper®
May Arts Ribbon®
Zip Dry™ Paper Glue by Beacon Adhesives
3D Foam Mounting Squares by 3L®

Here's what I did to create this card:

Stamp image with VersaMark™ ink pad, add embossing enamel, tap off excess powder and heat image
Trim embossed image close to edge
Create an A2 card base with a tent fold
Trim patterned paper to fit as shown
Cut a piece of ribbon to fit across
Wrap ends of ribbon around to back of patterned paper and adhere
Adhere layer of patterned paper to card base
Using foam mounting squares, attach embossed image to card front

This card is going into The Color Throwdown Challenge #358!

Here's what I used to create this card:

Pebbles™ Family Ties 6x6 Designer Paper Pad
Blue Cardstock by Bazzill Basics Paper®
May Arts Ribbon®
Zip Dry™ Paper Glue by Beacon Adhesives
3D Foam Mounting Squares by 3L®

Here's what I did to create this card:

Stamp image with VersaMark™ ink pad, add embossing powder, tap off excess powder and heat image
Trim embossed image close to edge
Create an A2 card base with a tent fold
Trim patterned paper to fit as shown
Cut a piece of ribbon to drop from top and dove-tail bottom end as shown, attach to card front
Wrap end of ribbon around to back of patterned paper and adhere
Adhere layers of patterned paper to card base
Using foam mounting squares, attach embossed image to card front

Here's a list of my teammates that are playing along today:


Thanks for stopping by today!  Hope you enjoyed my fast and easy Christmas cards and maybe they've inspired you to make some of your own!  Have a great Labor Day weekend for those of you in the U.S.A.!

Hugs,
Lea


Friday, January 2, 2015

Do You Want to Build a Snowman?

Heeheehee!  I simply could not resist that title!  Are you tired of hearing that yet?  I hope not because I have three adorable snowmen to share with you on one card and a gorgeous giant glittery gold snowflake on another.  That's right!  I have two cards for your viewing pleasure today!  The theme this past week for Stampendous has been snowmen, snowflakes, all things related to that fluffy white stuff!  Here's my first card:


Here's what I used to create this card:

Cardstock by Bazill Basics Paper®
Jolly Holiday Paper Pad by Recollections
Copic® Markers (B0000, B000, B00, B01, YR61, YR65, YR68, YG00, YG01, YG03, BG53, BG57, V12, V15, V17, BV08, BV11, BV13, BV17, RV52, RV55, RV66, R02, R05, R08, B32, B34, B37, C3, C6, C7,C9, E31, E33, E34, E35, E37)
Zip Dry™ Paper Glue by Beacon Adhesives

Here's what I did to create this card:

Stamp image and color, trim to desired size
Create standard A2 card base with a tent fold and create a mat for the image from the same paper
Trim patterned papers as shown
Add spoonful of snow to trimmed image and heat from underneath, shake off loose bits after heating
Adhere all layers as shown

And, for card number two!  I absolutely adore how this card turned out.  I think it's gorgeous!  There's a certain elegance about it that I love.  


Here's what I used to create this card:

Neenah® Classic Crest™ Natural White Cover Stock
Echo Park® Everybody Loves Christmas "Snowman" 12x12 Paper
Blue Metallic Cardstock of Unknown Origin (Sorry!)
May Arts Ribbon® Twine
Zip Dry™ Paper Glue by Beacon® Adhesives

Here's what I did to create this card:

First I created an A2 card base with a tent fold in the natural white cover stock
I trimmed my patterned paper to fit with a thin edge of the card base showing
I trimmed a piece of the metallic paper to the desired size, determined the area I wanted cut and then die cut my snowflake
Using temporary adhesive, I adhered the metallic paper to the patterned paper and stamped my snowflake through the die cut piece with the VersaMark™ ink
I removed the blue metallic paper, added my embossing powder and heat embossed the snowflake
I took a small scrap of the the natural white paper and stamped my sentiment and embossed it in the same manner as the snowflake then punched a hole in one end
Next I adhered the blue metallic paper to the patterned paper and added my twine and the sentiment by tying a simple bow
Finally, I adhere everything to the card base

Such a simple yet elegant card!  I hope you've enjoyed both cards today and, boy, are they on the different ends of the style spectrum!  The first being fun and the second being almost graceful in it's style.

Thanks for stopping by today.  I'll see you again soon with more inspiration from me to you!  Have a wonderful day!

Hugs, 
Lea

Friday, December 12, 2014

Art Anthology Hop

Today is the last day of our hop with our new friends at Art Anthology! We are in love with their cool paints and sprays, they’re just the perfect combo for the great mixed media projects our Stampendous Design Team has been making!
There are three amazing prize packages this week consisting of a Stampendous Creative Palette Monoprinting Plate, a $20 Stampendous Reward Card to spend on the Stampendous website, an Art Anthology Stencil, and one each Dimensional CrystalColorations Spray, and Dimensional Paint from Art Anthology (colors are random). Wow!! Now that’s something to slip under the tree for yourself! (PLUS – a little reindeer told us that Art Anthology will be giving away EVEN MORE paints and goodies over on their blog!!)
AND we’re celebrating the man in red! He’s checking the harnesses for those magic reindeer! It would sure be great if you found this prize package under your tree, wouldn’t it??!! Our Art Anthology hop has featured Santa in many posts this week. We’ve been the hardest working Design Team in show business!!  Thanks for joining us for some great fun and inspiration this week, oh, and a chance to win one of the great prizes!  Have you been leaving comments along the way?  
My card from yesterday was definitely NOT Christmas or winter themed so today's card is all about winter!  Here's my project:


Here's what I used to create this card:

Stampendous® Snowflake Tree Rubber Stamp
Stampendous® Chunky White Embossing Enamel
VersaMark™ Watermark Ink Pad by Tsukineko®
Art Anthology Sorbet Dimensional Paint - Buttercream
Art Anthology Dimensional Crystal Glaze - Mermaid
Art Anthology Colorations Spray - Grape Soda
Liquitex® Professional Acrylic Ink - Transparent Burnt Umber
Strathmore® Mixed Media Paper
Turquoise and Brown Cardstock by Bazzill Basics Paper™ 
Ranger® Archival Ink - Coffee
Ranger® Archival Ink - Aquamarine
Zip Dry™ Paper Glue by Beacon® Adhesives

Here's what I did to create this card:

  1. Stamp tree onto mixed media paper with coffee ink and another with aquamarine ink
  2. Mix Mermaid glaze with a bit of Grape Soda spray to create a slightly more blue color and paint a sky for the background
  3. Mix Buttercream paint with a bit of Grape Soda spray along with a tiny amount of burnt umber ink to create a brown paint and go over main trunk of tree to darken it
  4. Trim painted piece to card size
  5. Cut out snowflake circles from aquamarine tree and edge each circle with aquamarine ink
  6. Adhere circles to corresponding circles on painted tree
  7. Rub VersaMark pad across bottom of trimmed piece, add chunky white embossing enamel and heat from underneath until enamel melts
  8. Trim brown cardstock as a mat for stamped and painted image
  9. Create an A-2 card base with a tent fold
  10. Adhere all layers as shown


This was probably one of the fastest cards I've ever created!  I love the simple design.  It's really neat how easily the various paints, glazes and sprays mix together and expand your color repertoire.  All it takes is some very basic color mixing.  I do want to say that I absolutely love the shimmer in these paints.  They're truly very lovely!  Here's the rest of the team's links for today:

Stampendous Blog

Jamie Martin

Kristine Reynolds

Lea Kimmel (me!)

Asia King

Janelle Stollfus

Pam Hornschu

Wendy Price

Amy Hurley-Purdie

Tenia Nelson

Art Anthology Blog


Thanks so much for stopping by today.  I hope you found plenty of inspiration this week and left comments along the way; you might just win a prize!  I'll see you again soon.  Have a wonderful day!

Hugs,
Lea


Tuesday, November 26, 2013

Sleigh Bells Ring...

...are you listenin'?  In the lane, snow is glistenin'.  It's glistening on my card, too, while these adorable penguins have a little downhill fun!  This set is called Penguin Sleigh from Stampendous and available for purchase exclusively at Michaels.  Here's my card:


Here are the steps I used to create this card:

Stamp image with Memento onto white card stock and color with Copics
Cut red Bazzill for card base and tent fold
Trim patterned paper  leaving 1/8” edge and adhere to Bazzill
Using VersaMarker, color circles on sleigh, add Lavender Tinsel EP and heat
Trim image closely, trim blue patterned paper to create a mat with an 1/8” edge and adhere colored image to mat
Stamp sentiment with Memento onto white card stock and trim closely
Stamp snowflakes over sentiment using Boss Gloss, add Crystal EP and heat
Create a mat for sentiment and adhere sentiment to mat
Adhere matted main image to card base
Adhere matted sentiment to card base

Spread Zip Dry on corner of paper beneath sleigh, sprinkle on Shaved Ice and allow to dry

Here's the list of products and tools I used:

Stampendous® Penguin Sleigh
Recollections® Lavender Tinsel Embossing Powder
Recollections® Crystal Tinsel Embossing Powder
Stampendous® Shaved Ice
Recollections® Jolly Holiday 6x6 Paper Pad
Bazzill® (Red)
Memento® Tuxedo Black Ink Pad
White Card Stock
Stampendous® Boss Gloss™
VersaMarker™ Pen
Copic® Markers:
R81, 83, 85, 35, 37, 39
G12, 14, 16
BG000, 01
YG01, 03
V12, 15, 17
YR12, 14, 16, 21, 23
E23, 25, 27, 29
C1, 5, 6, 7, 9,
0 (Colorless Blender)
Zip Dry™ Adhesive
Heat Embossing Tool
Paper Trimmer

Hope you like my card for today and I'll have more posts this week, so please stop back by!  Thanks for taking a peek today!  See you soon!

Hugs,
Lea


Friday, August 2, 2013

Hopping the day away...

...it's Friday Hop Day!  Woohoo!


It's fun in the sun time again with another collaboration between Stampendous and Dreamweaver Stencils! We'll be playing together all of this week, with a fabulous hop on Friday, August 2nd, featuring a slew of amazing talent from both teams, and of course...prizes!!!

Two prize packages will be given away for the comments left on posts Monday-Thursday, July 29th - August 1st, and one prize will be given away for comments left on the hop day, Friday, August 2nd. Winners will be selected randomly and announced Thursday, August 8th. (Note: USA addresses only, please, due to shipping costs.) Here's what you could win:

Stampendous Surfer and Sandcastle Kiddos • Dreamweaver Hot Air Balloon, Ice Cream Cones, Summer, Mosaic Swirls, Bird Words, and Sandcastle stencils


 Here's what I created:


I love summertime weddings!  I decided to go for a more simple yet (hopefully) elegant look today!  I used Dreamweaver Stencil LL3034 Your Wedding and pasted it with matte black embossing paste.  Once dry I cut it out with a Spellbinder die and set it aside.  I trimmed a piece of white cardstock to the size I wanted and using Stampendous Zinnia stamp, I stamped it randomly on the cs with my Boss Gloss ink.  Next I heat embossed it with Kaleidoscope Embossing Powder and set it aside.  I used my VersaMark marker to highlight just part of the flourishes on my stenciled piece, then added Kaleidoscop EP on it and quickly heated it being careful not to bubble my paste.  Once that was done I created my card base from black cardstock, added a bit of May Arts silk ribbon to my white panel and adhered the two.  Using some pop dots, I attached my sentiment and, voila!, a simple card for that special couple getting married!  I added the two close-up photos so you can, hopefully, see the sparkle!  This is so pretty in real life and the pictures never seem to capture the true beauty of the sparkle!

Now, hop on over to the next in line. Don't forget to leave some love for a chance to win, and just 'cuz it's nice!


Thanks so much for joining those of us at Stampendous and Dreamweaver for this week long collaboration.  I hope you've enjoyed it and been inspired along the way. I appreciate all the wonderful comments you've left this past week, it's heartwarming to read them and know you've enjoyed my work.   I'll have more projects for you soon so be sure to check back in next week.  See you soon!

Hugs,
Lea

Friday, June 21, 2013

Yay! It's Blog Hop Friday!

Yay!  It's Blog Hop Friday!  After so much inspiration this week, are you feeling a little etch-y?  Those of us at Stampendous have sure had fun and we hope you have too!  Armour Etch is a really cool product and, I know I said this yesterday, but, it's so easy to use!  Here's the official link to show you how simple it is!  I'm sure I'll buy more to create some gifts for Christmas. If you're interested, you can buy some, too, here!  For today I created a votive holder using Cling Zinnia and a glass holder I purchased at the Dollar Tree.  I had already stamped the image with VersaMark onto the glass and embossed it with Copper embossing powder when I realized it would be nice to have photos showing the process.  So, the next best thing is to start the photos from the point where I've stamped, embossed, and edged with Contact paper, here goes:


Embossed, edges sealed and ready to etch!


In the pan waiting for etching cream!


Applying the etching cream!


 A nice thick coat of etching cream and the time is set for 6 minutes!


Time to rinse off the etching cream and peel off the embossing powder to unveil the design!


Glass is etched in all the right places but the detail in the center of the flower was lost.


In order to fill in the center part of the flower, I added some Zip Dry adhesive and then added some fun glitters and mica fragments, all from Stampendous!


Here it is all lit up!  I think it's kinda pretty! 

So this is my project, now check out the inspiration from the rest of the team:

Lea Kimmel (me!)
Go check out their projects, comment on their blogs, and you could win some etching supplies yourself! Remember to tell us in your comment where in the U.S. you’re writing from, only U.S. mailing addresses eligible to win due to the properties of the product.  Thanks for stopping by and I'll see you again soon!

Hugs,
Lea

Saturday, November 10, 2012

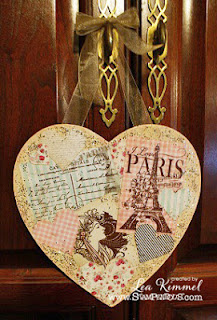
I {heart} Fast Finish!

Really!  I love this stuff and you will, too!  It's so easy to use and just like the name says, it's F-A-S-T!


I went to Michael's earlier this week and picked up this really cool wooden heart.  I've been wanting to create some decorative wall items for my shabby chic-styled craft room.  I'm fortunate to be one of those people that can pick something up and an idea instantly pops into my head as what I can do with it.  Well, as soon as I saw this heart, I knew what I wanted to do!  First, I stamped these images and embossed them with Clear Bark embossing powder on a Lost and Found 6x6 paper pad from My Mind's Eye.


  I used Stampendous images Deco Lady, I Love Paris, and Carte Postale.  I loved the vintage feel of these stamps and knew they would be great together.  (I added a tiny bit of pink and green to Deco Lady with my Copics!)

After stamping and embossing the images on the papers I picked out, I set about doing the background of my heart.  First I covered it with Tim Holtz distress ink in Antique Linen, then added accents in Spun Sugar.  Next I covered it with a thin coat of Distress crackle paint in Picket Fence.   While waiting for the crackle paint to dry, I used my Spellbinder heart and scalloped heart dies and cut out a few hearts using scraps from the paper I stamped my images on.  When the paint dried, I laid the stamped images and hearts out and found a layout I was happy with.  I did end up tweaking it just a little!


Next up was adding the Beacon Fast Finish Decoupage adhesive.  Let me tell you, I love how quick and easy this adhesive works!  I let the first coating dry, added a little more around the edges and sprinkled some chunky glass glitter around the edges for a little vintage sparkle!  For a finishing touch, I added some ribbon and bow to hang it with.   Here's a close-up.


I'm so pleased with how this project turned out and I hope I've inspired you to try this product for yourself.  I'm sure you'll love it just as much as I do!

These are the team members playing along today, so be sure to visit all of the blogs and leave some insightful, kind comments (the kind that let us know you looked at the project) and we'll give some great prizes, sending some of you with U.S. mailing addresses some Fast Finish Decoupage Medium and some Stampendous Stamps. Here we go...
Lea Kimmel (me!)

Thanks for stopping by and I'll see you again soon!  Have a blessed day!

Hugs,
Lea

Sunday, November 4, 2012

Meow-ry Christmas!

Who wouldn't want this cute little Christmas Kitten from Stampendous for Christmas?  I actually have a cat and a kitten that look just like the one on this stamp, Louie and Cleo.  That makes this stamp extra special for me.

And here's the whole card:


I stamped Christmas Kitten with Memento Tuxedo Black, colored it with Copics and die cut it with Spellbinders Label 17.  I inked the edges of my kitten image with Tim Holtz Distress Ink in Tea Dye and then softened that with some Distress Ink in Antique Linen.  My card base is Bazzill and the patterned paper is from DCWV The Four Seasons Stack.  I stamped Christmas Background from Stampendous on a piece of Neenah using my VersaMark pad, I embossed it with Detail Gold embossing powder from Stampendous, inked it with Tim Holtz Distress Ink in a mix of Tea Dye and Antique Linen and cut it to fit in the red stripe of the patterned paper.  Instead of doing the usual ribbon, I thought it would be fun to do a row of small buttons as an accent that I've attached with Mini Glue Dots. Using foam dots, I mounted the kitten on the front and now it's a happy Christmas Kitten! Meow, meow, meee-ow!

That's it for today, I hope you've enjoyed my card.  See you again soon!

Hugs,
Lea

Saturday, October 13, 2012

Core'dinations Comes Calling

Eeeekk!  It's Mumeek!  And, he's surrounded by some seriously goofy Jack-O-Lantern friends.  As I'm sure you already know, there's a blog collaboration between Stampendous and Core'dinations this week and we've have a great time playing with their paper and they've played with our stamps!  It's been a win/win for all!  Speaking of winning, if you comment on my blog, you're entered to win a prize.  If you don't comment, you won't win.  You should have landed here from Kristine's blog.  And here's my card:


I'm going to show you the card in two different lighting situations, this is because of the embossing powder I used and I want you to get the full effect.


Do you see the difference?  Isn't that embossing powder just yummy!?  Here's an even closer look:


I love this embossing powder!  This was so much fun to do.  My Core'dinations papers, both from the Tim Holtz Distressed Collection, are Black Soot and Spiced Marmalade.  That's right!  Core'dinations has a great collection of papers in most of the Tim Holtz Distress Ink colors.  This makes it so easy to coordinate your paper and ink.  Anyway, I took my piece of Black Soot and ran it through my Cuttlebug using a Cuttlebug folder of Jack-O-Lanterns.  Rather than using the embossed side of the paper, I used the debossed side, inked the inside of each Jack-O-Lantern with my VersaMark pen and then embossed with Carnelian Pearluster embossing powder from Stampendous.  Next, I used the Versamark pen inside the leaves and pumpkin stems and embossed with Jade Pearluster embossing powder also from Stampendous.  Once they were all embossed on the debossed side (still following?), I set about doing some light sanding.  The sanding is much more noticeable in the first picture.  I attached this piece to my Spiced Marmalade card base and added my ribbon and bow.  I set this aside and stamped my image on Neenah, colored it with Copics and then added some Tim Holtz distress ink in Black Soot to the edges.  I layered my image on a smaller mat of the Spiced Marmalade and attached it to my card base with pop-dots.  And there you have it!

Here's the complete blog hop list in case you've lost your way or are just starting with my blog.  If you splashed down here from Kristine, then your next stop is at Mary Dawn's blog.  Don't forget to comment if you want a chance to win a prize.

Lea Kimmel (that's me!)

Thanks for stopping by and I hope to see you again soon!  Hope you all have a wonderful weekend!

Hugs,
Lea

Monday, July 23, 2012

Who's New?

Steampunk Owl!  That's who!  What's new?  Tons of cool stamps at Stampendous!  Yay!  This week those of us on the design team are sharing a few of our newest stamps with you just to whet your appetite and leave you wanting more.  Hmmm...almost mean, huh?  I said almost! 

I'm so excited about this release that I'm going to do a first, I'm going to offer up some secret surprise blog candy.  Now, here's the deal, in order for you to be eligible for MY blog candy, you need to comment on at least three of my posts this week.  No comments, no candy!  Stampendous is offering up daily prizes but you have to comment to be eligible for those too.

So, without further ado, here's my card for today:


This is the new Cling Steampunk Owl, isn't he absolutely owl-some!?  I love this image and if you're an owl fan, I'm sure you will too!  I stamped him in Memento's Rich Cocoa on Bazzill and colored him in with Copics.  Using my VersaMark pad I also stamped some watch and clock faces from Time Flies and Steampunk Gears and embossed the images with clear EP.  I layered my image piece on black Bazzill and added those layers to  my base of Bazzill and patterned papers from KaiserCraft (the black and gray) and Graphic 45 (the clocks).  Next I threw on a little Fran•táge with a mix of Aged Taupe, Aged Copper and Chunky Black embossing enamels along with a smidge of Tea Stained Mica Fragments.  A simple card, but, oh so fun to create!  Here's another view that shows the Fran•táge elements a little better:


So, just to recap, if you want to be entered for my blog candy, you know what to do!  If you want to be entered to win the daily prize from Stampendous, well, you have to comment to be eligible for that too!  A few of my teammates are showing off new products from Stampendous as well!  Some of them have their own blog candy, too. Stampendous will be drawing a winner for this great prize pack.


One more time, how do you win it? It's easy! One of the featured bloggers today will be choosing a random commenter from her blog, and that lucky person will be announced on the Stampendous blog tomorrow. The more places you leave a comment, the better your chances are to win! Below is the list of team members who are sharing inspiration today:

Stampendous Impressions
Cyndi Bundy (has additonal blog candy)
Kristine Reynolds
Jennifer Dove
Taylor Usry (has additional blog candy)
Jan Garber
Wendy Jordan
Lea Kimmel (that's me!)
Rhea Weigand
Wendy Price

Leave us some love and you might just be a winner!  Be sure to check back tomorrow for another awesome image that's sure to be a treat!

Hugs,
Lea