Showing posts with label Tombow. Show all posts

Friday, September 11, 2015

How Do You Create Christmas?

Hello!  The Stampendous Design Team is sharing cards this week on how we Create Christmas, well, the cards and paper crafts anyway!  My card today is a very simple with a bit of a mixed media style. I've used products from companies that we collaborate or partner with yearly, including Tombow, Faber-Castell and Tsukineko.  Each of the companies listed below has been so very generous with our team and I sure appreciate their generosity!


Here's what I used to create this card:

Memento™ Tuxedo Black Ink Pad by Tsukineko®
Tombow® Recycled Color Pencils:  03, Yellow;  04, Chrome Yellow;  05, Yellow Ochre;  32, Vandyke Brown;  10, Deep Green
Faber-Castell® PITT Artist Pen, White - 101
Radiant Neon® #71 Electric Yellow Pigment Ink Refill by Tsukineko®
Radiant Neon® Amplify™ White by Tsukineko®
Blue Cardstock by Bazzill Basics Paper®
Zip Dry™ Paper Glue by Beacon Adhesives


Here's what I did to create this card:

Stamp tree and star on white paper, color and die cut
Add Amplify™ to tree and heat
Create an A2 card base with a tent fold from blue cardstock
Using white PITT pen, add "snow" to bottom of card front
Lay star face down, squirt out a small drop of yellow ink and using a small paintbrush, spread ink around star on card front
Remove star from card front and fill in star with additional ink and create "tails"
Adhere star to card front
Put a small amount of glue on finger tip, swipe across bottom of card in a few places and add glitter
Adhere tree to card front

I had fun creating snow on the tree with Amplify™ from Tsukineko!  I love the texture it adds and it's incredibly easy to use.  Would love to know what you think about how it looks, too!  Here's the rest of the team playing along today:


Thanks so much for stopping by today!  I'll see you again next week with more stamping inspiration. Have a wonderful weekend!

Hugs,
Lea

Friday, March 27, 2015

Bear-y Happy Birthday!

We have a different sort of collaboration for you!


At Stampendous we’re very excited to be able to offer our products in many countries around the world. We’re able to do this thanks to our terrific distributors in those countries who help retail stores to stock our products. In the UK we have a very long and valued partnership with Woodware Craft Collection. These wonderful folks stock almost all of our products, and they even stock several classic items that have retired from our store here in the US. They also stock almost all of our new Dreamweaver Stencils line, so we thought it would be another great event to celebrate the addition of Dreamweaver to the Stampendous family.

This week we’re going to celebrate with the awesome Woodware Design Team and the Dreamweaver Stencils Dream Team as we showcase some of the the great Stampendous and Dreamweaver Stencils products that Woodware makes available to the UK market. This is good news for our crafty friends in the UK because we’ll be offering prizes and our UK friends are eligible to win!! We’ll be offering three prizes in the UK and three in the US. Each prize package will consist of Nathalie Kalbach’s terrific Grunge Mixed Media Cling Rubber Stamp Sets and the beautiful Zen Butterfly Dreamweaver Stencil! Both products are ideal for adding texture and backgrounds to your projects!  Deadline to comment is Sunday, March 29th, Pacific Time. Winners will be picked using random.org and announced Tuesday, March 31st, in the afternoon.

And that’s our theme!! Making Texture. We hope you’ll enjoy the wonderful inspiration that three talented teams will bring you this week! Be sure to visit all the blog links listed and leave your comments! Each comment will count as an entry towards one of the terrific prize packages.  Here's the first of my two projects for today:


Here's what I used to create this card:


Stampendous® Gruffies® Balloon Bear
Stampendous® Happy Greetings Perfectly Clear™ Stamp Set
Stampendous® Jumbo Perfectly Clear™ Acrylic Handle
Cardstock by Bazill Basics Paper®
Memento™ Rich Cocoa Ink by Tsukineko®
Classic Crest™ Solar White Cover Stock by Neenah®
Snips and Snails 6×6 Paper Pad by Doodlebug Design Inc™
Party Day 6×6 Paper Pad by Crate Paper™
Tim Holtz® Antique Linen Distress Ink by Ranger®
Copic® Markers (C0; E42, E42, E44, E47, E49, E93, E95; G40, G43; Y18, Y21)

Zip Dry™ Paper Glue by Beacon Adhesives

Here's what I did to create this card:


1. Stamp image and color, trim image to desired size.
2. Ink edges with distress ink.
3. Trim patterned papers as shown.
4. Create card base.
5. Stamp sentiment, trim and add distress ink.
6. Cut out party hat from patterned paper to embellish and adhere to sentiment.
7. Trim a mat from patterned paper for the sentiment.
8. Adhere all layers as shown.

And, here's my second project today with plenty of texture for your tactile enjoyment!  If only you could reach through the internet and feel the canvas!  I've named this piece "Nathalie's Garden" since it's made using all stamps from our friendly artist, Nathalie Kalbach.


Here's a couple of close ups:


Here's what I used to create this canvas:

Tim Holtz® Tumbled Glass Distress Ink
Tim Holtz® Peeled Paint Distress Ink
Beacon 3-in-1 Advanced Craft Glue
11"x13" Canvas Panel 

Here's what I did to create this canvas:


  1. Using VersaMark Ink, stamp each "flower" stamp one type/color at a time, add embossing powder, tap off excess and heat
  2. Repeat the same process for applying the "leaves"
  3. Take VersaMarker and draw lines to apply embossing powder for "stems"
  4. Using a craft mat, scribble ink from Tombow markers onto mat, pick up color with a baby wipe and apply within "flower," repeat this process until each flower is colored
  5. Apply distress ink with a brush for sky and grass
  6. Adhere various glitters and color fragments that correspond with flower color as shown

Here's a list of all of the designer’s sharing their projects today:


Lea Kimmel (me)


Thanks so much for stopping by!  I've had a lot of fun creating my projects for you this week.  I hope you've found some inspiration here!  Have a wonderful weekend and I'll see you again next week.

Hugs,
Lea

Friday, March 6, 2015

Home Sweet Home

This week Stampendous has been showcasing our cute new house stamps.  I've used the Family Home Perfectly Clear Stamps Set for my card today and it's just an incredibly cute set with great sentiments!  You can see for yourself here!  Here's my card:


Here's what I used to create this card:

Tim Holtz® Distress Ink in Tumbled Glass, Peeled Paint and Shabby Shutters
African Daisy Yellow Cardstock by Bazzill Basics Paper®
Neenah® Classic Crest™ Solar White Cover Stock
May Arts® Black Grosgrain Ribbon
Gelly Roll White Gel Pen
Beacon® 3-in-1 Craft Adhesive
Tombow Mono Adhesive Temporary Adhesive
Scrapbook Adhesives® 3D Foam Mounting Squares

Here's what I did to create this card:

Stamp images, color with markers and trim to fit on an A2 card base
Create a horizontal A2 card base with a tent fold with yellow cs
Stamp an additional set of images, cut out to create a mask for each image
Using temporary adhesive, cover each image and add distress inks for grass and sky
Trim a piece of black ribbon and add white lines to create a "road"
Adhere ribbon across image panel as shown
Stamp sentiment on white cs and trim as shown
Create a mat for sentiment with yellow cs and adhere the two 
Adhere main image to card base
Attach sentiment as shown

I love the clean and simple look of this card and the bright, happy colors.  I'm pretty much in love with my ribbon road, too!  Thanks for stopping by today, I'll see you again soon.  In the meantime, have a wonderful day!

Hugs,
Lea

Friday, October 31, 2014

Who?

One of my favorite new Stampendous stamps this year is the PenPattern Owl.  I have a thing for owls and I'm so pleased that they have become popular again in the design world.  There's just something about the big round eyes that I can't resist!


This is what I used to create this canvas:

P230 PenPattern Owl
Memento™ Tuxedo Black Ink by Tsukineko®
Solar White Classic Crest™ Cover Stock by Neenah®
Leafless Tree Stencil by Dreamweaver Stencils©
Canvas Board 4×6 by Artist’s Loft™
After Midnight, Slate Grey, & Lemon Zest Dylusion’s™ Sprays
1 3/8″ Circle Punch by EK Success®
Removeable Adhesive by Tombow®
Weathered Wood, Faded Jeans, Stormy Sky, Tumbled Glass, Broken China, Aged Mahogany, Worn Lipstick, Barn Door, Fired Brick, Victorian Velvet, Spun Sugar, Peeled Paint, Forest Moss, Shabby Shutters, Wild Honey, Vintage Photo, Tea Dye, Dried Marigold, Tattered Rose, Rusty Hinge, Spiced Marmalade, Chipped Sapphire, Dusty Concord, Milled Lavender, Mustard Seed, Scattered Straw, & Black Soot Distress Markers™ by Ranger®
Zip Dry™ Paper Glue by Beacon Adhesives®
Q-tips™
Cosmetic Sponge
This is what I did to create this canvas:
  • Stamp image onto canvas and onto paper.
  • Cut out stamped image on paper to create a mask.
  • Punch circle to create a mask for the moon.
  • Add removable adhesive to both masks and place owl mask over owl and circle mask in upper right corner of canvas.
  • Spritz on blue and gray sprays and mix with fingertips onto canvas, heat with heat gun to dry.
  • Remove mask for moon and dip a q-tip in yellow spray and apply to canvas, be sure to slightly extend into blue/gray to create a halo around the moon.
  • Place stencil on left side of canvas and, using a cosmetic sponge, stencil tree branches onto canvas, repeat the process for the right side of the canvas but move the stencil down a little lower.
  • Remove mask for owl and draw a “branch” on left side of canvas extending off the edge so image isn’t floating.
  • Color image with markers

Happy Who-lloween!  Thanks for stopping by today and I'll see you again soon!  Have a blessed day!

Hugs,
Lea

Wednesday, October 15, 2014

Fright Night!!


It's another Smeared and Smudged 31 Days of Halloween card and I love how this one turned out.  It's pretty much exactly what I pictured in my head when I started this project.  I'm so glad the Dreamweaver Stencils Dream Team decided to play along this year!  Here's my project for today:


Here's what I used to create this project:

Copic® Markers (YG93, 95, 97, 99; Y11, 17; C3, 4, 6)
Basic Black Cardstock
Christmas Red Stickles™
Zip Dry™ Paper Glue by Beacon® Adhesives
1 1/4" Circle Punch by EK Success®
1" Circle Punch by EK Success®
Tombow™ Mono Adhesive - Removable

Here's what I did to create this project:

First I penciled in my hills just to give reference points and I stamped the tree
Next I drew the tombstones, stamped the witch and the two smaller bats
I then taped on the bats stencil and inked the one bat with a sponge
Punched out two circles, one of each size
I colored in the grassy hills and tombstones then masked them off, I also masked the area for the moon with the larger circle
Using the grays, I airbrushed the sky and then removed the masks
I colored in the moon
Next I die cut my tree and adhered it on the card front
I stamped the spider
Stickles™ were added to the bats for eyes
I created my card base and adhered the card front to the base
I colored some white scraps with the green and trimmed a few pieces of grass and adhered them
I colored another piece of white with a green marker, stamped my sentiment and adhered it to a scrap of black cardstock that I then trimmed and adhered

This was such a fun scene to create, I do hope you find it to be as spooky fun as I do!  Thanks for stopping by and I'll see you again soon with yet another fun project!  In the meantime, have a wonderful day!

Hugs,
Lea


Friday, March 21, 2014

Tombow Hop Time!


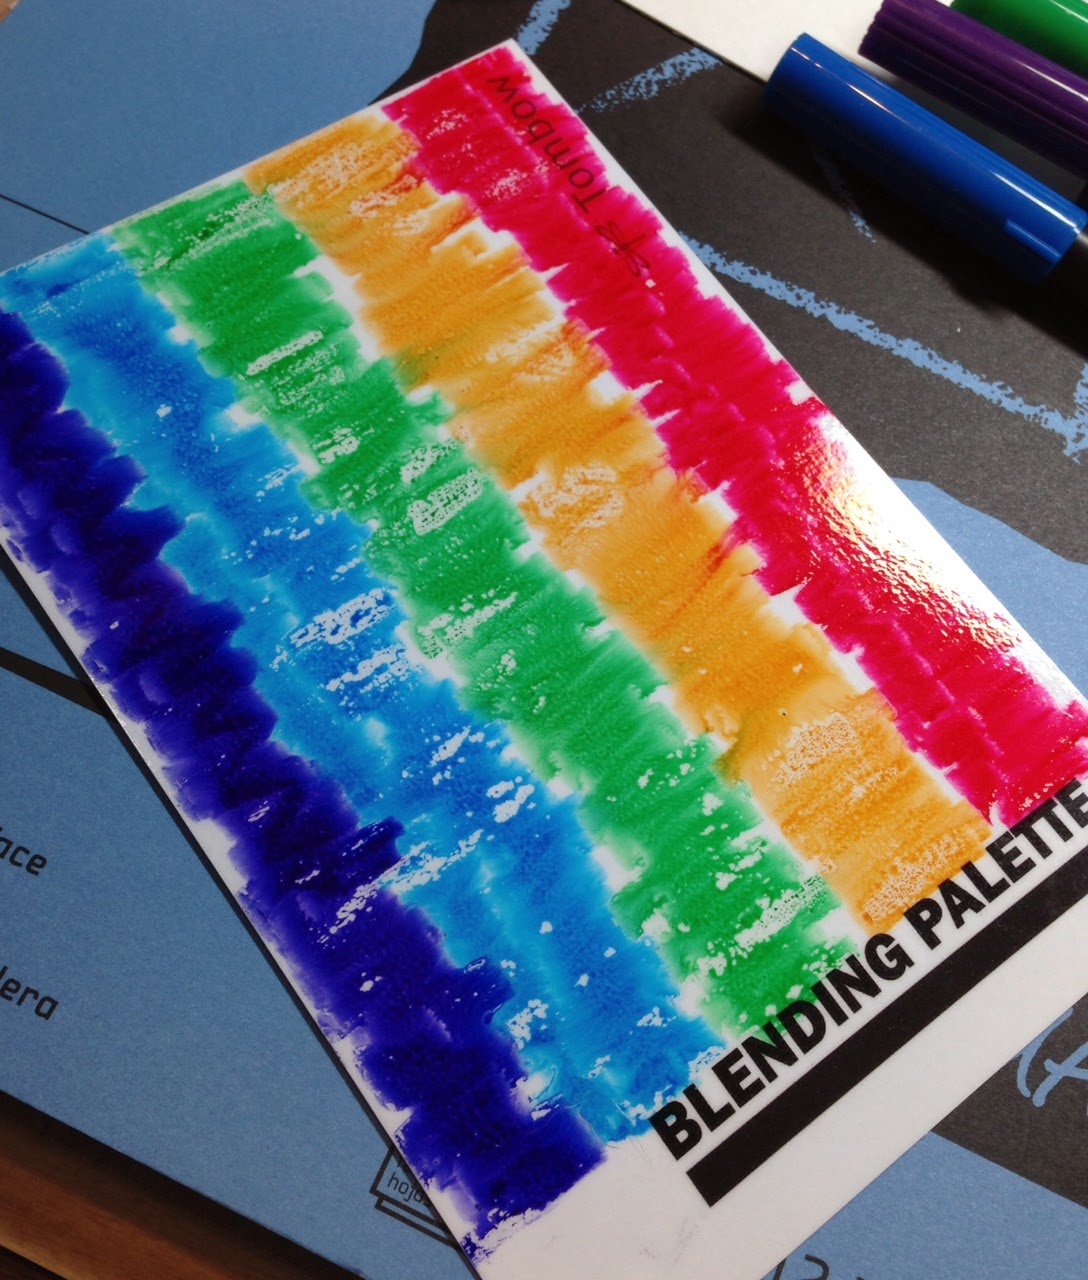
It's Friday, you know what that means!!!  It's HOP Day! Yay!!  The Stampendous Design Team is hopping along with the TombowUSA Design Team and I'm sure there will be plenty of eye candy to soothe your sweet tooth!  Remember, we have prizes to give out but you must comment to win a prize!  So, you may or may not recall that I received the set of 6 Jewel Dual Brush Pens and a Blending Kit from Tombow.  My first project uses five of the colors, 847/Crimson, 636/Imperial Purple, 245/Sap Green, 476/Cyan and 946/Gold Ochre.  I didn't use N25/Lamp Black for obvious reasons!  Here's my card using the Splash Technique:


Here's what I used to create this project:

Canson® Watercolor Paper
Black Cardstock
Archival Ink™ - Jet Black
Hug Snug® Seam Binding - White

Here's how I created this project:

Trim watercolor paper to fit blending palette
Color blending palette with markers in wide stripes (as shown above)
Spritz blending palette with water
Apply watercolor paper to blending palette and rub paper to make sure it picks up ink evenly
Set wet paper aside to dry (dry paper shown above)
Trim seam binding to desired length
Re-color blending palette and mist
Lay ribbon across palette and rub ribbon to help apply ink
Continue doing sections of ribbon while moving down palette
Set ribbon aside to dry (you can use your heat gun to speed this process up)
Stamp image on dry inked watercolor paper
Trim away excess paper at bottom
Stamp sentiment
Create card base to fit image
Adhere image to to card base
Tie dried ribbon around top of card with a simple knot in front

For my next project, I went back to mixing colors on the blending palette and applying the color using the Indirect Blending Technique to color my image with the blender pen.  I really like this technique!  


Here's what I used to create this project:

Bazzill® Cardstock in Parakeet and Lava
Making Memories Kids™ Collection - Emma
Canson® Watercolor Paper
Archival Ink™ - Jet Black

Here's what I did to create this project:

Stamp image and color, trim to desired size, set aside to completely dry
Create card base from green cardstock
Trim red-orange cardstock pieces as shown
Trim patterned paper as shown
Stamp sentiment on dry image
Adhere all layers as shown

So that's both of my projects, I hope at least one of them may have inspired you to give this a go yourself.  Easy and fun, what more can a girl/guy ask for!?  Here's the complete link list, I wouldn't want anyone wandering lost around the Internet, it could be light years before you're found! 

Lea Kimmel (me!)


Don't forget to leave some love along the way in order to be entered to win a prize.  Thanks for hopping by and I hope to see you again soon!  Have a blessed day!

Hugs,
Lea

Thursday, March 20, 2014

Time for Tombow!


And a Toadal Makeover!  This week has been all about Stampendous® Stamps and TombowUSA and lots of wonderful creations designed to inspire you!  I love it when the Stampendous Design Team does a blog collaboration with a fantastic company like TombowUSA; it's just so much fun!  Of course, as you can see, there are prizes to win, too!  However, if you want to win a prize, you have to comment on our blogs, the more blogs you leave comments on, the better your chance of winning!  Pretty darn simple, right!?  So, without further ado, here's my project for today:


These were the colors I received, the Jewel set of 6!  I also received one of their new Blending Kits, which includes the Blending Palette I've shown you here, a Blender Pen and a Compact Spray Mister.    I wanted to show you my blending palette with colors still mixed on it so you could get an idea of how easy it is to get the color you need even from the Jewel set of 6 markers.  There's a super cute coloring chart for all the House-Mouse mice that can be found here, however, since I wasn't sent any of those colors, I had to mix my own! By combining purple and golden yellow, I was able to get my brown for the mouse fur, combining the golden yellow and red gave me the peachy tones I needed for his skin.  As you can see here, I mixed a few other colors, too, I wouldn't want you to think you are limited to just these six colors.  I used the Indirect Blending technique for this card.

Here's what I used to create this project:

Stampendous® HMM04 Toadal Makeover
Tombow Dual Brush Pens - Jewel
Tombow Blender Kit
Archival Ink™ - Jet Black
Bazzill® - Ruby Slipper
Canson® Watercolor Paper
Bo Bunny® Mistletoe 6x6 Paper Pad (Wonky Squares)
Crate Paper® Party Day 6x6 Paper Pad (Stars)
May Arts Ribbon®
Mono Adhesive Power Bond
Foam Mounting Squares

Here's how I created this project:

Stamp image and color; trim to desired size
Create card base and image mat from Bazzill
Trim patterned papers as shown
Adhere patterned papers and attach ribbon as shown
Adhere patterned papers with ribbon to card base as shown
Adhere image to mat and attach to card base with foam mounting squares

This was a very easy card to create and I have to tell you, I really enjoyed mixing my colors and applying them with the Blender.  I know my colors are a little Christmas-y but when you have a green toad and red lipstick, you just have to go with what looks good, no matter what the season may be!

Thanks for stopping by today and don't forget to comment if you wish to be entered to win a prize.  Don't forget that tomorrow is the BIG HOP!!  You don't want to miss it and I'll have two projects to share tomorrow!  Have a blessed day and I'll see you again soon!

Hugs,
Lea