Showing posts with label #RadiantNeon. Show all posts

Thursday, December 22, 2016

Wicked Wednesday with Sami Stamps

It's Wicked Wednesday ATC Challenge Blog time and this week our sponsor is Sami Stamps.  The image I've used is Three Christmas Labradors.  Our theme this week is Cats and Dogs, easy and lovable.  I love their bewildered expressions!  So, have you "got snow?"


Here's what I used to create this ATC:

A Muse® Stamps Got Snow?
Copic® Markers
Memento™ Love Letters Ink Pad by Tsukineko® for Imagine®
Radiant Neon Amplify™Ink in White by Imagine®
Neenah Classic Crest Solar White Cover Stock
3D Foam Mounting Squares by Scrapbook Adhesives

I hope you'll play along with our fun little challenge!  This is our last challenge for 2016 so you have two weeks to join us.  Let us see your cutest cats and dogs!  See you again soon!  Merry Christmas!

Hugs,
Lea


Thursday, January 7, 2016

New Stencils, New Stamps, New Fun!


What a fun week we’ve been having on the Stampendous Design Team with Imagine Crafts AND new product release.   For my card today, I’ve used my very favorite Dreamweaver stencil ever!  I love this stencil and it’s really cool that it has a matching die, I know you’re going to want, no, NEED, them both!  


Here’s what I’ve used to create this card:

Blue Cardstock by Bazzill Basics Paper®
Zip Dry™ Paper Glue by Beacon Adhesives


Look at all the yummy texture!!


Here’s what I did to create this card:

Using a stipple brush, cover a large section of the white paper with blue ink for sky.
Tape stencil to paper and apply gray ink.
Using a small flat paint brush, add espresso ink along edges to add some visual depth.
Mix blue, orange, green and yellow Amplify! inks to get two shades of green.
Stipple on Amplify! mixes for dark and light sections of leaves, heat to puff.
Paint on Amplify! mixes for grass, heat to puff.
Add little dots of blue Amplify! and heat for flowers
Create card base with a tent fold and attach card front.
(Here’s where I decided I wanted the green mixture to go all the way to the bottom of the card, so, I added more of the mix and heated it.)
Stamp sentiment with blue ink.

Here’s a list of my teammates that are playing along today:


Prize Information:

We have prizes! Three lucky commenters will receive a prize package that includes:
1 Radiant Neon Ink Pad and Ink Refill
1 Color Fragments Jar
a Creative Palette Rectangles Set
See Official Contest Rules for details.

Thanks so much for stopping by today!  I sure appreciate your company and I look forward to seeing you again tomorrow with my favorite catalog project.  Until then, have a blessed day!

Hugs,
Lea

PS  The fun comes with entering this card into the Monday Greeting Challenge over at The OutLawz!!  Come check out the fun!

Friday, January 1, 2016

Baby, It's Cold Outside!

Cold weather is headed our way!  After a December of record highs, January 2016 is coming in with a chilly blast!  In honor of the chilly weather, Stampendous has been sharing some "cool" cards all week.  Today I've got a sweet and simple little card to share that was super quick to create but, oh so darling!  And, when you have a million things to do, fast is good!


Here's what I used to create this card:

Radiant Neon™ Amplify™ in White by Tsukineko®
Copic® Markers - BG0000, B0000, B000, C1, C3, C4, C5, RV52, RV55, YG11, YG13, YG17, YR21, YR23, YR24
May Arts Ribbon®
Zip Dry™ Paper Glue by Beacon Adhesives

Here's what I did to create this card:

Stamp image with black ink onto white paper, color with markers.
Using VersaMarker pen, create an oval under snow girl, add ice blue embossing enamel and heat.
Swipe VersaMark pad across paper below blue oval, add white embossing powder and heat.
Trim image to desired size.
Add Amplify to card and heat to puff.
Adhere a piece of ribbon across bottom of card.
Create an A2 card base from pink cardstock.
Adhere image to card base.
Create a bow with same ribbon and adhere to front of card.

Here's a list of my teammates that are playing along today:

Alumni designer – Rhea Weigand

Thanks so much for stopping by today.  I hope you like my quick little card!  Here's to a happy and healthy New Year to all!

Hugs,
Lea


Thursday, December 31, 2015

Brrr, Birrrdy!

Birdy, er, Baby it's cold outside!!  Well, actually it's been pretty warm here in North Carolina, however, a cold front is headed our way.  Yuck!!  The older I get, the less I like cold weather, it makes my bones ache like nothing else can.  I do like to look at the snow, though.  It's beautiful when it's falling.  I have some woods behind my house and I do enjoy a walk through them after it's snowed.  It's so peaceful and beautiful glistening on the trees.  So, maybe I don't dislike winter as much as I thought!

This week, Stampendous has been celebrating winter in all of her glory.  My sweet little Winter Birds are enjoying a snowfall!  Aren't they adorable in their cute little hats and scarf!?  This is such a sweet stamp and I had so much fun creating this card.  The beautiful Dreamweaver Snowflakes Stencil is the perfect background for any winter-themed card, especially when sprinkled with Stampendous Crystal Micro Glitter!


Here's what I used to create this card:

Stampendous® R180 Winter Birds
Stampendous® Dreamweaver Stencil LJ819 Snowflakes
Stampendous® Dreamweaver Regular Embossing Paste
Stampendous® Crystal Micro Glitter
Stampendous® Mixed Media White Paper
Memento™ Tuxedo Black Ink Pad by Tsukineko®
Radiant Neon™ Amplify™ in White by Tsukineko®
Copic® Markers - E41, E42, E43, E44, W4, W7, YG93, YG95, YG97, B91, B93, B95, R24, R27, R29, R59, G40, G43, G46
Little Yellow Bicycle® "Winterings" Collection Patterned Paper
Blue Cardstock by Bazzill Basics Paper®
Zip Dry™2 Paper Glue by Beacon Adhesive
Scrapbook Adhesives® 3D Foam Mounting Squares by 3L®


Here's what I did to create this card:

Trim a piece of blue cardstock and tape stencil over paper, paste emboss with white paste.
Remove stencil carefully and cover snowflakes with crystal micro glitter, tap off excess glitter and return to jar.
Set aside pasted piece to dry.
Stamp image with black ink and color with markers.
Fussy cut image.
Add Amplify where there's supposed to be snow and heat to puff.
Use finger to add glue to puffed "snow" and sprinkle on glitter, tap off excess and return to jar.
Create an A-2 card base with a tent fold.
Trim a piece of patterned paper to 4 1/8" x 5 3/8".
Adhere layers as shown.
Add foam squares to back of birds and adhere to the front of the card.

Here's the list of my teammates with more inspiration:

Thanks so much for stopping by today!  I hope you've enjoyed my card, I'll have another fun winter card to share with you tomorrow.  In the meantime, have a wonderful New Year's Eve and please be safe!  See you next year!

Hugs,
Lea

P.S.  I think I'm going to enter this one in the Outlawz Color Challenge!


Wednesday, November 18, 2015

Wicked Wednesday with Sweet Pea Stamps

It's Wicked Wednesday ATC Challenge Blog time and this week our sponsor is Sweet Pea Stamps.  The image I've used is from Conie Fong and it's called "Sally and Snowball."  She's an amazing artist and I just love her images!  This is a sad post for me, though, as Sweet Pea Stamps is closing on November 25th.  Truly a sad day for many who love the variety of artists there.  However, you still have time to go take a look and pick up some adorable digis.  Our theme this week is to use torn paper or torn edges, so, get tearing and come play along!


Here's what I used to create this ATC:

Copic® Markers
Neenah® Classic Crest™ Solar White Cover Stock
Light Blue Cardstock by Bazzill Basics Paper®
Radiant Neon™ Amplify! in White by Tsukineko®
Crystal Micro Glitter by Stampendous!®
Zip Dry™ Paper Glue by Beacon Adhesives

Here's what I did to create this ATC:

  1. Print image, color and fussy cut.
  2. Cut your ATC base from blue cardstock to 2.5"x3.5".
  3. Trim a piece of white paper to 2.5"x3" and tear into strips.  
  4. Layer strips of white across bottom finishing with the clean cut edge on the bottom.
  5. Add a little blue color to define edges.
  6. Add glitter to torn edges and then a little more at the bottom as shown.
  7. Glue image to ATC and add shadow with markers.
  8. Add white Amplify! in random dots and heat.

It's such a simple ATC  but I love the way the Amplify! brings it to life with the snowfall.  I think it turned out really sweet.  So show us what you can do with some torn up stuff!  Thanks for stopping by today and I'll see you again soon!

Hugs,
Lea

Friday, October 30, 2015

On Your Mark, Get Set...


...KISS!  This week, Stampendous® is hopping with Glue Dots®, my favorite little dots of glue ever!  There are so many fun things you can do with them, use them to adhere items to each other, add embossing powder and heat, or, my favorite, add glitter! It's so easy, just sprinkle a little glitter on top and, using your finger, burnish the glitter into the dot.  It's the perfect way to add little bits of sparkle here and there!

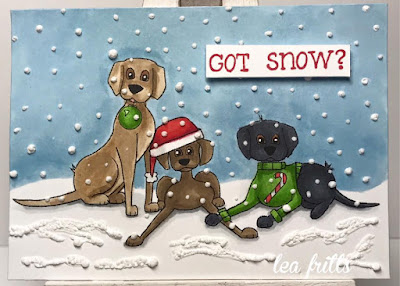
The card I'm posting today, is actually one I wanted to create last week to celebrate our wonderful Nathalie Kalbach and her amazing stamps she designed for Stampendous!  Unfortunately, I risked the "cooties" and the "cooties" did me in!  Needless to say, my card didn't get finished last week but I've completed it and I'm sharing it with you today, cootie free, of course!


Here's what I used to create this card:

Radiant Neon™ Pigment Ink Refills by Tsukineko in Electric Blue, Electric Pink and Electric Purple
Radiant Neon™ Pigment Ink Pads by Tsukineko in Electric Blue, Electric Pink and Electric Purple
Pink Cardstock by Bazzill Basics Paper®
Blue Cardstock by Bazzill Basics Paper®
Zip Dry™ Paper Glue by Beacon Adhesives

Here's what I did to create this card:

Drip refills onto Creative Palette and, using a brayer, spread ink.
Place paper down onto ink covered palette and rub with your hand (or brayer), lift paper and set aside to dry.
Ink stamps and stamp onto various pieces of paper previously inked on palette.
Trim stamped images to desired sizes.
Create an A2 card base with blue cardstock.
Adhere large background piece to card base.
Trim mats for stamped images from pink cardstock.
Adhere stamped images to mats and then adhere to card.
Add a few mini glue dots, cover with glitter, burnish glitter, tap off excess glitter.


Prize Information:

As our fans know we love a contest while we hop, so, three lucky commenters will win a prize package that includes:

Glue Dots® Craft Dots 3/8”
Glue Dots® Mini Dots 3/16”
Glue Dots® Removable Dots 3/8”
CRS5080 Cling Create Christmas Stamp Set by Stampendous®
DCS5080 Create Christmas Die Set by Stampendous®
MGK02 Christmas Micro Glitter Kit by Stampendous®

Just comment on both company blogs and all the design team posts for our hop with Glue Dots. Commenting is open until Sunday, November 1st at 11:59 pm and winners will be announced sometime on Monday, November 2nd. See Official Contest Rules.

Here's a list of my teammates playing along today:

Thanks so much for stopping by today and I'll see you again soon!  Have a lovely day!

Hugs,
Lea