Showing posts with label Tim Holtz. Show all posts

Friday, August 14, 2015

A Little Mouse Mischief

Today is the last day of the Stampendous® week of Mousey Mischief!  It’s always fun to see what these cute little House-Mouse® critters are up to.  You never know what they’ll be doing next!  Here’s my project for today:


Here’s what I used to create this card:

Stampendous® House-Mouse® Designs Watermelon Mice
Stampendous® Fran’s Mixed Media White Paper
Memento™ Tuxedo Black Ink by Tsukineko®
Painted Desert Cardstock by Bazzill Basics Paper®
Frosted Kiwi Cardstock by Bazzill Basics Paper®
May Arts Ribbon®
Beacon 3-in-1™ Advanced Craft Glue
Tim Holtz® Tumbled Glass Distress Ink by Ranger®
Copic® Markers:  W1, W4, W7; T2, T4, T6; C0; YG0000, YG01, YG13, YG21; RV13, RV14; R35; E21, E23, E25, E31, E33, E35, E50, E51, E53, E93


Here’s what I did to create this card:

Stamp image, color and trim to desired size
Add distress ink all around
Create A2 horizontal card base with a tent fold in green cardstock
Trim a piece of red cardstock as shown
Adhere image to red cardstock
Create a bow with the green ribbon and adhere to background panel
Adhere panel to card base  

Here’s the list of my teammates playing along today:


Thanks for stopping by today!  I hope you’ve enjoyed all of the fun Mousey Mischief this week.  Have and wonderful weekend and I’ll see you again next week.

Hugs,

Lea

Tuesday, October 14, 2014

Stampin' and Dreamin' to the Core

SANDY Claus is Coming to Town!


Yes...SANDY Claus! All of this week, the Stampendous and Dreamweaver teams are playing with a mix of their products, along with some wonderful, SAND-ABLE papers from Core'dinations. Join us as we sand our way to the "core" of all things Christmas and the Holiday season. Of course, there will be prizes, and we give away the best...this time with a mix of fun Core'dinations products as well. To be one of three prize package winners, follow the posted link lists each day, leave a comment, and winners will be selected from these comments at the beginning of next week. This is what you might win:


Here's what I'm sharing today:


So, I know this is a totally different color scheme for a Christmas card but I like it!  So many people do green, red, purple, silver and gold cards and I've been eyeballing this black and white snowflake paper for a while trying to decide what to put with it.  So when I was looking through my Core'dinations paper and saw the new Chalk Core black/blue combo, I knew it was just right! It's really cool because it gives a neat chalkboard look to it when sanded.  Usually I pick my stencil/stamp first and then pick papers but this was one of those occasions when the papers picked the stencil and dies first.  I love the distressed chalkboard look of this card!

Here's what I used to create this card:

Dreamweaver Stencils© LL511 NOEL Snowflake
Stampendous® Snowflake Die Set
Stampendous® Crystal Micro Glitter
Core'dinations® Chalk Core in Blue
Teresa Collins™ Christmas Home 6x6 Designer Paper Pad
Tim Holtz® Paper Distresser
Zip Dry™ Paper Glue by Beacon® Adhesives

Here's what I did to create this card:

  • Dry embossed my stencil through my Big Shot and then sanded and trimmed it to the size I wanted
  • Trimmed another piece of the same paper to use as a mat for my embossed piece and distressed the edges
  • Created a card base for a 4x6" card, folded it in half using a tent fold and sanded the edges
  • I trimmed a piece of my patterned paper and distressed the edges
  • Using the same chalk core paper, I cut out two snowflakes and gave them a light sanding
  • Using glue and the crystal micro glitter, I covered both die cut snowflakes and the embossed snowflake
  • Adhere all layers as shown


Leave a comment for me, and head to the next designer on the list:

Team members with an (*) are also on the Dreamweaver Stencils Team.


Core'dinations

Gini Cagle

Dreamweaver

That's it for me today, I'll have another post for you tomorrow so be sure to stop by and check it out!  Hope you have a wonderful day!

Hugs,
Lea

Thursday, May 29, 2014

Be Ewe-nique!

Well, it's the end of the merry month of May! The Dream Team has challenged you this month to a "Flora and Fauna"theme! Considering most of the Dreamweaver designs incorporate both of these in the huge variety of stencils, you should have no problem playing along with our challenge this month! As usual, link your creations at the end of theDream It Up! blog post, or at the end of our posts where it says, "Add Your Link"

Here's what I've been playing with this week...


We have a new stencil, Open Sheep, and I have had so much fun creating this canvas!!  I believe my kids think I've gone off the deep end since I giggled almost the entire time I was creating this one!

Here's what I used to create this canvas:

Imagine Crafts®/Tsukineko® Radiant Neon™ Inks in these "Electric" colors: Coral, Orange, Blue, Green, Purple, Yellow and Pink
Tim Holtz® Grunge Board Letters
Faber-Castell® White Pitt™ Pen
Faber-Castell® Black Pitt™ Pen
Canvas board
Beacon Adhesive® Zip Dry™

Here's what I did to create this canvas:

Ink canvas as shown using Blushers with green, yellow and blue inks
Paste emboss sheep as shown
Once the first layer of paste dries, use your finger to apply another layer to give sheep their "fluff"
Allow second layer of paste to dry and ink the one sheep with multiple colors
Using the white Pitt™ Pen, go over areas that are too translucent and their faces
Using the black Pitt™ Pen, add their "eyes"
Using the purple ink, shade the letters, once dry, glue to canvas

Since this is the 5th Thursday of the month, the whole team is playing along so you'll have lots of inspiration to get those creative juices flowing.  Here's the list:


Be sure to play along with us!  We're lots of fun!  That's my post for today, thanks for stopping by.  I'll see you again soon.  Have a blessed day!

Hugs,
Lea


Friday, May 23, 2014

Imagine Stampendous and Tsukineko Together

Stampendous and Imagine Crafts Header

Welcome back! We're on Day 5 of our collaboration with the folks at Imagine Crafts! We're just super excited about these terrific inks and the Radiant Neon™ just have us feeling all summer time and happy! Combining them with Stampendous Images and terrific Fran•táge Color Fragments has made some super cheery, bright inspiration for you!! Plus you have a chance to WIN!


  STM Imagine Crafts Prize Package

I have two projects for you today.  One project just fed the second one so I figured, why not do two!  My first project is a bracelet I thought would be fun to create for the summer.


Here's what I used to create this project:

Stampendous Stamps® Angel Wings Quotes PCS
Stampendous Stamps® Regal Bird Quotes PCS
Stampendous Stamps® Royal Heart Quotes PCS
Imagine Crafts®/Tsukineko® Radiant Neon™ Inks in these "Electric" colors: Coral, Orange, Blue, Green, Purple, Yellow and Pink
Imagine Crafts® /Tsukineko® StāzOn® Midi in Jet Black
Imagine Crafts®  GlāzOn® in Matte Finish
Imagine Crafts® InkBlushers
Tim Holtz® Fragment Charms
Misc chain and jump rings


Here's what I did to create this project:

Pick out your fragments and ink one side using the ink blushers, set aside to dry
Once the ink has dried, add a coat of glaze to protect your finish
Stamp the various words on the non-inked side of each charm, allow to dry and cover with glaze
Add jump rings to charms and attach to chain
Add clasp to chain

As I was inking my charms, I noticed I had ink left on the blushers and rather than waste that ink, I pulled out my small Dylusions journal and randomly added ink to a double-page spread.  I loved the soft look of the colors and there was actually enough of each color to cover both pages!  I added some stamps and a favorite quote and my pages were complete!


Here's what I used to create these pages:

Stampendous Stamps® Cling Hydrangea Garden
Imagine Crafts®/Tsukineko® Radiant Neon™ Inks in these "Electric" colors: Coral, Orange, Blue, Green, Purple, Yellow and Pink
Imagine Crafts® /Tsukineko® StāzOn® Midi Inks in Emerald City and Blue Hawaii
Imagine Crafts® InkBlushers
Dylusions® Small Journal
Black Medium Pen

Here's what I did to create these pages:

Smoosh blushers on journal pages until no more ink comes off
Stamp images as shown (I stamped off with every other small blossom)
Write quote with pen


Remember to comment on as many posts as you can. You can comment until the end of Sunday, May 25, 2014. We'll draw three random blog posts from all the posts this week, then choose a winner from each post. You must have a US Mailing address to win, although we sure hope all of you will comment! You can find the Official Rules for all our contests HERE. We'll announce winners here on Monday or Tuesday next week, so be sure to check back with us. (or subscribe to our blog by email at the top of this page!) If you missed the earlier posts this week, it's not too late to comment on those. You can find them here: MONDAY, TUESDAY, WEDNESDAY, THURSDAY. Check out this inspiration today - remember to leave a comment!

Stampendous Blog

Imagine Crafts Blog

Kristine Reynolds

Darsie Bruno

Janelle Stollfus

Nancy Hawes

Jamie Martin

John Creighton Petersen

Krissy Fossmeyer

Tobi Crawford

Tenia Nelson

Wendy Price

Rhea Weigand

Lea Kimmel (me)

Suzanne Czosek

So that's it for me today.  I hope you've enjoyed my projects and have left comments to be eligible to win a prize!  Thanks for stopping by and I'll see you again very soon!

Hugs,
Lea

  ***Blog Hop Hint - if you click on a link that takes you to a page saying something like, "Sorry this page cannot be found," just click on the header at the top of the blog (usually a picture, or the blog's name), and it will take you to that blog's most recent post. That post *should* be our hop. If not, you can probably scroll down a short way to find the hop post.  
 

Friday, May 2, 2014

People Are Strange!

It's Desert Islands Crafters Challenge time again and we have such a fun itinerary for you!  Our image sponsor is The Stamping Boutique and here's the itinerary:


1.  Go Goth/Emo
2.  Black & White & One Other Color
3.  Use chipboard OR corrugated cardboard
4. Add text
5. Based on a song
6. Include an animal
7. Crowns or tiaras
8. Dry embossing
9. Use a stencil
10. Something funny/humor

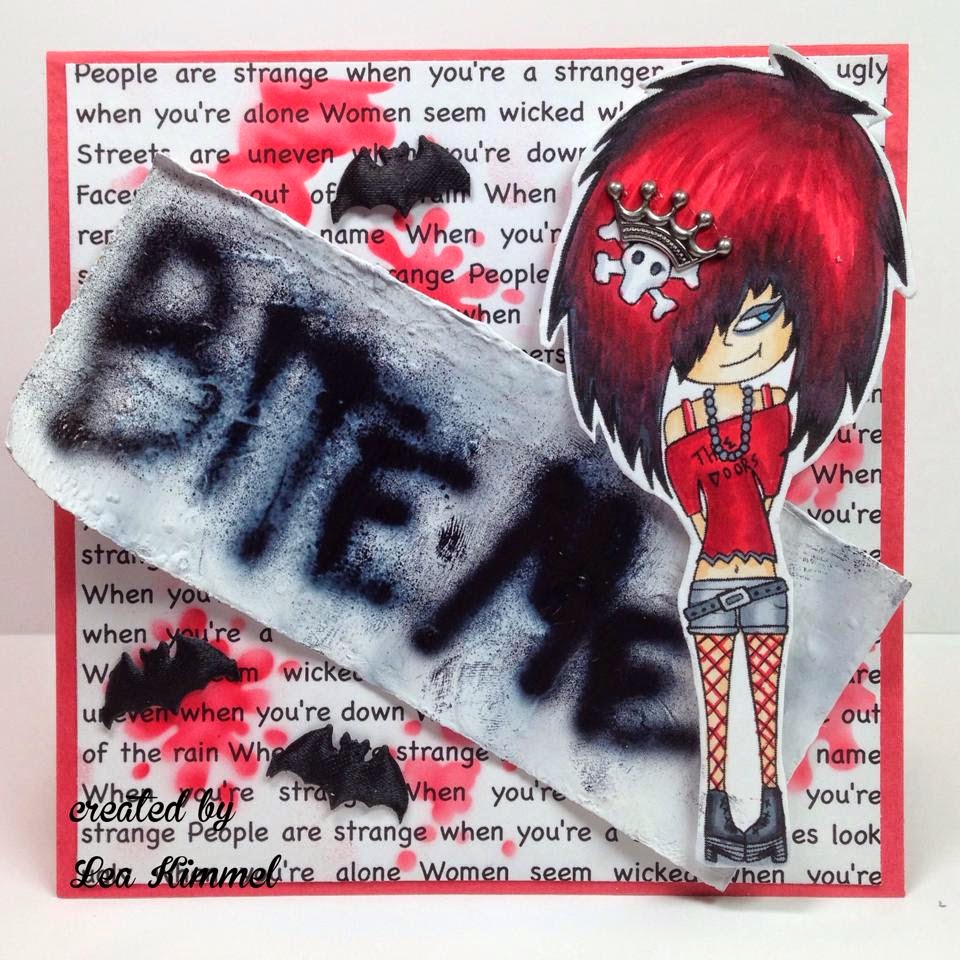
Here's my card using Emo Alice and #'s 1, 2, 3, 4, 5, 6, 7, 9 and 10!


Now this was a fun card to create!  I typed up the lyrics for The Doors "People Are Strange" as my background and just repeated it to cover the amount of space needed.

Here's what I used to create this card:

Bazzill® Cardstock
Neenah® Classic Crest™ Solar White
Scrap of Cardboard
Copic® Markers and Airbrush System
May Arts Ribbon® Puffy Bats
DecoArt® Gesso
Tim Holtz® idea-ology™ adornments
Beacon Adhesive® Zip Dry™
Foam Mounting Squares

Here's what I did to create this card:

Print out digital image and color with markers, trim with scissors
Adhere crown adornment to skull  
Type lyrics to song and print
Create card base with a tent fold
Trim and adhere lyrics to card base
Airbrush a few "Splats" over lyrics with red marker
Trim and gesso cardboard piece, use heat gun to speed drying process
Airbrush "Bite Me" with marker
Adhere cardboard piece to card base
Adhere bats
Using foam squares, attach Emo Alice

Doesn't it look like she's just spray-painted "Bite Me" on the side of a building.  She has that look on her face like "look what I just did!"  That's it for today!  I do hope you'll play along with our challenge, this will be a fun one!  Thanks for stopping by today!

Hugs,
Lea


Thursday, March 13, 2014

Emma's Zen Flower Garden

It's March Madness at Dreamweaver Stencils and we've all gone a little crazy!  Well, some of us have been there for a while!  Heehee!  Since we get to create pretty much whatever we want this month, I'm going to make a sweet little girl happy.  I had a "Nina request" recently from my adorable little granddaughter, Emmaline Grace.  (I'm Nina, by the way, that's what she has always called me and I love it!)  Emmaline knows I created a canvas for her Aunt Kiki so she wanted one made for her, too.  How could I possibly say no?  Creating art for a five-year old is easy, fast and fun!  You get to keep it simple and child-like.  I had to embrace my inner child and I decided to create something similar to one of the many drawings she has made for me.  Here's my project, I hope she's going to like it!


Here's what I used to create this canvas:

Echo Park's "Little Girl" 12x12 Collection
DecoArt Gesso
     Titanium White
     Cerulean Blue
     Viridian Hue
     Light Green
Artist Loft Canvas Panel
Sweet Petites Grosgrain Ribbon in Moss
Tim Holtz idea-ology fastener
Glue Dots
Office Depot brads

Here's what I did to create this canvas:

Gesso canvas panel, set aside to dry
Place stencil on back side of papers, trace cutting lines, trim flowers
Gesso back side of flowers, this covers trace lines and adds body to paper
Paint canvas as shown, set aside to dry
Layer flowers with brads and shape
Trim ribbon for stems and leaves, fold and fasten ribbon with staples to create leaves
Attach ribbon stems to back side of canvas and wrap to front
Holding ribbon in place, determine leaf locations and adhere leaves with glue dots
Adhere stems to front
Adhere flowers

So that's it for me, here's the list of my teammates that are playing along:


Be sure to leave some love along the way, we aim to please!  If your interested in becoming a member of the Dream Team, go here for more information on how you can apply.  Also, be sure to play along and link your creation here for a chance to win a stencil of your choice. Thanks for stopping by today, I hope you've been inspired to create something for a special child in your life!  See you again real soon!

Hugs,
Lea

Sunday, February 2, 2014

Happy Birthday!

Desert Islands Crafters Challenge Blog is three today so we're having a mini blog hop!  Woohoo!  Happy birthday and congratulations, Suzi, for creating this challenge blog we've all grown to know and love!  Here's my card to help celebrate the occasion:


Our sponsor this time around is Sassy Studio Designs and my image is Rainbow Bright Sassy that I've colored with Prismacolor Pencils.  Boy, did this one ever take me back in time!  LOL!  One of my daughters used to love Rainbow Bright!  For this card I've used Bazzill, Neenah Classic Crest and My Mind's Eye Hootenanny Six by Six Designer Paper Pad papers.  The stars are punched, the ribbon is seam binding I colored with Tim Holtz Distress Paint in Barn Door and the number 3 is part of a Tim Holtz grunge board letter and number set that I painted with the same paint.  I put it all together with Beacon Zip Dry and a few pop dots.  Here's the itinerary for the current challenge:

1.  Birthday
2.  Party
3.  Cake
4.  Ribbon or Twine
5.  Add Some Sparkle
6.  Emboss It - Dry or Wet Embossing
7.  3 Patterned Papers
8.  3 Different Embellishments
9.  Favorite Colors
10. It's a Gift - Make a Gift or Gift Box/Bag

I used numbers 1, 2, 3, 4, 7, and 8 for my card and I'm kind of stretching #2!  LOL!  That's okay, I know the thought process behind the card so if I say I was thinking party, you just have to believe me!  Here's the hop list:


Thanks for stopping by today and I sure hope you'll leave us each a little birthday love as you go!   Don't forget to play along, we want to see what you come up with!

Hugs,
Lea

Monday, January 13, 2014

My Favorite Tool!

For Creative JumpStart 2014 we've been asked to share our favorite tool.  I have to say that my little Tim Holtz Paper Distresser by Tonic has to be one of my most favorite tools to use!  I love how it softens the edge of the paper and gives it a distressed look.  Hence the name, eh!?


Here are some samples where I've used this handy dandy little tool:


Some are obvious, others more subtle, either way, it's a tool I love to use.  Happy creating!

Hugs,
Lea


Tuesday, December 17, 2013

Clean and Simple Christmas Card

If you've waited until the last minute and need a super fast Christmas card to create, here it is!  This sentiment is part of the Stampendous® Kiddo Toyland Set sold exclusively at Michaels.


Here's what I did to create this card:

Using Tim Holtz Distress Markers in Peeled Paint and Fired Brick, color directly onto the stamp and stamp onto white cardstock
Cut out stamped sentiment/image with Spellbinders Petite Scalloped Oval die and use the next size up to cut out the mat from green cardstock
Create your card base and create a tent fold
Trim your patterned paper as shown 
Create you bow leaving tails long enough to wrap around the patterned paper and adhere onto the back
Adhere all pieces as shown

Here's what I used to create this card:

Stampendous® Kiddo Toyland Stamp Set
Tim Holtz® Distress™ Markers in Fired Brick and Peel Paint
White Cardstock
Green Bazzill® Cardstock
Red Rayon Ribbon
Three Bugs in a Rug® Patterned Paper – Much Fun Christmas Trees and Candy Stripe
Spellbinders® Small and Large Petite Scalloped Ovals
Zip Dry™
Paper Trimmer
Cuttlebug Die Cut Machine

This is super fast card to create but still has that sweet homemade look you're going for.  Thanks for stopping by today and I'll see you again real soon.

Hugs,
Lea

Thursday, November 14, 2013

Damask Book


Have you played along yet with our new monthly challenge, "Holiday Celebrations?"  For the entire month of November we will be demonstrating ways to use Beacon Adhesives' entire line of products with Dreamweaver to create special projects in home decor and gifts of love.  For today's post, I've created a book that could be used for a variety of purposes.  It could be a mini gratitude journal, a place to write your thoughts or you could add some photos, whatever you choose!


Here's the inside, I've randomly stenciled each page a little differently.

Slightly different view to show the thickness.


To create this book, I painted both sides of my chipboard covers with antique linen distress paint and inked the edges with distress stain in tarnished brass.  Once dry, I stenciled on the forest moss distress ink using LX 7001 Damask stencil.  I stamped my sentiment from Stampendous using just the top half of the stamp and layered it onto my papers with Zip Dry.  Using the distress paints, I painted the metal festive foliage findings and, once dried, adhered them to the cover with Gem-Tac.  I cut my interior pages to size, punched the holes and stenciled them randomly with antique linen distress ink.  I had rings to hold it all together but I wanted to use something different so I threaded tulle through the holes and knotted it off loosely so I can still turn the pages with ease.  I like the girlie look of the tulle!

Here's the list of products used:

Dreamweaver Stencil LX 7001 Damask
Melody Ross® Chipboard Book
Stampendous® Kind Friendship
Beacon® Zip Dry
Beacon® Gem-Tac
Bazzill® French Vanilla
Basic Grey® Blitzen Collection
My Mind's Eye® Lost & Found Two - Breeze
Neenah® Classic Crest in Natural White
Tim Holtz® Idea-ology® Findings - Festive Foliage
Tim Holtz® Distress Paints™:
     Antique Linen
     Forest Moss
     Barn Door
Tim Holtz® Distress Stain™ Tarnished Brass
Tim Holtz® Distress Ink™:
     Forest Moss
     Antique Linen
Memento Tuxedo Black Ink Pad
Antique Gold Metallic Tulle

Check out the rest of the team's creations as well as our guest designer for the month, Linda Neff!

Thanks so much for stopping by today.  Please visit again soon as I'll have more creations to share with you.

Hugs,
Lea

Thursday, November 7, 2013

Don't Stress, Distress...

...with Ranger's Tim Holtz® Distress™ product line!


Ready to be festively distressed once again? The Dream Team has been playing with Ranger's Distress Paints, and is ready to inspire you to be distressed as well...paint distressed that is! Dreamweaver Stencils are the perfect choice to mix with all things festively distressed, as nothing shows off color and texture better than great designs. By following our hop and leaving love along the way, you have the opportunity to win a great prize package including five Ranger Distress Paints and five Dreamweaver Stencils! Here's the lineup for today, including our November Guest Designer:


This is also our first posting day featuring our new monthly challenge, "Holiday Celebrations", and for the entire month we will be demonstrating ways to use Beacon Adhesives' entire line of products with Dreamweaver to create special projects in home decor and gifts of love. Here's mine:


I started off with a cheap wooden frame I purchased at Wal-Mart for $0.97.  I liked it because it really lends itself to being stenciled upon!  Look at all that flat surface just screaming for paint, stain, ink, and stenciling!  I started off by staining the wood with Tim Holtz® Distress Stain™ in Vintage Photo.  I love the warmth of this color!


Here's how the front looks completely stained!


This is the back side completely stained with the exception of inside the hole where the dowel goes to make it stand.  I'm showing you these pictures so you can see how it looks with just the stain.  I think it looks great!

For my next step I waited until the stain was dry and I put a light coat of Tim Holtz® Distress Paint in Antique Linen over the entire front of the frame.  This gave it a bit of a washed look but still allowed the stain to show through.   Once the paint was thoroughly dry, using LX 7001 Damask and Tim Holtz® Distress Ink™ in Frayed Burlap, I stenciled my pattern over the stain and paint base.  I let that sit for a bit to dry and then coated it with Beacon Fast Finish to create a seal.  You can tell in the picture below that it's coated as the light reflects more on the top showing the was of the paint off more so than at the bottom where the light isn't hitting it directly.

I know that home decor items with numbers is very popular right now so using Tim Holtz® Idea-ology® Numerals, I added my favorite number, 24, to the front.  The numbers are silver in their natural state so I coated them with Tim Holtz® Distress Paint in Forest Moss leaving a little of the silver showing through for a nice distressed look!  I added the brads and attached the numbers with some glue dots (that I boosted the holding power of with Beacon 527 glue).  I added some scrap green paper where the photo would go; since I plan to give this as a gift I didn't want to add a photo.


Just for fun, here's a close-up of the numbers!  Don't they look old!?  I love it!


I must admit, I'm super pleased with how this turned out!  I love it when a project I have pictured in my head comes out just the way I envision it!  I have to say, I love Tim Holtz® products of any kind!  I think I use at least one of his products on almost every project I create.  I love the vintage feel his products invoke.

I do hope I've inspired you to make a few gifts for your family and friends, especially when you can save so much money in the process.  Thanks for stopping by today and I hope you'll stop by again real soon!

Hugs,
Lea

Thursday, August 15, 2013

Perfectly Charming!

Have you ever made one of those projects that you just absolutely fall in love with?  I mean crazy in love with it!  This is one of those projects!  I love the new Stampendous SSC1177, Butterfly Charms Perfectly Clear Stamps Set!  It's perfect for so many different uses!  I created a card that I showcased on Tuesday and today I've got a jewelry project to share!


 Here I've stamped the butterflies and painted the first coat of DecoArt Dazzling Metallics Peacock Pearl Paint on some washers.  I stamped an extra set of images as a "just in case" but didn't need them.  I colored the butterflies with my Copics and cut them out.  I added a second coat of paint to the washers.  Once the paint was dry I wrapped two pieces of craft wire around each side of each washer wrapping the jump rings against the outer edge of the washers to attach them.


I connected the washers with more jump rings adding pearl charms from Tim Holtz idea-ology Baubles.  Using craft wire I added a pearl charm from the center washer as well.  I attached the chain, added a clasp and completed the process by adding the butterflies on top of the washers.


Here's a picture of it hanging around my daughter's neck.  I am so in love with this necklace!!  It came out exactly as I envisioned it!  I hope you like it. Thanks for stopping by and I hope to see you back soon.

Hugs,
Lea