Showing posts with label #Christmas. Show all posts

Friday, December 14, 2018

Over the River...

...and through the woods to Grandmother's house we go in our adorable Stampendous CURIO Woody!  Is this not the cutest Woody you've seen in a while?  I love these old-fashioned station wagons and I had to color this one green like the station wagon I grew up with.  There was nothing better than riding in that back rear-facing seat and waving at the people behind us!


Here's what I used to create this card:

Stampendous Products - 


Other Products - 

Spanish Moss Cardstock by My Colors®
Red Cardstock
Copic® Markers - R24, R29, V15, V17, YG13, YG17, YG91, YG93, YG95, YG97, G29, G40, G85, G94, G99, Y13, E31, E33, E35, E41, E42, E43, E71, E74, C0, C1, C5, T8, W8
E-Z Runner® by Scrapbook Adhesives™

Here's what I did to create this card:
  1. Stamp image on white paper, color and trim as shown
  2. Poke a hole on each side of the tree, thread twine through and tie a bow
  3. Trim a mat for the stamped image from red cardstock 
  4. Trim an A2 card base from green cardstock and adhere all layers
  5. Stamp sentiment as shown
Thanks so much for stopping by today.  I hope you like my simple little card and I hope it brings back some special memories and puts a smile on your face.  Have a wonderful weekend and a joyous holiday ahead!

Much love and blessings,
Lea

Wednesday, December 12, 2018

Llama Delivery

Special delivery!  Anytime you have gifts arriving by llama, you know they're special!  Today's card is created using one of the new Stampendous CURIO stamps, CURIO Llama, and the sentiment is from Greetings Galore Perfectly Clear™ Stamps.  Isn't this llama just the cutest!?


Here's what I used to create this card:

Stampendous products - 


Other products - 

Red Cardstock
Kraft Cardstock
Copic Markers
Zip Dry by Beacon Adhesives

Here's what I did to create this card:
  1. Stamp image with black ink on white paper, color and trim as shown
  2. Create a red mat for image
  3. Create an A2 card base from red cardstock as shown
  4. Trim a piece of kraft cardstock to 4"x5 1/4" and stamp sentiment as shown
  5. Assemble all layers

Thanks so much for stopping by!  I'll see you again next week with more Stampendous goodness!  Until then, have a wonderful week!

Hugs,
Lea


Thursday, July 26, 2018

Brrr...

It's a Winter Blizzard out there!  At least it's a Stampendous Cling Winter Blizzard Rubber Stamp!  Right now I think it would be appreciated by those in the hot zones.  Thankfully it's not too bad here in North Carolina right now.  Give it 24 hours and it will all change!  Of course a little Christmas in July is bound to help you feel a little cooler, even if it's just the imagination working overtime.  Here's  my card:


Here's what I used to create this card:

Stampendous® Cling Winter Blizzard Rubber Stamp
Stampendous® Merry Words Perfectly Clear™ Stamp Set
Stampendous® Twinkle Glitter
Stampendous® Mixed Media White Paper
Starmist Cardstock by Bazzill Basics Paper®
Memento™ Summer Sky Ink Pad by Tsukineko®
Memento™ Nautical Blue Ink Pad by Tsukineko®
Rhinestones by Queen & Co.®
Zip Dry™ Paper Glue by Beacon Adhesives

The best thing about this stamp, the large snowflake pops out.  This gives you a lot of flexibility in how you use the stamp to create your projects.


Isn't that just the coolest!?  It's like having three stamps in one!  The full stamp, the stamp without the snowflake and just the snowflake.  Options!

Thanks so much for stopping by today!  I'll see you again next week with more Stampendous goodness!  Until then, have a wonderful week!

Hugs,
Lea

Wednesday, December 6, 2017

Winter White

My Stampendous Winter White is really more like a case of Moody Winter Blues!  I don’t know about you, but I love the Moody Blues and I was listening to their music this weekend.  It really puts me in a relaxed creative mindset.  I love this stamp and die set!  It’s so convenient to have both in one set!  Even though I didn’t use one of the sentiments that comes with the set, it does have some great ones you can check out here.


Here’s what I used to create this card:

Dylusions™ Ink Spray in London Blue, Bubblegum Pink and After Midnight
Delicata™ Silvery Shimmer Ink Pad by Tsukineko®
Strathmore® Watercolor Paper
Purple Cardstock by Bazzill Basics Paper®
Zip Dry™ Paper Glue by Beacon
3D Foam Squares by Scrapbook Adhesives®

Here’s what I did to create this card:
  1. Trim watercolor paper to desired size
  2. Spray inks onto watercolor paper, allow to dry
  3. Stamp snowflakes randomly onto inked paper with silver ink
  4. Stamp largest snowflake onto purple cardstock and die cut
  5. Adhere ribbon to stamped paper as shown
  6. Trim a piece of purple cardstock for card base with a tent fold
  7. Adhere stamped piece to base and add snowflake with foam squares

Thanks so much for stopping by today.  I do apologize for my post being tardy, however, I'm having internet connection problems at home.  Thankfully they're coming in the morning to try to fix whatever is going on.  Keeping my fingers and toes crossed!  See you again on Friday!

Hugs,

Lea

Friday, December 1, 2017

Wisemen Seek Him


It's the last day for this week's theme The Reason for the Season at Stampendous and I'm finishing off my week with our beautiful Wisemen Seek Him rubber stamp.  This card is so simple but it has a certain elegance, in my opinion, at least!  This card design would certainly make some super fast Christmas cards if you're like me and pressed for time.


Here's what I used to create this card:

Stampendous® Wisemen Seek Him Rubber Stamp
Stampendous® Detail Silver Embossing Powder
VersaMark™ Watermark Ink Pad by Tsukineko
Delicata™ Silvery Shimmer Pigment Ink Pad by Tsukineko
Hug Snug® White Seam Binding
Arctic Blue Cardstock by Bazzill Basics Paper®
3D Foam Mounting Squares by Scrapbook Adhesives®
E-Z Runner® by Scrapbook Adhesives™

I didn't have any silver ribbon to use for my project so, being the clever girl I am, I ran my silver Delicata™ pad over my white seam binding.  I wish the photo showed the shimmer you can see in real life.  So pretty!

Thank you for joining us this week and for stopping by my blog.  I'll see you again next week for another week of Stampendous inspiration.  In the meantime, I hope you have a wonderful weekend.

Hugs,
Lea
SaveSave

Wednesday, November 29, 2017

Blessed Nativity


This week at Stampendous, we're celebrating "The Reason for the Season!"  For my card, I used Blessed Nativity Perfectly Clear Stamps Set.  This is such a sweet stamp set!  It's an adorable nativity scene and has multiple sentiments to choose from.  I thought it would be fun to try out my new Mermaid Markers from Jane Davenport's line of products.  They were pretty cool and very vibrant.


Here's what I used to create this card:

Stampendous Products - 


Other Products - 

Jane Davenport Mermaid Markers
Canson Watercolor Paper Pad
Green Cardstock by Bazzill Basics Paper
Yellow Cardstock by Bazzill Basics Paper
E-Z Runner by Scrapbook Adhesives

Thanks so much for stopping by today!  I'll be back on Friday with another card celebrating "The Reason for the Season!"  See you soon!

Blessings,
Lea


Friday, November 24, 2017

Nap By Candle

It's the day after Thanksgiving and what's a mouse to do but take a nap!  At Stampendous, we've been celebrating a week of House-Mouse® Designs and I'm wrapping up the week with Nap By Candle!  Isn't this just the sweetest stamp? 


Here's what I used to create this card:

Stampendous Products - 


Other Products - 

Firecracker Cardstock by My Colors®
Merry Mistletoe Cardstock by Graphic45®
Creative Impressions Ribbon
E-Z Runner® Adhesive by Scrapbook Adhesives™
Copic® Markers (Y04, Y08, Y26, Y28, R20, R27, R29, R89, YR09, E50, E51, E53, C1, C5)

Here's what I did to create this card: 
  1. Stamp image with black ink on white paper
  2. Color image with markers
  3. Trim image closely
  4. Trim red cardstock in a horizontal A2 size with a tent fold
  5. Trim a mat for image and sentiment from red cardstock
  6. Trim patterned cardstock for background as shown
  7. Adhere gold ribbon to patterned cardstock as shown and adhere to card front
  8. Adhere sentiment to mat and set aside
  9. Adhere layers as shown
Thanks so much for stopping by today!  I hope you have a wonderful weekend and I'll see you again next week.  Enjoy the rest of the holiday weekend!

Blessings,
Lea

Friday, November 17, 2017

Seated Elf


Santa's elves have been busy at Stampendous!  They've been working extra hard to create all sorts of stamps, dies and embellishments to make your Christmas merrier.  Here's a couple of cuties that were super fast to create.


Here's what I used to create this card:

Stampendous Products - 


Other Products - 

Wasabi Vintage Double Dot Cardstock by BoBunny®
Firecracker Cardstock by My Colors®
Mint Julep Cardstock by My Colors®
Pine Forest Cardstock by My Colors®
E-Z Runner® Adhesive by Scrapbook Adhesives™
Zip Dry™ Paper Glue by Beacon Adhesives
3D Foam Squares by Scrapbook Adhesives®
May Arts Ribbon®
Spectrum Noir™ Markers 
Copic® Markers

Thanks so much for stopping by today.  I hope you have a wonderful weekend and I'll see you again next week.

Hugs,
Lea

Wednesday, November 15, 2017

Lighthouse Christmas


"You better watch out, you better not cry
Better not pout, I'm telling you why
Santa Claus is comin' to town..."


In the meantime, Santa has been hanging out with Stampendous and we have some awesome stamps featuring jolly old St. Nick and his travels.  My card today features Lighthouse Christmas.  Apparently Rudolph is MIA but this lighthouse is showing Santa the way. 


Here's what I used to create this card:

Stampendous Products -


Other Products -

Firecracker Cardstock by My Colors
Olive Green Cardstock
E-Z Runner® Adhesive by Scrapbook Adhesives™
Zip Dry™ Paper Glue by Beacon Adhesives
Copic® Markers (B34, B39, B37, B95, B97, B99, R46, R59, Y11, C1, C5, G94, G99)
Spectrum Noir™ Markers (EB1, EB2, IG1, IG2, IG4)

Here's what I did to create this card:
  1. Stamp image with black ink on white paper
  2. Color image with markers
  3. Trim image closely
  4. Trim red cardstock in a vertical A2 size with a tent fold
  5. Trim a mat for image in olive cardstock
  6. Adhere layers as shown
  7. Using glue, adhere glitter where desired
Thanks so much for stopping by today.  I'm a firm believer that you can balance a little naughty in with the nice!  Heeheehee!  

Hugs!
Lea


Wednesday, November 8, 2017

Ice Skater


Welcome to a Pink Week with Stampendous as we celebrate the adorable holiday stamps from Pink Your Life designer, Nicoletta Zanella. These adorable characters are celebrating a Whisper Friends Christmas!  What could be sweeter?  My card today features the Pink Your Life Whisper Friends Ice Skater, isn't she just the cutest!?


Here's what I used to create this card:

Stampendous Products:


Other Products:

Island Mist Vintage Double Dot Cardstock by BoBunny®
Pink Punch Vintage Double Dot Cardstock by BoBunny®
Grasshopper Cardstock by My Colors®
E-Z Runner® Adhesive by Scrapbook Adhesives™
Zip Dry™ Paper Glue by Beacon Adhesives
Copic® Markers (YG11, YG13, YG17, C1, C5, BG0000, BG01, BG02, BG13, BG15, BG18, BG70, BG72, G94, G99, E50, E51, E53, R20, B0000, RV17, RV19, RV55, RV63, RV66)

Here's what I did to create this card:

  1. Stamp image with black ink on white paper
  2. Color image with markers
  3. Trim image closely
  4. Trim green cardstock in a 5” square with a tent fold
  5. Trim vintage dot patterned papers as shown
  6. Adhere all layers as shown
  7. Mix flock and glitter and adhere as desired


Thanks so much for stopping by!  If you go here, you can find out about the fun prizes Stampendous is offering this week just for commenting on our blogs.  You could be our next winner!  See you again on Friday with more Pink Your Life cuteness!

Hugs,
Lea

Thursday, December 22, 2016

Wicked Wednesday with Sami Stamps

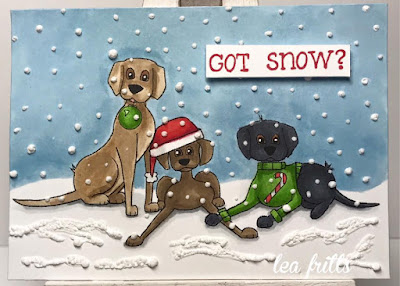
It's Wicked Wednesday ATC Challenge Blog time and this week our sponsor is Sami Stamps.  The image I've used is Three Christmas Labradors.  Our theme this week is Cats and Dogs, easy and lovable.  I love their bewildered expressions!  So, have you "got snow?"


Here's what I used to create this ATC:

A Muse® Stamps Got Snow?
Copic® Markers
Memento™ Love Letters Ink Pad by Tsukineko® for Imagine®
Radiant Neon Amplify™Ink in White by Imagine®
Neenah Classic Crest Solar White Cover Stock
3D Foam Mounting Squares by Scrapbook Adhesives

I hope you'll play along with our fun little challenge!  This is our last challenge for 2016 so you have two weeks to join us.  Let us see your cutest cats and dogs!  See you again soon!  Merry Christmas!

Hugs,
Lea


DICC with A Day For Daisies

It's time for another Desert Islands Crafters Challenge and this week our sponsor is A Day For Daisies.  The image I've used is Christmas Pixy One.  Here's the list of items to choose from for this challenge, remember, you must use at least three:


For my card, I've used 2, 3, 4, 5, 7, 8, 9


Here's what I used to create this card:

Copic® Markers
Neenah® Classic Crest™ Solar White Paper
Blue Cardstock by Bazzill Basics Paper®
Be Merry™ 6x6 Paper Pad by My Mind's Eye™
Star Dust Stickles™ by Ranger®
Christmas Red Stickles™ by Ranger®
Tim Holtz® Distress Stickles™ in Picket Fence by Ranger®
Miscellaneous Lace Trim
E-Z Runner® by Scrapbook Adhesives™

I'd love for you to play along with us.  This is such a fun challenge.  With 10 items to choose from, you can truly make it your own.  I'll see you again soon, in the meantime, have a wonderful holiday.

Merry Christmas,
Lea


Sunday, December 4, 2016

Not A Creature Was Stirring...

...not even a mouse!  That's because these little Stampendous House-Mouse cuties were snuggled into stockings in front of the warm, glowing fire.  Does it get much cuter than this?


Here's what I used to create this card:

Copic® Markers
Creative Impressions Ribbon®
Red Cardstock by My Colors®
Blue Cardstock by My Colors®
E-Z Runner® by Scrapbook Adhesives®

I had so much fun creating the warm glow with my yellow Copic!  I even took the liberty of spreading the glow out to the bow, why not, right?!  I really love these little mice!  There's just something so darling about their antics, even when they're sleeping.  

I hope you're enjoying your Sunday.  It's rainy here with a distinct chill in the air.  This is one of those days when I find myself wanting to snuggle down for a nap, not that I would fit in a Santa hat like these cuties!   I'll see you again soon!

Hugs,
Lea

Friday, December 18, 2015

Wise Gifts

All this week, the Design Team at Stampendous has been sharing cards created to show the “Reason for the Season.”  My card today uses Wise Gifts depicting the three Kings or Wise Men, which ever you prefer to call them.  I always found it fitting that those men chose to seek Him and honor Him with gifts befitting a King.  Such a beautiful celebration of one so tiny!


Here’s what I used to create this card:

Stampendous:
P272 Wise Gifts

Plus:
Chameleon™ Markers (NU3, CG8, BR2, YO3, OL3, BV4, BL3, PR4, RD4, VO4, BL6)
Delicata™ Golden Glitz Pigment Ink Pad by Tsukineko®
atyouSpica™ Glitter Pen in Sand by Too Marker Products®
atyouSpica™ Glitter Pen in Gold by Too Marker Products®
Olive Green Cardstock by Bazzill Basics Paper®
Purples Cardstock by Bazzill Basics Paper®
ZipDry™ Paper Glue by Beacon Adhesives™

Here’s what I did to create this card:

1. Stamp image and color, add glitter pen ink to crowns and vessels.
2. Edge trimmed image in gold ink.
3. Trim green cardstock for mat and edge in gold ink.
4. Create an A2 card base in a tent fold from purple cardstock.
5. Using the stamp that mimics peeled paint, stamp gold ink on front of card base, allow a few minutes for ink to dry as this new ink will air dry within minutes.
6. Adhere all layers.

Here’s a list of my teammates that are also posting today, it would be awesome if you left them some love for their efforts:

Thanks so very much for stopping by today.  I hope you’ve found some inspiration along the way for creating your own Christmas cards.  I’ll see you next week with more projects to share.  Have a wonderful weekend!  Merry Christmas!

Hugs,
Lea


Thursday, December 17, 2015

Merry Christmas!

This week at Stampendous, we’re celebrating the “Reason for the Season!”  Today I’m taking it back to the beginning when Jesus was born.  Can you imagine being in Mary’s shoes, or sandals?  Here you are pregnant, ready to give birth, and you’re having to travel across a desert!  What misery she must have been in!  The heat, the bumpy ride on an ass, all while in labor!  I’m totally in awe of Mary.  Anyway, as I reflected on Mary’s journey, I decided to create my card with that thought in mind.  


Here’s what I used to create this card:

Memento™ Rich Cocoa Ink Pad by Tsukineko®
Memento™ Bamboo Leaves Ink Pad by Tsukineko®
Memento™ Desert Sand Ink Pad by Tsukineko®
Tim Holtz® Distress™ Ink in Tumbled Glass by Ranger®
Copic® Markers
My Colors® Grasshopper Canvas Texture Cardstock
Zip Dry™ Paper Glue by Beacon Adhesive
Scrapbook Adhesives® 3D Foam Mounting Squares by 3L®

Here’s what I did to create this card:

Stamp image with black ink on white paper and color with markers.
Cut out image and set aside.
Trim a piece of white paper to 4” x 5.25” and tape stencil down.
Stencil palms on left side and then switch to right side and stencil just the large palm.
Using a sponge dauber, add Desert Sand ink to bottom of paper.
Using a stipple brush, add Tumbled Glass ink to the “sky” portion 
Trim a piece of green cardstock to 4.25” x 11” and fold in half, top to bottom for card base.
Adhere stenciled piece to card base.
Add foam squares to back of stamped image and adhere to card.

Here’s a list of my teammates playing along today:


Thanks so much for stopping by today!  I have another card to share with you tomorrow so please do come back.  Until then, have a wonderful day and enjoy the season!  Merry Christmas!

Hugs,

Lea

Friday, December 11, 2015

Celebrating Christmas

Today the Stampendous Design Team is celebrating the Christmas Season with an adorable Stampendous® House-Mouse® Designs stamp called Pinecone Tree.  I’m in love with this stamp!  Little Muzzy is concentrating so hard on getting those berries strung!  


Here’s what I used to create this card:

Copic® Markers
Red and Green Cardstock by Bazzill Basics Paper®
Green Twine by May Arts Ribbon®
Zip Dry™ Paper Glue by Beacon Adhesives

Here’s what I did to create this card:

Stamp image with black ink onto white paper.
Color image with markers and trim away excess paper.
Create an A2 card base with a center fold from green cardstock.
Trim a piece of red cardstock as a mat for the stamped image.
Adhere all layers as shown.
Wrap twine around center of card twice and tie a knot.

Here’s a list of my teammates posting today:


Thanks so much for stopping by today!  I hope you have a wonderful weekend and I’ll see you again soon!

Hugs,

Lea